EN-24 Originalbetriebsanleitung Allgemein
17.1 Setting the height of the seat
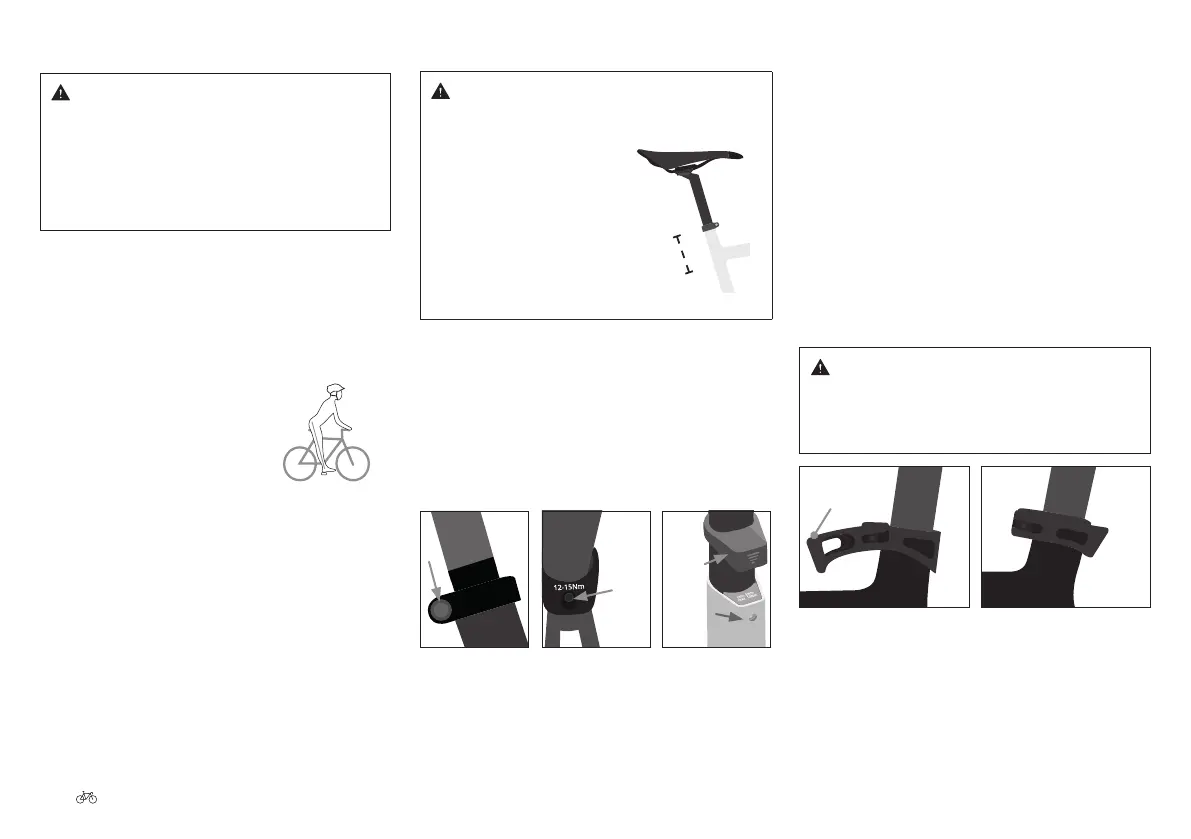
Warning
Serious falls due to a bent or broken seat post.
▪ The seat post must be inser-
ted into the seat tube to a
depth of at least 10 cm. The
10 cm minimum insertion
depth also applies if a lower
minimum insertion depth
is given in the component
operating instructions or on
the seat post itself.
10 cm
Fig. 17
Minimum insertion depth
You can adjust the height of the seat using the seat post.
The seat post is inserted into the seat tube of the bicycle
and is secured there with an external or built-in seat post
clamp. The seat post clamp is then tensioned either with
one or two seat post clamp screws or with a quick-release
skewer with tensioning lever.
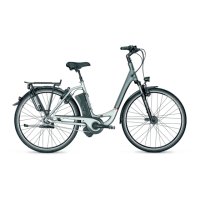
17.1.1 Securing with seat post clamp
screw(s)
Fig. 18 Seat post clamping variations
Designer
cover
Seat
post
clamp
screw
Seat
post
clamp
screw
Seat
post
clamp
screw
1. If the seat post clamp screw(s) is (are) covered with
a designer cover, you will need to rst lift this up
slightly before starting with the adjustment.
2. Undo the saddle clamp screw(s) by turning it/them
anticlockwise with an Allen key. Be careful not to turn
the screw(s) beyond their resistance.
3. Move the seat post into the right position.
4. Tighten the seat post clamp screw(s) by rotating
them clockwise with the specied torque and a
torque wrench 13. Tightening torques for threaded
connections Page EN-19.
5. If a designer cover is provided to protect the seat post
clamp screw(s), this can now be lowered again.
6. Try to twist the saddle to check that it is rmly xed.
17.1.2 Fastening with quick-release skewer
Warning
Serious falls due to loose or broken seat post.
▪ The tensioning lever must be correctly closed before
you set o.
Tensioning
lever
Fig. 19a Tensioning lever open Fig. 19b Tensioning lever closed
17. Seat height
Warnings
Serious falls due to incorrect adjustments.
▪ We recommend having your cycle dealer perform all
assembly and adjustment work. If you want to screw
something on by yourself, be sure to observe
13. Tightening torques for threaded connections
Page EN-19.
How to determine the optimal seat height for your body
size:
1. Sit on the saddle and at the same time, lean against
a wall.
2. Turn the foot pedal on the
opposite side to the wall to its
lowest point.
3. Place your heel on the pedal.
Your leg should be fully
extended.
4. If your leg is not fully extended
when your heel is on the pedal,
raise the saddle. Lower the
saddle if you cannot reach the
pedal.
Fig. 16
Push leg through