EN-56 Originalbetriebsanleitung Allgemein
Notice
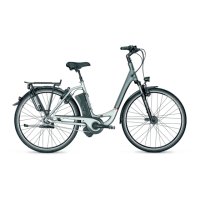
If it is dicult to draw the cable sleeve out of the
holder in the gearshift unit, insert a 2 mm Allen key or
a #14 spoke in the hole in the ratchet wheel and rotate
it to loosen the cable. Then, rst remove the cable
fastening screw from the ratchet wheel before drawing
the cable sleeve from the cable sleeve holder.
CJ-8S20
JAPAN
LOCK
Turn the
ratchet
wheel
Ratchet wheel hole
2 mm Allen key or #14 wrench
Remove the cable fastening
screw
Draw out of the
cable sleeve
holder
1
2
3
Fig. 131 Tip for removing the cable sleeve ©Shimano
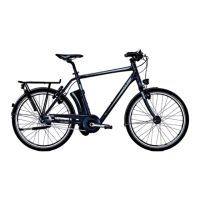
CJ-8S20
JAPAN
LOCK
Cable fastening screw
Ratchet wheel
Fig. 132 Removing the cable fastening screw ©Shimano
6. Loosen and remove the screw on the brake arm.
7. Loosen the wheel nuts and set them aside. Remove the
lock washers from the wheel axle.
8. Pull the rear wheel out of the drop-out slots.
29.3 Dismantling the tyre and tube
1. Unscrew the valve cap, securing nut and eventually the
union nut from the valve.
2. Let the remaining air out of the tube.
3. Place the tyre lever against the valve on the inside
edge of the tyre.
4. Lever the tyre wall over the rim ange.
5. Push the second tyre lever approximately 10 cm away
from the rst between the rim and tyre.
6. Use the tyre lever to lever the tyre over the rim until
the tyre is loose over its entire circumference.
7. Remove the tube from the tyre.
29.4 Repairing the tube
1. Inate the tube.
2. To check where the tube is damaged, place the tube in
a container full of water.
3. Submerge the tube. Air bubbles will escape at the
position of the damage on the tube.
4. If the problem occurs while you are under way, and
you are unable to determine the position of the hole,
simply inate the tube heavily. It will become larger,
and the increased pressure and noise of the escaping
air will allow you to determine the position of the
hole.
5. Allow the tube to dry.
6. You can now repair the tube. Observe the usage
instructions on the repair kit.
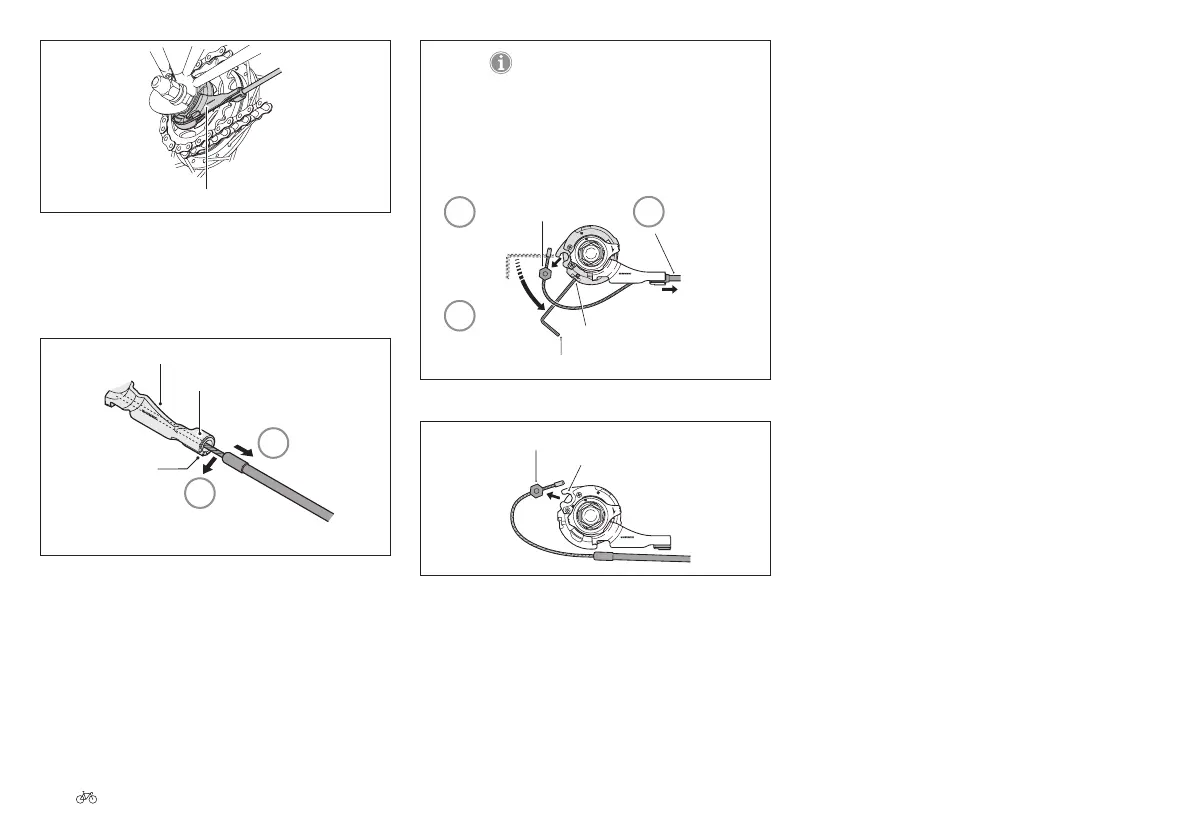
Gearshift unit
CJ-8S20
JAPAN
LOCK
Fig. 129 Tip for removing the cable sleeve ©Shimano
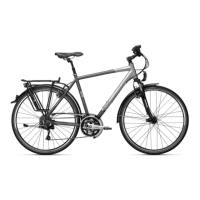
3. Set the control element on the handlebars to 1.
4. Draw the cable sleeve out of the cable sleeve holder of
the gearshift unit and remove the cable from the slot
in the bracket.
1 Draw out of the cable sleeve holder
2 Remove from the slot
CJ-8S20
JAPAN
Bracket
Cable sleeve holder
Slot
1
2
Fig. 130 Removing the cable ©Shimano
5. Remove the cable fastening screw from the ratchet
wheel.