Originalbetriebsanleitung Allgemein EN-51
26.2.2 Drop-out II: adjusting the belt tension
1. Pedelec/S-Pedelec: Remove the battery.
2. Loosen the four screws on both sides of the rear
stays by turning these counterclockwise. There are
two screws behind the plastic cover, and one of the
screws on the other side holds the side stand plate in
position. Do not remove the bolts completely.
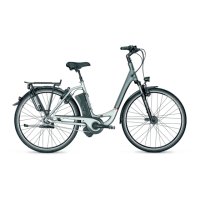
3. You can increase or decrease the belt tension by
turning both setting screws.
Fig. 112 Setting the belt tensioning
2. Adjusting the setting
screws
1. Loosen screws
4. Tighten the four screws on both sides of the rear stays
clockwise to the specied tightening torque.
Plate xture
9.5 NM
Belt tensioning
16.5 NM
Belt
tensioning
16.5 NM
Fig. 113 Setting the belt tensioning
26.3 Checking the belt for wear
1. Pedelec/S-Pedelec: Remove the battery.
2. Check the belt for wear.
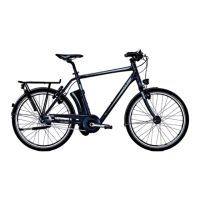
Fig. 114 Belt with no wear ©Gates
This belt is in good condition. The loss of blue colour is
not a sign of wear.
Fig. 115 Worn belt ©Gates
Missing teeth and cracks in the tooth root: This belt
is in a very poor condition.
3. When the safe wear limit has been reached, the belt
must be replaced. Have this done in your specialist
workshop.
26.4 Cleaning and care
Notice
Damage to the electronics due to water ingress.
▪ Do not spray the bicycle or its components, either
with a water hose or with a high-pressure cleaning
device. Although the components are sealed,
damage to the cycle may still result. Clean the bike
with a soft damp cloth.
Please remove the battery before cleaning the belt on a
Pedelec or S-Pedelec. Then, clean the belt with a soft, damp
cloth. Allow it to dry before putting it back on your bike.
27. Wheels
Wheels provide the connection between your bicycle and
the road. They can be attached to the frame and fork using
axle nuts, quick-release skewers or through-axles.
27.1 Fastening wheels with quick-release
skewers
Warning
Serious falls due to loose components.
▪ All quick-release skewers must be properly closed
before setting o. Quick-release skewers cannot be
closed by simply turning the lever.
▪ Check that all quick-release skewers are rmly
seated before every use.
▪ Do not bend the brake disc or hold onto it when
closing the quick-release skewer.
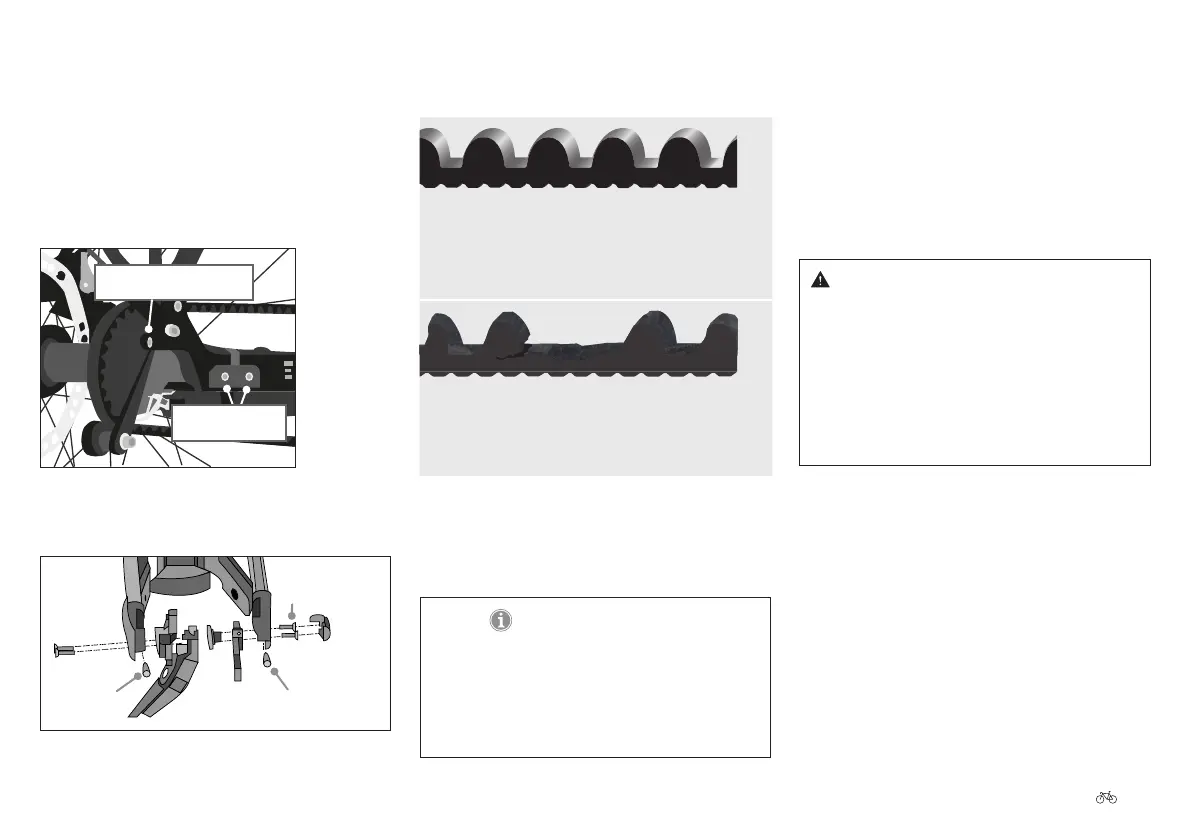
Wheels are attached to most bicycles using quick-release
skewers. These are clamping devices which have the
advantage that they can be quickly loosened and tightened
by hand. Quick-release skewers normally consist of ve
parts: the axle, the tensioning lever, the clamping nut and
two springs. The tensioning lever and axle are rigidly
connected to one another, while the clamping nut is
screwed onto the end of the axle. The tensioning lever
exerts a clamping force, and the clamping nut is used to set
the pre-tension.

 Loading...