EN-34 Originalbetriebsanleitung Allgemein
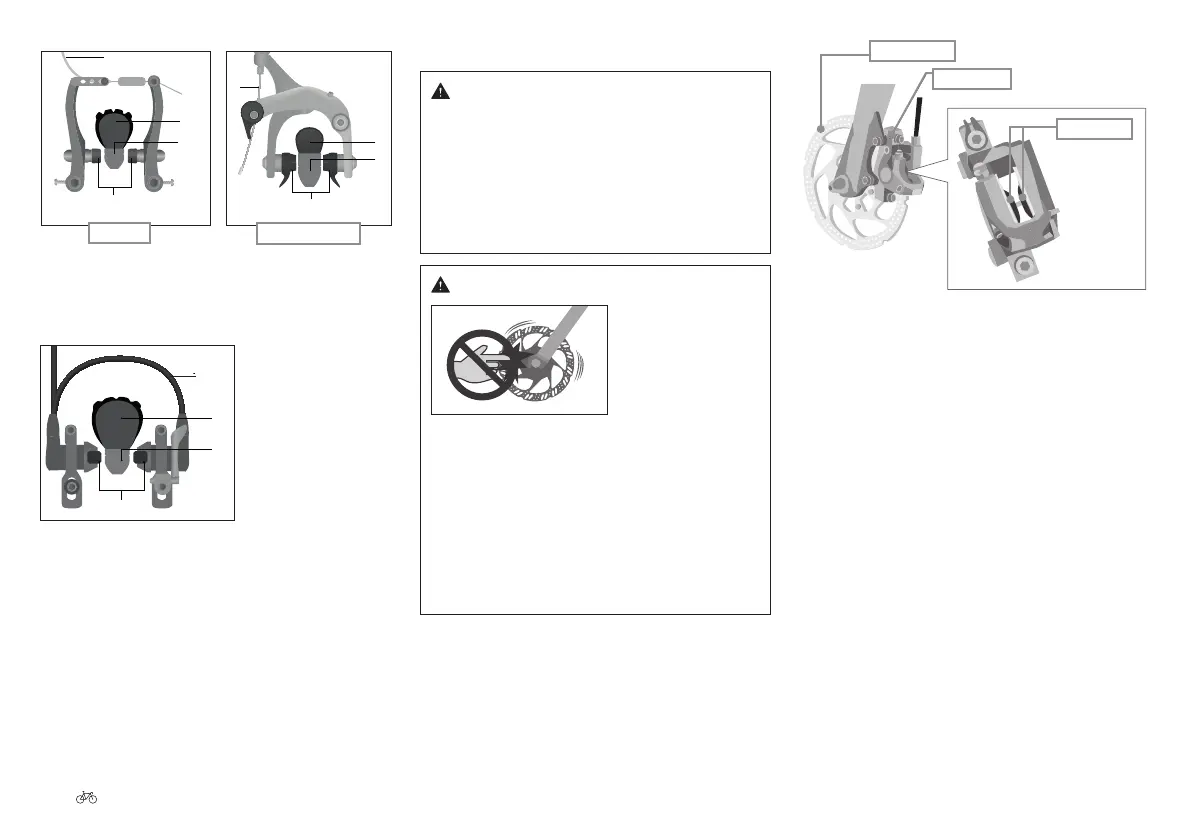
Abb.: Mechanische Felgenbremsen (exemplarisch)
1 Seilzug
2 Reifen
3 Felge
4 Bremsschuhe
1
3
2
4
V-brakes
Fig. 42 Mechanical rim brakes (example)
1 Cable 3 Rim
2 Tyre 4 Brake disc
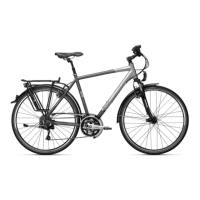
Abb.: Mechanische Felgenbremsen (exemplarisch)
1 Seilzug
2 Reifen
3 Felge
4 Bremsschuhe
1
3
2
4
2
3
1
4
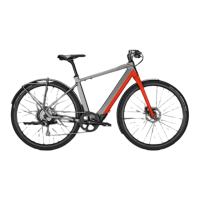
Side-pull brakes
Fig. 43 Hydraulic rim brakes (example)
1 Brake cable or line 3 Rim
2 Tyres 4 Brake lining
Abb.: Hydraulische Felgenbremse (exemplarisch)
1 Bremsleitung
2 Reifen
3 Felge
4 Bremsschuhe
2
3
4
Abb.: Mechanische Felgenbremsen (exemplarisch)
1 Seilzug
2 Reifen
3 Felge
4 Bremsschuhe
1
3
2
4
2
3
1
4
1
3
2
4
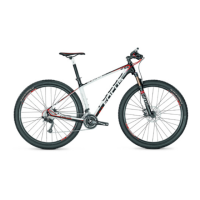
23.3 Disc brakes
Warnings
Serious falls and accidents caused by reduced braking
power.
▪ Avoid using disc brakes continuously on long
downhill stretches. It is better to brake in interrupted
cycles.
▪ Have the brake disc replaced immediately if it is
cracked or deformed, and do not use the bicycle.
Caution
Fig. 44 Do not touch
the brake discs
Burns from touching the brake discs.
▪ As the brake disc can become very hot during
extended braking, you should wait for at least
30 minutes after your ride before touching it.
Injury from touching the rotating brake discs.
▪ Please keep your ngers away from rotating brake
discs. The brake disc is so sharp that it will cause
severe injuries to your ngers if you get them caught
in the brake disc openings.
When braking, the brake pads mounted on the brake
calliper press on a brake disc which is mounted on the axle
and which rotates with the wheel.
Bremsbelag
Bremssattel
Bremsscheibe
Brake disc
Brake calliper
Brake lining
Fig. 45 Disc brakes ©Shimano
Breaking in new disc brakes
Full braking power will not yet be available with new disc
brakes! Braking performance will improve as you use the
brakes until the pads on the brake disc are fully broken in.
A few hard stops will accelerate this process.
23.4 Brakelever(s)
Your bicycle is tted with either one or two brake levers.
Pulling the brake levers can slow down and/or bring your
bicycle to a stop. If your bicycle is tted with a coaster
brake and a brake lever, you can actuate the front brake
by pulling the brake lever mounted on the right-hand side
of the handlebars. If two brake levers are tted, you can
actuate the front brake with the left-hand brake lever and
the rear brake with the right-hand brake lever. This is
exactly the reverse in Australia and Great Britain, where
the brake lever for the front brake is on the right, and that
for the rear brake on the left. If you are used to a dierent
arrangement, have your specialist workshop rearrange the
brake levers before you set o. There are brake levers for
one to four ngers. The fewer the ngers used to actuate
the lever, the shorter the lever is.