Do you have a question about the DigiTech iPB-10 and is the answer not in the manual?
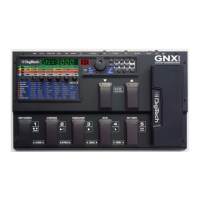
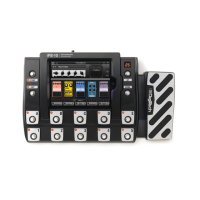
Create your ultimate pedalboard by dragging and dropping up to 10 pedals, amps, and cabinets.
Change entire signal chain configurations with a single footswitch and recall 100 favorite pedalboards.
Overview of the iPB-10's capabilities including its user interface, storage, and connectivity options.
List of components included in the iPB-10 footswitch pedalboard package.
Specifies the necessary iTunes version, account, disk space, RAM, and iPad model.
Details the required Mac computer specifications, OS version, and software.
Outlines the PC processor, OS version, and software needed for Windows.
Access the help file within the iPB-Nexus application.
Access the built-in tuner to tune your guitar.
Adjust the volume for each tone independently.
Configure global parameters for the iPB-10.
Save the currently loaded tone to memory, overwriting the previous version.
Save a new user tone or create a copy of an existing tone.
Toggle between Edit and Performance modes to manage the pedalboard chain.
Shows the currently loaded tone, bank, and assigned footswitch.
Use the slider to select one of the 20 banks, each with 5 custom tones.
Buttons displaying tones in each bank; LED indicates active tone.
Shows the selected amplifier and allows editing its controls.
Displays the currently selected cabinet for the amplifier.
Displays pedals assigned to the A-E footswitches.
Expands the view to display all effect pedals in the signal chain.
View all tones assigned to the iPB-10 Pedalboard.
Browse and select from the available factory tones.
Access and manage your custom user tones.
Displays and allows editing of tone name, genre, artist, and assignments.
Instructions on how to activate the tuner using the pedalboard footswitches.
Displays the note and tuning status with LEDs.
Use the Volume icon and slider to set the preset level for each tone.
Set the tuner's reference point frequency.
Adjust the digital signal level for recording to iPad or computer DAW.
Set the mix between recorded track and playback for XLR outputs.
Set the mix between recorded track and playback for 1/4" outputs.
Procedure to calibrate the iPB-10 Expression Pedal.
Shows the currently selected bank in the iPB-10 Pedalboard.
Use these footswitches to select a tone bank.
Select one of 5 tones within a bank; LED indicates active tone.
Enables/disables the mono stompbox effects loop.
Enables/disables the amp loop.
Provides real-time control of assigned effect parameters.
Turn assigned effect pedals on/off; LED indicates status.
Connect the included power adapter here.
Turns the iPB-10 power on and off.
High impedance 1/4" input for connecting your guitar.
Connect headphones here for optimized listening.
Connect external preamps/amplifiers instead of internal ones.
Insert external stompbox pedals into the signal path.
Helps prevent hum/buzz caused by ground loops.
Connect to guitar amps, mixers, or recording devices.
Optimizes 1/4" outputs for amp or mixer connection.
Lifts pin 1 of XLR outputs to solve ground loop issues.
Controls the output level of the 1/4" outputs.
Designed for recording devices/consoles with speaker compensation.
Diagram for connecting an amp with a stomp loop.
Diagram for connecting both amp loop and stomp loop.
Diagram for connecting the iPB-10 to a mixer.
Steps to load tones using the iPB-Nexus application.
Steps to load tones directly from the iPB-10 pedalboard.
Swap effect pedals without entering Edit mode.
Swap effect pedals by entering Edit mode.
Drag and drop pedals to desired footswitch slots for assignment.
Assign an amp and configure its position in the signal path.
Add and position the Stomp Loop in the signal path.
Assign controls, set min/max values, and save expression pedal assignments.
Assign parameters to LFO 1 or LFO 2, set ranges, wave form, and speed.
Quickly save edited user tones to the My Tones library.
Save tones with custom name, description, and memory location.
Select tones from My Tones library and assign them to footswitches.
Bypass a tone by stepping on its footswitch; internal pedals/amp are bypassed.
Description of the iPB-10's collection of pedals, amplifiers, and cabinets.
Provides Low, Mid, and High tone shaping with adjustable frequency.
Procedure to restore factory settings with iPad connected.
Procedure to restore factory settings without iPad.
| Expression Pedal | Built-in |
|---|---|
| USB | Yes |
| Looper | Yes |
| Effects Types | Delay, Reverb, Modulation, Distortion, Compression, EQ, Filter |
| Display | LCD |
| Inputs | 1 x 1/4" (instrument), 1 x 1/4" (aux) |
| Outputs | 2 x 1/4" (L/Mono, R) |
| MIDI I/O | MIDI In/Out |
| Power Supply | 9V DC |
| Form Factor | Floor |
| Connectivity | USB |
| Compatibility | iPad |
| Type | Multi-effects pedal |