Troubleshooting/Service
80 UDC2500 Universal Digital Limit ControllerProduct Manual 8/05
Procedure #2
Table 7-6 explains how to troubleshoot Latching Output Relay failure.
Table 7-6 Troubleshooting Latching Output Relay Failure
Step What to do How to do it
1
Make sure all the configurable
data stored in the controller is
correct. Reconfigure, if
necessary.
Refer to Section 3 - Configuration to check all this
data and how to reconfigure.
2
Check that the Latching Relay
actuates properly.
Move the setpoint above or below the PV value,
depending on the type of Limit Control configured.
Listen for the click of the relay as the setpoint is
moved above or below the PV.
3
Check the Latching Relay
jumper position (NO or NC).
Refer to Section 2.4 Limit Control and Alarm Relay
Contact Information for Relay Contact information.
Procedure #3
Table 7-7 explains how to troubleshoot Alarm Relay Output failure.
Table 7-7 Troubleshooting Alarm Relay Output Failure
Step What to do How to do it
1
Check the alarm configuration
data. If it is correct, check the
field wiring.
Reconfigure if necessary.
Refer to
Section 3 - Configuration for
details.
2
Check that the applicable alarm
relay actuates properly
depending on what you have set
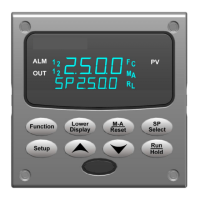
at prompt AxSxTY.
If it does, check the field wiring.
If the alarm type is set for PV, place the
controller in manual mode. Vary the input
to raise and lower the PV around the
setpoint. Listen for a click from the relay
as the PV moves in either direction and
note that the proper ALM1 or ALM2 is lit.
3
Check the contacts. Make sure the NO or NC contact wiring is
correct.
Refer to
Section 2 - Installation for relay
contact information.
4
Change the relay and/or the
current output board.
Installation instructions supplied with the
new relay or board.
5
Change MCU board. Installation instructions supplied with the
new board.