EasyManuals Logo

Epson FX-2190 Service Manual

Epson FX-2190
129 pages
To Next Page IconTo Next Page
To Previous Page IconTo Previous Page
Page #74 background imageLoading...
Page #74 background image
EPSON FX-890/2190 Revision B
Disassembly and Assembly Main Components Disassembly 74
4.2.3 C524MAIN Board
1. Perform Pre-Disassembly. (p.70)
2. Remove the Upper Housing. (p.72)
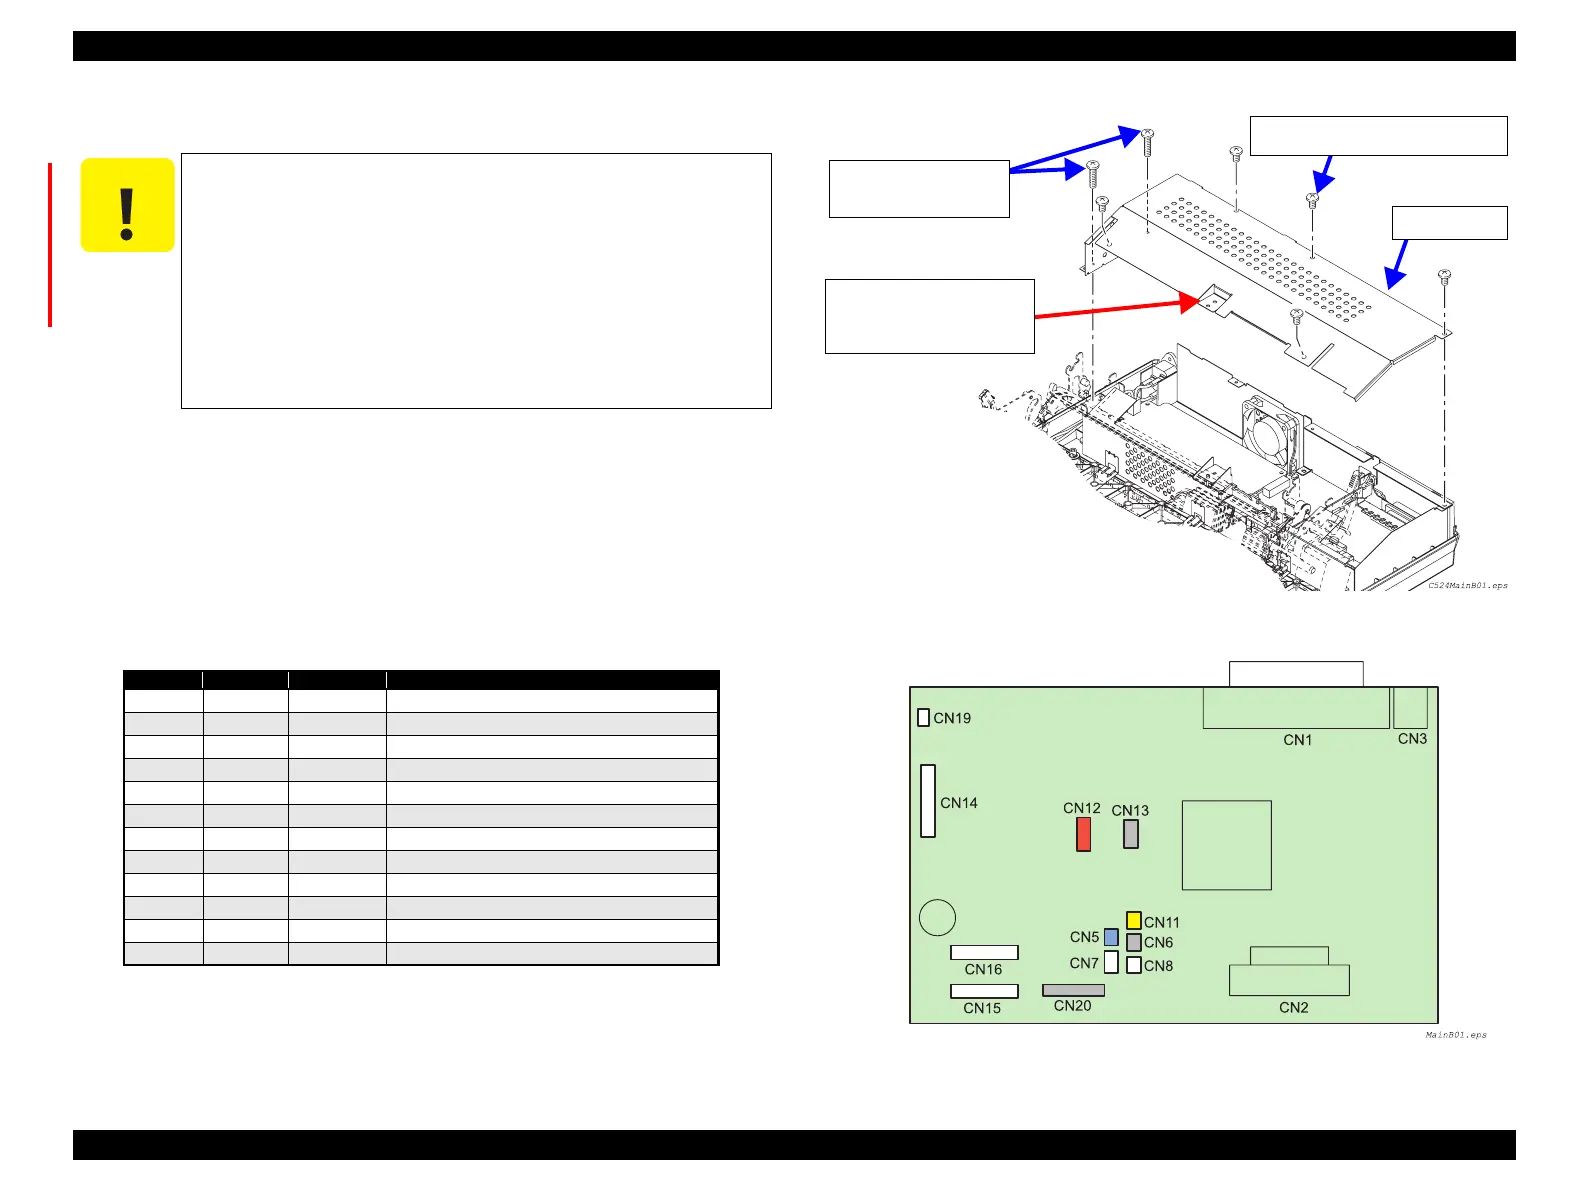
3. Remove 5 CBS (M3x6) screws and 2 CBP (M3x12) screws securing the shield
cover to the Printer Mechanism and lower housing. Then remove the shield cover.
(See Figure 4-8)
4. Disconnect all the connectors connected to the C524MAIN board.
(See Figure 4-9)
Figure 4-8. C524MAIN Board Removal 1
Figure 4-9. C524MAIN Board Removal 2
C A U T I O N
The C524MAIN board has the mechanical drive power supply
voltage (+42V, Vp) management circuit and an electrical
characteristic of the components composed of this circuit is
measured with the custom instruments and regulated at the
assembly process. Never attempt to replace any components of
this circuit on the board, and doing so resulted in damaging the
unit.
Be careful with the edges of the shield plate, as they are very
sharp.
Be sure to match the connector colors with each other.
Table 4-4.
CN No. Pins Color Connected to
CN5 2 Blue PG Detector
CN6 2 Black Front PE Detector
CN7 3 White Rear PE Detector
CN8 2 White HP Detector
CN11 2 Yellow Release Detector
CN12 5 Red CR Motor
CN13 4 White PF Motor
CN14 10 - C524PSB/PSE/PSH Board
CN15 (FPC) Printhead
CN16 (FPC) Printhead
CN19 2 White Fan
CN20 (FPC) Panel
CBS Screws (3x6) x5
Tightening Torque: 0.58-0.78 N.m
Shield Cover
CBP Screws (3x12) x2
Tightening Torque
: 0.78-0.98 N.m
No screw here
(Screw for tightening the
Upper Housing together
must be installed later)

Table of Contents

Other manuals for Epson FX-2190

Questions and Answers:

Question and Answer IconNeed help?

Do you have a question about the Epson FX-2190 and is the answer not in the manual?

Epson FX-2190 Specifications

General IconGeneral
Maximum print sizeA3 (297 x 420 mm)
ColorNo
Character pitch10 cpi
Maximum resolution240 x 144 DPI
Maximum printing width (columns)136
Print technologyDot matrix
Dimensions (WxDxH)589 x 360 x 157 mm
Standard interfacesParallel, USB 1.1
Optional connectivityEthernet
Country of originIndonesia
Sound pressure level (printing)55 dB
Mean time between failures (MTBF)20000 h
Sustainability certificatesENERGY STAR
Windows operating systems supportedWindows 2000, Windows 2000 Professional, Windows 7 Home Basic, Windows 7 Home Basic x64, Windows 7 Home Premium, Windows 7 Home Premium x64, Windows 7 Professional, Windows 7 Professional x64, Windows 7 Starter, Windows 7 Starter x64, Windows 7 Ultimate, Windows 7 Ultimate x64, Windows 8, Windows 8 Enterprise, Windows 8 Enterprise x64, Windows 8 Pro, Windows 8 Pro x64, Windows 8 x64, Windows Vista Business, Windows Vista Business x64, Windows Vista Enterprise, Windows Vista Enterprise x64, Windows Vista Home Basic, Windows Vista Home Basic x64, Windows Vista Home Premium, Windows Vista Home Premium x64, Windows Vista Ultimate, Windows Vista Ultimate x64, Windows XP Home, Windows XP Home x64, Windows XP Professional, Windows XP Professional x64
Power consumption (typical)53 W
Operating temperature (T-T)5 - 35 °C
Operating relative humidity (H-H)10 - 80 %
Pallet width1200 mm
Pallet height1000 mm
Pallet length (UK)2040 mm
Quantity per pallet14 pc(s)
Quantity per pallet (UK)21 pc(s)
Quantity per pallet layer2 pc(s)
Quantity per pallet layer (UK)3 pc(s)
Package depth700 mm
Package width460 mm
Package height270 mm
Package weight11740 g
Quantity per pack1 pc(s)

Related product manuals