IN1804 Seamless Scaling Switchers • Installation 11
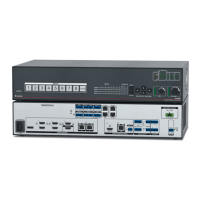
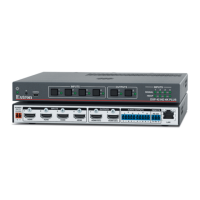
A
AC power connector
B
DisplayPort input connector — Input 1
C
HDMI input connectors —
Inputs 2-4 (standard and DO models)
Inputs 2-3 (DI and DI/DO models)
D
Over TP IR pass-through input port
(DI and DI/DO models)
E
DTP2/XTP input connector — Input 4
(DI and DI/DO models)
F
DTP2/XTP/HDBT output connector —
Output 1A (DO and DI/DO models)
G
Over TP IR pass-through port
(DO and DI/DO models)
H
HDMI mirrored output connectors —
Outputs 1A and 1B (Standard and DI
models)
HDMI output connector — Output 1B
(DO and DI/DO models)
I
LAN connector
J
Reset button
K
Reset LED
L
Remote RS-232 connector
M
Analog audio output connector
N
Analog audio input connector
O
+V connector (for tally voltage output)
P
Ground pin (for contact/tally ports)
Q
Contact/Tally ports
A
AC Power connector — Connect a standard IEC power cord (provided) from a
100 to 240 VAC, 50-60 Hz power source to this connector. The front panel button
LED for the selected input (see figure 16,
B
) on page 21) blinks for approximately
30 seconds. When the unit is ready for operation, the input selection LED lights steadily.
If auto-input switching has been enabled, the Auto SW LED lights also (see Auto
Switch on the OSD Advanced submenu on page 39).
B
DisplayPort input connector (input 1) — Connect a DisplayPort source to this
female DP connector.
C
HDMI input connectors — Connect HDMI video sources to these female HDMI
connectors. (The standard and DO models have three HDMI input connectors while the
DI and DI/DO models have two.)
TIP: Use Extron HDMI LockIt Lacing Brackets to secure HDMI cables to the
device (see HDMI Connections on page 17).
D
Over TP IR pass-through port for input (IN1804 DI and IN1804 DI/DO only) —
To transmit and receive infrared data to and from a source
connected to the DTP2 transmitter or XTP matrix switcher, connect a
control device (such as an Extron IPCP Pro Control Processor) to
this 3-pole IR Over TP captive screw port (see the illustration at
right).
NOTE: RS-232 communication can also be sent to the far end
of the twisted pair connection, but it must be done through
RS-232 insertion via Ethernet. A signal sent to an IN1804
LAN port can be routed to the RS-232 port of any connected
twisted pair device (see Ethernet to RS-232 Insertion on
page 44).
IN1804
Tx, Rx, and G
Pins
RxTx
RxTx
IR Contr
Device
G
G