5.3.3 Insertion of the Transducer Full Size (TFS)
When the transducer holders and ball valves are installed, the ultrasonic transducers may be
inserted. This shall ONLY be done by personnel certified by Fluenta. If this is a first time
installation, the transducer holder should be checked for liquid and drained prior to
installation. Care must be taken to avoid any impact or friction to the ultrasonic sensor head.
Also, it must be ensured that the sensor casing is connected to protective earth.
NOTE:
During transducer installation, the power supply to FGM 160 must be turned
OFF!
Verify that the installed ball valves are gas tight (no gas leaks). This should be done by the
on-site personnel - using a gas monitoring device. Measure and adjust the installation depth
of each transducer, which is set by fastening the A-lock lock-ring. Mount the
transducer/packbox. Open the ball valve, and push the transducer all the way in, until
meeting the A-lock locker ring. Fasten the A-lock nut to the transducer packbox.
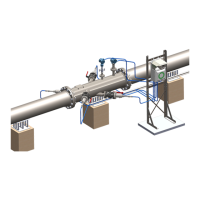
Figure 29: Mounting the Transducer Full Size.
NOTE:
Make sure that the Draining Plug is in its place in the Packing Box.
It can be removed only in order to remove impurities while no media is flowing
through the pipe. After cleaning the Packing Box, the Draining Plug should be
immediately screwed back.
6. FIELD COMPUTER INSTALLATION
In order to reduce signal loss and maintain signal quality, the length of the signal cables
should be kept as short as possible. Thus the FGM 160 (Ex-d/e Enclosure) must be mounted
close to the spool piece/ transducers. The FGM 160 has lugs that enable easy mounting on
either a separate frame or on top of the spool piece by brackets.