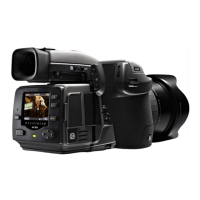
33
Approval / (OK) button F
is button steps through the three approval levels,
thereby assigning an approval status to the image
currently displayed (or selected) in the preview
screen. (part of the Instant Approval Architecture system). Also
acts as a conrmation button (OK button) for some types of menu
operations, such as deleting images; indicated by a label beside the
button on the preview screen.
Busy-light G
Flashes to indicate that the digital capture unit is performing an
operation (such as saving a new capture). Although a new capture
cannot be made while the light is ashing, focusing, aperture and
shutter speed settings can all be changed.
Red signies a problem (an explanatory message will be dis-
played).
Flash-card slot H
Flash-card removal button I
Flash-card slot cover J
Safety catch K
Used when removing the digital capture unit.
CCD and IR lter L
is is the light-sensitive element, which is positioned behind
a permanently mounted IR lter. Always be very careful not to
touch or scratch the surface of the lter when it is exposed and to
replace the protective cover whenever the digital capture unit is
not mounted on a camera.
WARNING: never attempt to remove the glass lter—you will
probably ruin the CCD if you do so.
See Cleaning the CCD section for cleaning.
Databus connectors M
For digital communication with camera body.
Flash sync input N
Flash synch connector (protected behind a rubber cover) for when
the digital capture unit is used with a view camera.
Flash sync output O
Flash synch connector (protected behind a rubber cover) for when
the digital capture unit is used with a view camera.
FireWire connector P
Insert a FireWire 800 cable here to connect the digital capture unit
to a computer or ImageBank-II.
General
Using the menu on the H3D II is very similar to using a menu on a mobile/cell phone or similar. When
you enter the menu (by pressing the MENU / button) you will be see an initial list:
ISO
White Bal.
Media
Browse
.............
Storage
Settings
It is advisable to initially quickly skim through the following section of the manual to
build up a picture of the menu structure and its various sections.
Note that some of the buttons have a double function while others remain single function.
For example, the navigation button always takes you through the menu in the direction
that the arrowhead illustrates. e zoom in/out buttons (
+
and
–
) though, for example,
act as image enlargers and reducers as well as conrmation buttons, according to where
you are on the menu.
Time & Date settings on the digital capture unit (which are included with les and
batch labels) are updated automatically through a FireWire/Phocus connection.
These settings are retained for about two consecutive weeks by a small rechargeable
cell that is automatically recharged by the main battery or Firewire with regular use.
If problems occur, charge the cell by leaving the digital capture unit turned ON for
around 12 hours.

 Loading...