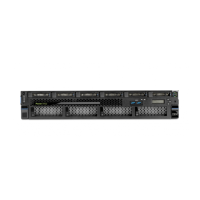
Figure 355. Removing an NVMe U.2 drive from the 9080-M9S system
3. Place the NVMe U.2 drive on an appropriate ESD surface.
Replacing an NVMe U.2 drive in the 9080-M9S system
To replace an NVMe U.2 drive in the system, complete the steps in this procedure.
Procedure
1. Ensure that you have the electrostatic discharge (ESD) wrist strap on and that the ESD clip is plugged
into a ground jack or connected to an unpainted metal surface. If not, do so now.
2. If necessary, remove the NVMe U.2 drive from the antistatic package.
3. To install or replace an NVMe U.2 drive, complete the following steps:
a) Press the handle release latch (A) in the direction that is shown to release the latch handle.
b) Slide the NVMe U.2 drive into the slot until it’s fully seated.
NVMe drives
413
 Loading...