IDEATEC S.A. - Z.I. de Noville-les-Bois - rue Léopold Génicot 19A - 5380 Fernelmont, Belgium - Tel: +32(0)81 42 00 10 - Fax: +32(0)81 57 91 70 - E-mail: info@ideatec.be
User Guide POLARIS V1.0 - Console V1.16 - Module V2.16
Page 52
a
FSP-4K FSP-6K FSP-9K
Fig.2
Fig.1
9.
9.3 FSP Configuration
Configuration (continued)
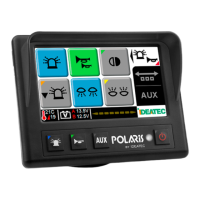
9.3.2 Pictograms
ATTENTION: The force applied to tighten the screw must never be higher than 6Nm. The manufacturer
can not be able to provide repairs if the MAX 6Nm tightening force is exceeded.
To ensure good adherence of
the pictogram on each key,
avoid touching the adhesive
part of the pictograms and the
key surface with your fingers.
The keys of the FSP consoles are configurable for the pictograms thanks to the stickers provided. The backlight is
white by default but you can change it thanks to the color stickers provided with the console.
To access to the keys, you have first to dismantle the front panel to release the protection membrane (Fig.1).
To do it, please release the screws behind the console :
Then set the color sticker(s) BEFORE the pictogram stickers (Fig.2).
Set all the pictograms then screw the front panel without forgetting the washers on the screws. Take care of the front
panel position before fixing.