41
A
PPENDIX
C:
P
ROGRAMMING
Y
OUR
S
YSTEM
You can program the following items on your system:
• System time and date
• User codes
• Schedules
• Schedule events
• Downloading feature
•Silent Arming feature
• Brightness of touchpads
• Volume of speakers
•Chime features
• Energy saver options
• Attach lights to sensors
Two Methods to Program Your System
There are 2 methods for programming your system:
• Programming menus—Offer visual text cues from your
touchpad.
• Programming shortcuts—Allow you to type in a
sequence of numbers for a specific programming task.
Either method requires a valid System or Partition Master
code. You cannot program the system using a regular
user code.
Using Programming Menus
The programming menus are arranged much like a com-
puter software program: Each menu containing multiple
options.
To navigate through the menus:
Examples of Programming Using Menus
Here are two examples of programming using system
menus. The examples describe each step involved in pro-
gramming a user code and in erasing a user code from an
alphanumeric and fixed display touchpad.
To change or assign a user access code:
1. Enter the programming menus by pressing
9
+ System or Partition Master
CODE.
2. Press
B
until the touchpad displays “USER
CODES,” then press
ƒ
.
3. Press
B
until the touchpad displays the type of
code you wish to change (Regular User codes, Par-
tition Master Codes, or System Master code), then
press
ƒ
. For example, if you want to change a
Regular User code, press
ƒ
when the touchpad
displays “REGULAR USER CODES” or “REG
CODES.”
4. Press
B
until the touchpad displays the user code
you wish to change, then press
ƒ
.
For example, if you want to change Regular User
code 2, press
ƒ
when the touchpad displays
“USER 02” or “REG CODE 02.”
5. Enter the new code and press
ƒ
.
6. Press
B
. “DIRECT BYPASSING” or “BYPASS”
appears:
•Press
1
+
ƒ
to turn the option off for this
user code.
•Press
2
+
ƒ
to turn the option on for this
user code.
7. Press
B
. “REMOTE ACCESS” or “REMOTE”
appears:
•Press
1
+
ƒ
to turn the option off for this
user code.
•Press
2
+
ƒ
to turn the option on for this
user code.
8. Press
B
. “PARTITION JUMP” or “PTN JP”
appears:
•Press
1
+
ƒ
to turn the option off for this
user code.
•Press
2
+
ƒ
to turn the option on for this
user code.
9. Press
B
. “SYSTEM TESTS” or “TESTS” appears:
•Press
1
+
ƒ
to turn the option off for this
user code.
•Press
2
+
ƒ
to turn the option on for this
user code.
10. Press
B
. “LATCHKEY REPORT” or “LATCH”
appears:
•Press
1
+
ƒ
to turn the option off for this
user code.
•Press
2
+
ƒ
to turn the option on for this
user code.
11. Press
‚
+
B
to move to the next user code, or
‚
+
00
+
ƒ
to exit the programming
menus.
Note: The system will not accept the same code for
two different users.
Stay
Status
Features
press both
Lights
System
Away
Pager
Off
No Delay
press both
press both
Test S ystem W eekly
S ile n t
7
0
8
4
5
6
3
Bypass
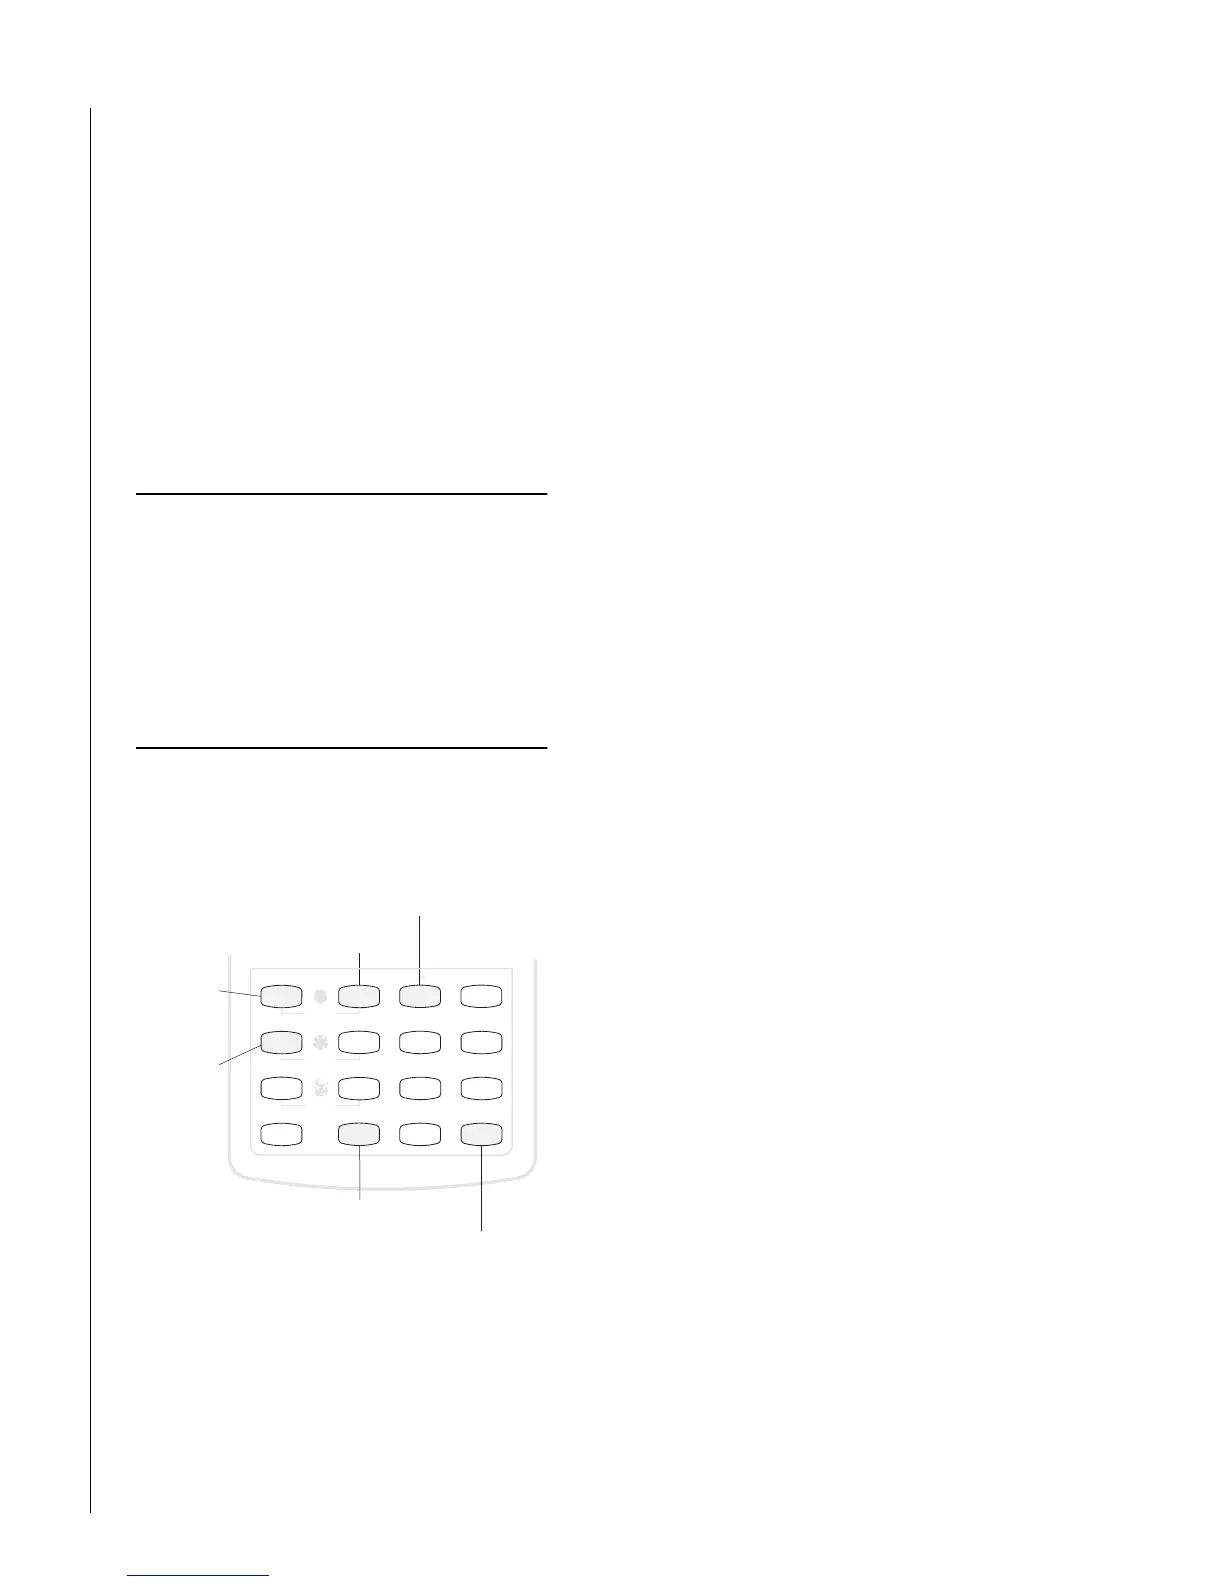
Menu
C
9
P re ss to
m o v e fo rw a rd
th ro u g h
th e m e n u
D
*
#
P re ss to d e se le c t
an option or to
cancel an entry
P re ss to s e le c t
an option or to
accept an entry
P re ss to
m ove backw ard
th ro u g h
th e m e n u
B
A
A
B
ƒ
‚
P re ss to tu rn
a feature off
1
P re ss to tu rn
a feature on
2
12
Press num bered
keys w hen
values or code
choices are
re q u e ste d