42
EN
6. Programming the door path
6.1 - Basic programming of the
automation’s movement
Through this procedure, the control unit memorizes working times
and power required for opening and closing the system.
The slowdown points are automatically set to ensure a cor-
rect arrival to the end of gate path.
- To exclude the deceleration, see the paragraph "Advanced
programming of the automation’s movement.
STEP ACTION RESULT
1
PUT THE DOOR TO HALF
WAY POSITION
2
PRESS THE SET BUTTON
FOR 3 SECONDS
The yellow “set”
LED ashes and
then turns on in
xed mode
3
THE DOOR PERFORMS
A PARTIAL OPENING
MOVEMENT
The yellow “set”
LED stays on in
xed mode
4
THE DOOR PERFORMS
A FULL CLOSING
MOVEMENT
The yellow “set”
LED stays on in
xed mode
5
THE DOOR PERFORMS
A FULL OPENING
MOVEMENT
The yellow “set”
LED stays on in
xed mode
6
THE DOOR PERFORMS
A FULL CLOSING
MOVEMENT
The yellow “set”
LED stays on in
xed mode
7
THE DOOR PERFORMS
A FULL OPENING
MOVEMENT WITH
SLOWDOWNS
The yellow “set”
LED turns off
8
THE DOOR PERFORMS
A FULL CLOSING
MOVEMENT WITH
SLOWDOWNS
9
END OF THE
PROGRAMMING
PROCEDURE
If the “FORCE” potentiometer is adjusted, the automa-
tion’s movement must be reprogrammed.
The red “Error” LED ashes during the automation’s
movement when a mechanical stress point is detected (this
corresponds to increased motor effort). Adjust OBSTACLE
and FORCE knobs (slightly turn them clockwise) to solve this
and check gate mechanics if necessary.
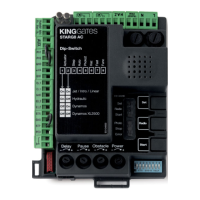
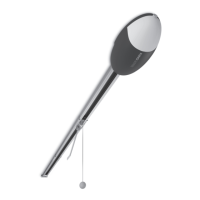
SET
3
HAZ
4
5
6
7
8
9
10
L
Set
Radio
Start
Photo
Stop
Error
0
i
t
rt
t
top
To start up the system, one of the following programming procedures
must be carried out:
- basic programming of the automation’s movement: self-learning of
the manoeuvre times and slowdown start points.
- advanced programming of the automation’s movement: self-learn-
ing of the manoeuvre times and manual setting of the slowdown
start points.
If, at the start of the following procedures, the “set”, “ra-
dio” and “error” LEDs ash, it means that the programming
protection has been activated – see Paragraph 14.1.
To interrupt the following programming sequences at
any time, press the SET and RADIO buttons simultaneously.
35