Diagnostics
SM1399-1 – 19JUN06 33
[27] Press:
• 4-WAY BUTTON left and right to check that the exposure value changes
• SHUTTER BUTTON to capture an image
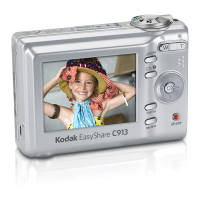
[28] Check that the MONITOR LCD displays:
• image
• icons:
–“Flash” mode
– quality of the image
– type of memory
–“Zoom” mode
– exposure value
• number of additional images that can be captured
“delete” 1. Press:
•“review” BUTTON
•“delete” BUTTON
2. Check that options display.
3. Select the “EXIT” option.
4. Press:
•“OK” BUTTON to quit the “delete” screen
•“review” BUTTON to return to the “Auto” mode
5. Press:
•“review” BUTTON
•“delete” BUTTON
• SHUTTER BUTTON to capture an image
6. Check:
• CAMERA quits the “delete” screen
• image is captured
• image displays on the MONITOR LCD
7. Immediately press the “delete” BUTTON.
8. Use the 4-WAY BUTTON to select “YES”.
9. Press:
•“OK” BUTTON
•“review” BUTTON
10. Use the 4-WAY BUTTON to check that the image is deleted.
11. Press the “delete” BUTTON.
12. Use the 4-WAY BUTTON to select “PICTURE”.
13. Press:
•“OK” BUTTON to delete the image
•“OK” BUTTON again to select “EXIT”
14. Use the 4-WAY BUTTON to check that the image is deleted.
15. Press the “review” BUTTON to quit.
BUTTON/SWITCH Do:
 Loading...