5 Installation at Site
22 of 96
Sewatec
5 Installation at Site
5.1 Checks to be carried out prior to installation
Place of installation
WARNING
Installation on mounting surface which is unsecured and cannot support the load
Personal injury and damage to property!
▷ Use a concrete of compressive strength class C12/15 which meets the
requirements of exposure class XC1 to EN206-1.
▷ The mounting surface must be set, flat, and level.
▷ Observe the weights indicated.
1. Check the structural requirements.
All structural work required must have been prepared in accordance with the
dimensions stated in the outline drawing/general arrangement drawing.
5.2 Installing the pump set in a horizontal position
For installation types 3E and 3H
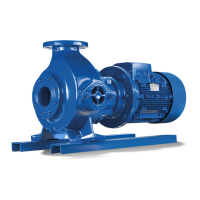
Fig.3: Installation on a foundation with chemical anchors
L Bolt-to-bolt distance 1 Shim
2 Shim if (L) > 800mm 3 Chemical anchor
ü The foundation has the required strength and characteristics.
ü The foundation has been prepared in accordance with the dimensions given in
the outline drawing/general arrangement drawing.
1. Position the pump set on the foundation and level it with the help of a spirit
level placed on the shaft and discharge nozzle.
Permissible deviation 0.2 mm/m.
2. Use shims (2) for height compensation, if necessary.
Always fit shims, if any, immediately to the left and right of the chemical
anchors (4) between the baseplate/foundation frame and the foundation.
For a bolt-to-bolt distance (L) ≥ 800 mm fit additional shims (2) halfway between
the adjoining holes.
All shims must lie perfectly flush.
3. Drill the holes as specified in the table "Chemical anchor bolt dimensions". Then
clean the holes.
WARNING
Improper handling of mortar cartridge
Skin sensitisation and/or irritation!
▷ Wear suitable protective clothing.
4. Insert the mortar cartridges into the drilled holes.
Observe the curing times of the mortar cartridges!