5. Continuity / resistance measurement
IMPORTANT
The continuity test will auto-range from 0.01 Ω to 99.9 kΩ. Circuits up to 2 Ω will be tested at >200 mA.
To change the test current, go to “11. Setup options” on page 53.
The continuity test is automatic. The test starts as soon as the leads are connected to a circuit.
The TEST button is ONLY used to null the lead set.
WARNING : Prior to any continuity testing, ensure the circuits under test are isolated and not live.
SETUP allows the follow configuration options:
Positive test current
Bi-Directional test current
Bi-directional test current allows the automatic testing of the circuit in both directions and the highest measured
value being displayed See “11. Setup options” on page 53.
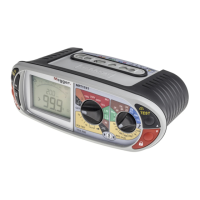
5.1 Nulling test lead resistance (up to 9.99 ohms)
W
Before starting a continuity test, the test lead resistance should be nulled such that it does not add extra resistance to
the circuit being measured. Once nulled it does not need repeating for each test. Periodically it should be checked to
ensure nothing has changed.
The “Lead Null” value is retained even when the tester is switched off.
To null test leads:
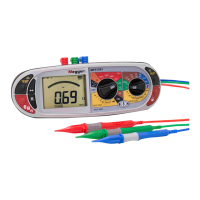
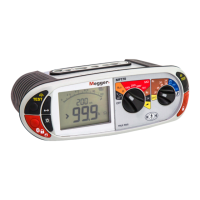
1. Short test probes or clips together and press the TEST button. The null symbol
will be displayed to indicate
lead null is active.
Lead null OFF Lead null ON
This null value is stored until the TEST button is pressed again.
2. To cancel the LEAD NULL, separate the test leads and press the TEST button.
www.megger.com MFT1800 series
21
Continuity / resistance measurement