OM-273473 Page 36
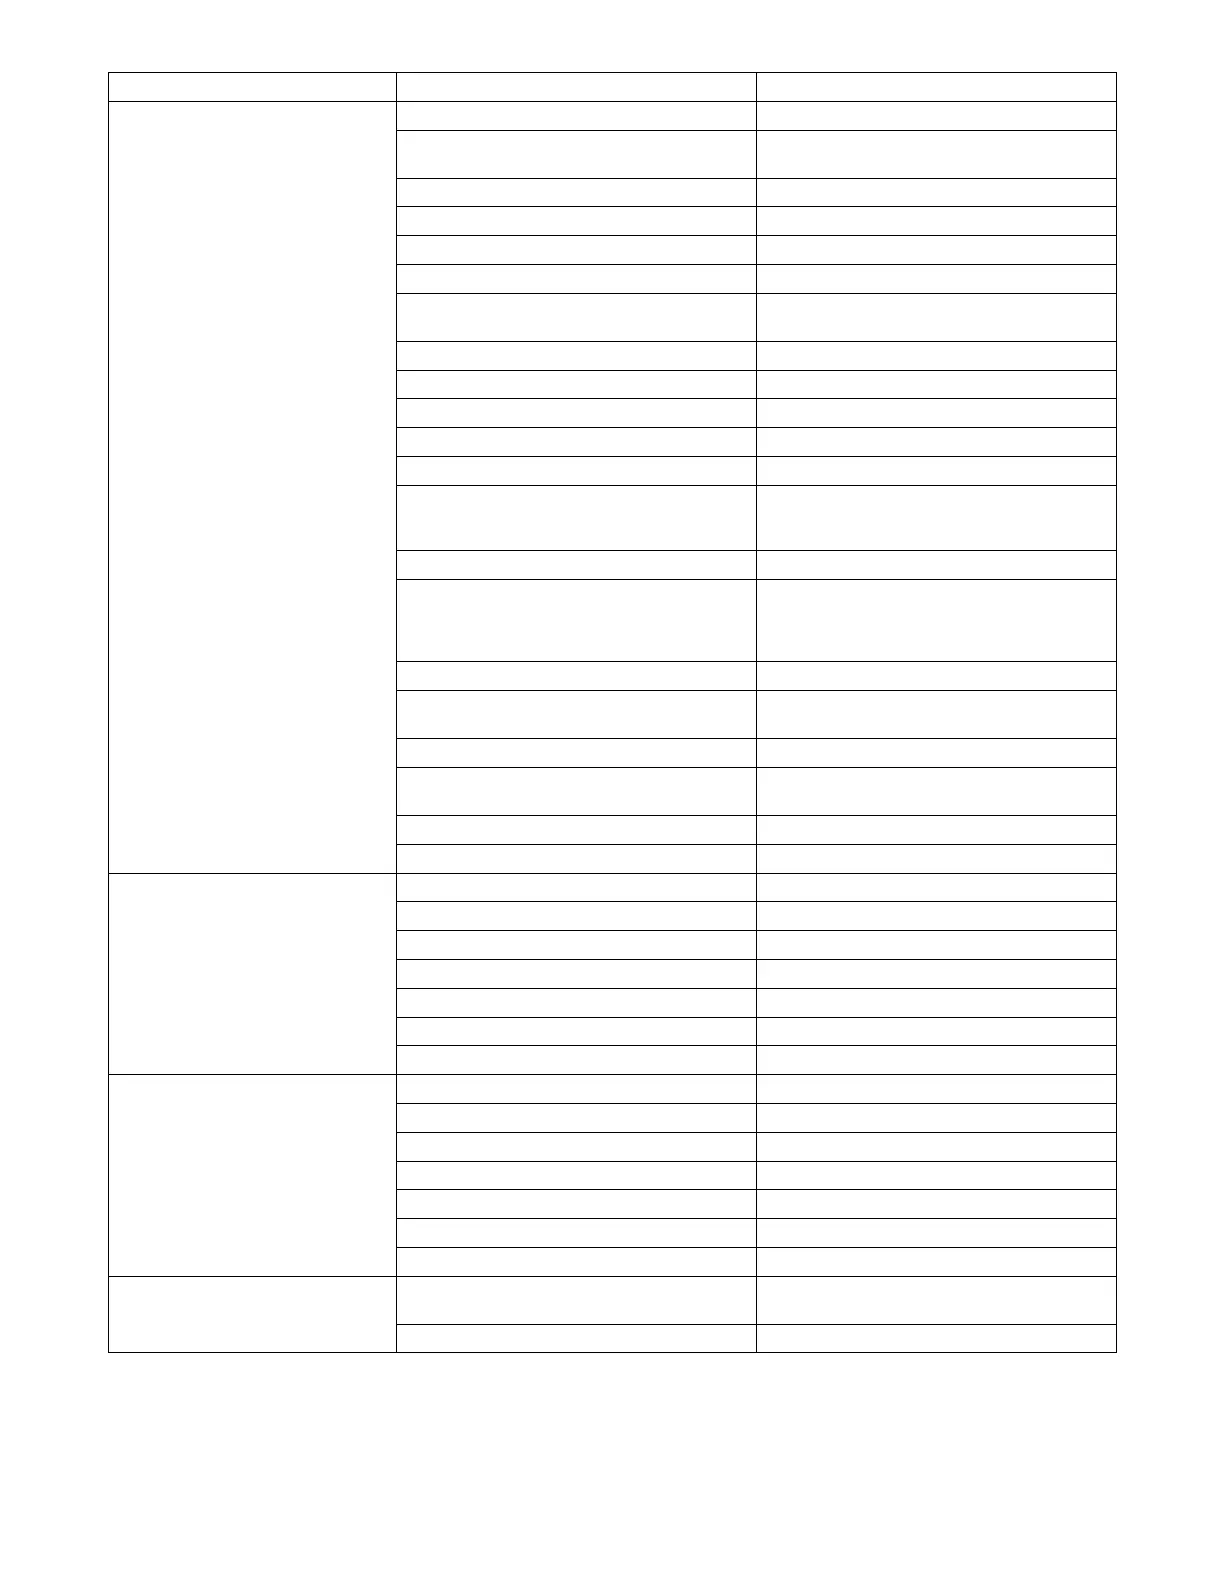
Trouble RemedyProbable Cause
Wandering, hunting or erratic arc. Restriction in unspooler or drum adapter. Replace unspooler or repair restriction.
Dirty or worn gun liner or inlet cable. Remove gun liner or inlet cable and clean or re-
place.
Sharp bends or kinks in gun cable or liner. Straighten gun cable and/or replace liner.
Loose or worn contact tip. Tighten or replace contact tip.
Wrong size or type of contact tip. Replace with proper size and type contact tip.
Gun overheating. Use gun with proper amperage rating.
Loose power cables or other electrical
connections.
Tighten, repair or replace connections or cables,
also check all rotary or brush type connections.
Incorrect gun or torch angle. Set proper gun angle.
Too much or too little gas flow. Adjust for proper gas flow.
Moisture in shielding gas. Replace gas cylinder or supply.
Wrong gas for wire type or transfer mode. Use correct shielding gas.
Wrong program selection for pulse welding. Make proper program selection.
Improper or unsteady analog command from robot
controller.
Check signal from robot controller (as a trouble-
shooting aid go to power source control of voltage
and wire speed).
Gun or outlet cable leaking. Repair or replace faulty parts.
Incorrect nozzle to work distance. Set proper distance [3/8 in to 5/8 in (9.5 to 15.9 mm)
for short arc, 5/8 in to 1 in (15.9 to 25.4 mm) for
pulse welding, and 3/4 in to 1-1/4 in (19.1 to 31.8
mm) for spray welding].
Voltage sensing leads open or shorted. Repair or replace voltage sense leads.
High frequency noise in the area. Be sure proper grounding methods are followed
when TIG or plasma equipment is used in the area.
Arc blow. See Section 6-7.
Drive motor tachometer or motor cable open or
shorted.
Check drive motor tachometer and cables, and re-
pair or replace.
Wrong size drive rolls. Replace with proper size drive rolls.
Too much or too little drive roll pressure. Adjust drive roll pressure.
Welding wire burns back to contact tip a
the start of a weld.
Restriction in wire feed system. Check inlet cable, gun liner and wire guides.
Worn drive rolls. Replace drive rolls.
Wrong size drive rolls. Replace with proper size drive rolls.
Improper start parameters. Adjust start parameters.
Worn contact tip. Replace contact tip.
Wrong size or type of contact tip. Replace with proper size and type contact tip.
Not enough cast in welding wire. Add a wire straightener to put cast in wire.
Welding wire burns back to contact tip
during welding.
Restriction in wire feed system. Check inlet cable, gun liner and wire guides.
Worn drive rolls. Replace drive rolls.
Wrong size drive rolls. Replace with proper size drive rolls.
Too much or too little drive roll pressure. Adjust drive roll pressure.
Worn contact tip. Replace contact tip.
Wrong size or type of contact tip. Replace with proper size and type contact tip.
Not enough cast in welding wire. Add a wire straightener to put cast in wire.
Welding wire burns back to contact tip a
the end of a weld.
Welding power source output not shutting off. Make sure all switches are in correct position,
repair power source if necessary.
Burnback setting too high or too long. Adjust burnback setting or turn off completely.
 Loading...