Contents
Configuring the cRIO-905x...................................................................................................... 2
Connecting the cRIO-905x to the Host Computer Using USB........................................ 3
Connecting the cRIO-905x to the Host Computer or Network Using Ethernet............... 4
Configuring Startup Options.............................................................................................4
cRIO-905x Features.................................................................................................................. 6
Ports and Connectors........................................................................................................ 6
Buttons............................................................................................................................ 10
LEDs................................................................................................................................11
Chassis Grounding Screw............................................................................................... 14
Internal Real-Time Clock................................................................................................14
Digital Routing................................................................................................................14
Clock Routing................................................................................................................. 15
Synchronization Across a Network.................................................................................16
Battery.............................................................................................................................18
File System......................................................................................................................18
Mounting the Controller..........................................................................................................19
Alternative Mounting Configurations.............................................................................20
Mounting Requirements..................................................................................................20
Dimensions......................................................................................................................21
Front Mounting on a Flat Surface................................................................................... 23
Rear Mounting on a Flat Surface.................................................................................... 25
Mounting the Controller on a Panel ...............................................................................27
Mounting on a DIN Rail ................................................................................................ 31
Mounting on a Rack........................................................................................................33
Mounting the Device on a Desktop.................................................................................33
Choosing Your Programming Mode....................................................................................... 37
Analog Input with NI-DAQmx....................................................................................... 38
Analog Output with NI-DAQmx.................................................................................... 44
Digital Input/Output with NI-DAQmx........................................................................... 50
PFI with NI-DAQmx...................................................................................................... 62
Counters with NI-DAQmx..............................................................................................63
Counter Input Applications.............................................................................................68
Counter Output Applications.......................................................................................... 87
Counter Timing Signals.................................................................................................. 95
Worldwide Support and Services.......................................................................................... 100
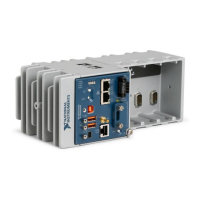
Configuring the cRIO-905x
You can connect the cRIO-905x to a host computer or network and configure the startup
options using the USB 2.0 Type-C Device Port with Console Out or the RJ-45 Gigabit
Ethernet port 0.
Tip Refer to the NI cRIO-905x Getting Started Guide for basic configuration
instructions and information about connecting to a host computer using the USB 2.0
2 | ni.com | NI cRIO-905x User Manual

 Loading...