NCR SelfServ 34 ATM Installation Guide
8 B006-6590-C000
INSTALLING THE ATM
The ATM can be installed through a new hole, or an existing NCR 5886 hole in the wall
with minimal rework required, provided the specifications supplied in the NCR Personas
M Series 5886 Site Preparation (B006-6191) were adhered to during the 5886 initial
installation.
Customised collars or surrounds made by the owning organisation may need rework or
replacement due to the following installation requirements.
Installation Categories
For information on the installation categories, refer to the publication, NCR SelfServ 34
Site Preparation (B006-6586).
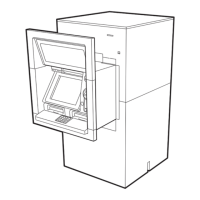
Positioning the ATM
Using the lifting trolleys, move the ATM onto the floor or plinth, and through the prepared
hole in the wall so that the sleeve protrudes through the other side. There should be
enough of the sleeve showing to allow the collar to be fitted.
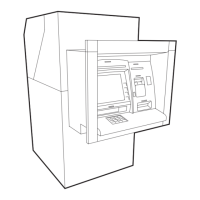
Fitting the Collar
The collar may pre-assembled when it leaves the factory and may require to be partly
dismantled before fitting to the ATM. Make sure that you retain all parts, including
screws, in preparation for fitting to the ATM.
Note: Both the open advert collar and the advert collar require a decal. Fix the advert
decal before fitting the collar. For more information on decals, refer to the section “Fitting
Decals”. For information on decal dimensions, refer to the publication, NCR SelfServ 32,
34, 38 Site Preparation Requirements (B006-6670).