EN
English – 15
WARNING! – If wishing to change the type of motor from one with an
inverter to one without an inverter, perform the EE_0 type deletion before
connecting the motor. If the motor is connected before performing the
deletion and the control unit is switched on, the motor will run for about
2 seconds (in an unspecied direction), after which the control unit will
go into error.
3.12 Position learning
Enter the position setting as indicated on p.15 and p.16. The control
unit then autonomously runs 4 complete cycles to improve motor/control unit
performance and to comply with the limits (setup) as closely as possible.
WARNING! – Before starting to move the door, make sure it is at least
50 cm above the ground. If not, use the emergency manoeuvre system
(see motor instruction manual). This precaution prevents the support
cables (sectional doors) slipping out of their seat or the shutter being over-
wound (rolling shutters) in the event of reverse rotation.
WARNING! – If the direction of rotation does not match the set direction
(Open button = opening direction) or error “F06” appears on the display,
change the direction of rotation (see “3.13 Changing direction of motor
rotation“ on p. 17)
WARNING! – DO NOT interrupt the position learning procedure. If this
happens, the entire learning procedure must be repeated.
The position learning phase can be repeated at any time, even after installation.
19
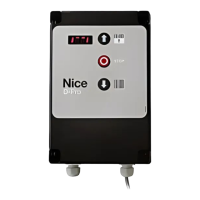
The “OPEN”, “STOP”
and “CLOSE”
buttons are used
both to operate
the automation
during normal door
movement and during
the position learning
phase
OPEN
BUTTON
STOP
BUTTON
CLOSE
BUTTON
REAR BUTTONS
+BA
X7
-
J27
J26
J34 J35 J29
J5
20
COM
Limit UP
Therm
RS485
Encoder
Limit
DOWN
Pre - L
DOWN
Setting opening and closing positions with ELECTRONIC LIMIT
SWITCH (ENCODER)
Three positions can be programmed, as described below:
TABLE 9 - Opening/closing position
Position Meaning
Opening
Maximum opening position.
The door stops on reaching this position.
Closure
Maximum closing position.
The door stops on reaching this position.
Partial opening
Partially open position.
Position at which the door stops after a partial-opening
command is given.
WARNING! – Before starting to move the door, make sure it is at least
50 cm above the ground.
Proceed as follows to set the positions with electronic limit switch:
TABLE 10 - Setting positions with electronic limit switch
Phase Operation to be performed Graphical description
1 Set all DIP switches to OFF
ON
2 Set DIP switch 4 to ON
ON
3
The display shows the adjacent
image with the top dashes
ashing
4
Use the front button to move
the door to the desired
maximum opening position
5
After selecting the maximum
opening position, press one of
the rear buttons to conrm
6
The display shows the adjacent
image with the bottom dashes
ashing
7
Use the front button to
move the door to the desired
maximum closing position
8
After selecting the maximum
closing position, press one of
the rear buttons to conrm
9
The display shows the adjacent
image with the central dashes
ashing
10
If you do not wish to set a partially open position, skip to phase
14 of this procedure
11
Use the front button to move
the door to the desired partially
open position
12
After selecting the partially open
position, press one of the rear
buttons to conrm
13
The display shows only the side
bars
14 Lower DIP switch 4
ON
15 The display shows "Setup-4"
16
Give an open or close command
using the appropriate buttons
on the front of the control unit.
Wait for the control unit to nish
setup
/
7
At the end of the setup, the door
will be fully open and the display
will show the adjacent “image”