30
VQT2J52
Advanced timer recording
[RAM] [-R] [-R]DL] [-RW‹V›] [+R] [+R]DL] [+RW] [VHS]
≥You can enter up to 16 programmes up to a month in advance.
(Each daily or weekly programme is counted as one programme.)
[RAM] [-RW‹V›] [+R] [+R]DL] [+RW]
≥To use a new disc, formatting is necessary.
You cannot switch subtitles during timer recording.
Preparation
≥Turn on the television and select the appropriate video input to suit
the connections to this unit.
≥If recording to DVD, insert a disc that you can use for recording
(> 11).
≥Make sure that the clock settings are correct (> 67).
[For]Germany[and]Austria[
Entering S
HOWVIEW numbers is an easy way of timer recording. You
can find these numbers in TV listings in newspapers or magazines.
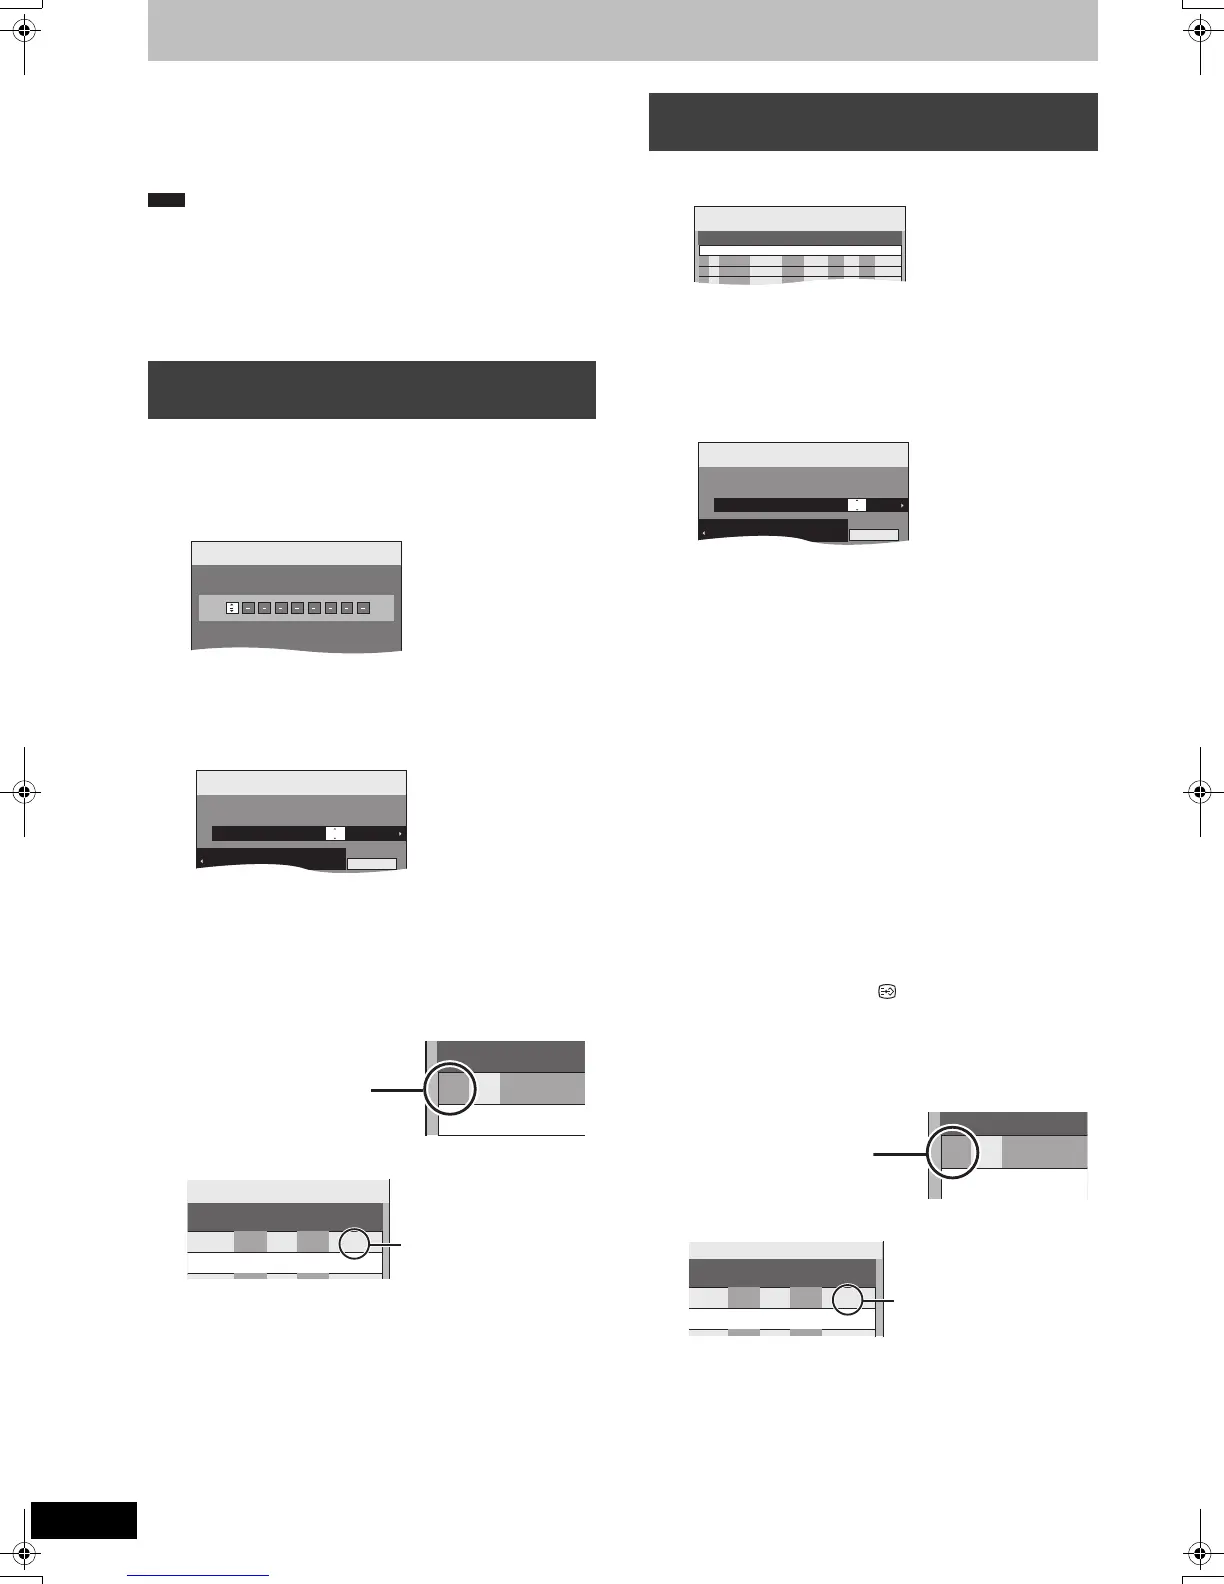
1 Press [ShowView].
2 Press the numbered buttons to enter
the S
HOWVIEW number.
Press [2] to move back to correct a digit.
3 Press [OK].
≥Make corrections if necessary using [3, 4, 2, 1]
(> right, step 3).
≥When “-- ---” appears in the “Channel” column, you cannot
set timer recording. Press [3, 4] to select desired
programme position. After you have entered the information
of a TV station, it is kept in the unit’s memory.
4 Press [OK].
The timer programme is stored and the timer icon is
displayed.
“F” lights on the unit’s display to indicate timer recording
standby has been activated.
Repeat steps 1–4 to programme other recordings.
Press [Í] to turn the unit off.
1 Press [PROG/CHECK].
2 Press [3, 4] to select “New Timer
Programme” and press [OK].
3 Press [2, 1] to move through the
items and change the items with
[3, 4].
≥When “Channel” is selected, you can press the “Blue” button
to change the category [e.g., TV, Radio, Favourite (> 62)]
and then press [3, 4] to select the channel you want to
record.
≥Press and hold [3, 4] to alter the Start (Start time) and Stop
(Finish time) in 30-minute increments.
≥You can also set Channel (Programme position/TV Station
Name), Date, Start (Start time), and Stop (Finish time) with
the numbered buttons.
≥Date
≥You can also press [DRIVE SELECT] to select the recording
drive.
≥You can also press [REC MODE] to change the recording
mode.
≥Programme Name
Press [2, 1] to select “Programme Name” and press [OK].
(> 45, Entering text)
≥STTL (Subtitles) (Digital broadcast only)
AUTO!)OFF
When the “Channel” column is set in AV1, AV2 or AV3, this
setting is unavailable.
You can also press [STTL ] to switch “STTL” setting.
When there are multiple languages, select the subtitle
(> 63, DVB Preferred Language).
4 Press [OK].
The timer programme is stored and the timer icon is
displayed.
“F” lights on the unit’s display to indicate timer recording
standby has been activated.
Repeat steps 2–4 to programme other recordings.
Press [Í] to turn the unit off.
Using SHOWVIEW number to make timer
recordings (Analogue broadcast only)
Note
Input ShowView Number 0-9, and press OK.
ShowView
Record
1:34 SP
2:59 SP
DVD
VHS
Remain
TUE 12.10.10. 12:53:00
Timer
Recording
1:34 SP
2:59 SP
DVD
VHS
Remain
Mode
Stop Start Channel Date
STTL
Drive
17:00 16:00 19. 10. TUE
−−−
1 ARD
Programme Name
SP
DVD
All Channels : ARD
TUE 12.10.10. 12:53:00
Mode
Stop
STTL
Drive
DVD
Drive
space
SP
OK
17:00
−−−
Programme
TUE 12.10.10. 12:56:00
2:59 SP
Check to make sure “OK” is
displayed (> 31).
e.g.,
Manually programming timer
recordings
[.
l
l
l
l
a.
Date: Current date up to one month later minus
one day
;:
Daily timer: SUN-SAT>MON-SAT>MON-FRI
;:
Weekly timer: SUN>--->SAT
Timer
Recording
1:34 SP
2:59 SP
DVD
VHS
Remain
Mode
Stop Start
No.
Date
STTL
Drive
Channel
Drive
space
New Timer Programme
TUE 12.10.10. 12:54:00
Timer
Recording
1:34 SP
2:59 SP
DVD
VHS
Remain
Mode
Stop Start Channel Date
STTL
Drive
22:30 22:00 19. 10. TUE OFF DVD
1 ARD
Programme Name
SP
All Channels : ARD
TUE 12.10.10. 12:54:00
Mode
Stop
STTL
Drive
DVD
Drive
space
SP
OK
22:30
OFF
ogramme
TUE 12.10.10. 12:56:00
2:59 SP
Check to make sure “OK” is
displayed (> 31).
e.g.,
DMR-EZ49VEGEC-VQT2J52_eng.book 30 ページ 2010年1月7日 木曜日 午後4時0分
 Loading...