Installing PenMount 6000 Control Boards
15
PenMount 6300 Touchscreen Control Board Upside
3. Power on the computer and the display. Install the software drivers and
utilities and calibrate the touchscreen. See
Chapter 3. Install Drivers for
6000 Boards
for details.
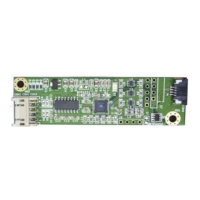
4. The mechanical diagram of PenMount 6300 Control Board:
PenMount 6300 Touchscreen Control Board Mechanical Diagram
2.3.4. Install A PenMount 6500 Control Board
The PenMount 6500 control board is a touchscreen control board that uses
both RS-232 and USB interfaces and supports 4-wire, 5-wire, and 8-wire
touchscreens. The size of the board is 26 x 60 mm and it has two connectors
and four dipswitches on-board. Follow the steps below to install the 6500
control board.
1. Power down your computer and display and open your display or system
case. Find space on your system and attach the control board to your