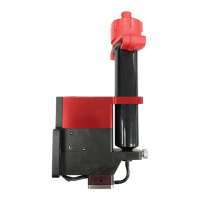
Maintenance 4.
Examine the material outlets for contamination and cured
material.
Examine material containers or cartridges for signs of cured or
dried material.
• Flush or clean the system.
• Clean or replace the nozzle plate, diaphragm, and feed tube.
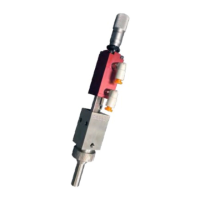
Flush the System 4.1
1. Decrease the air pressure to 0 psi.
2. Turn the air cap counterclockwise to remove it.
3. Turn the thumb screw counterclockwise to loosen it.
4. Remove the feed tube from the syringe.
5. Remove the syringe from the syringe holder.
6. Install a clean empty syringe.
7. Push the feed tube in the end of the syringe.
8. Turn the thumb screw clockwise to tighten.
9. Fill the syringe with approximately 3 cc of solvent.
10. Put the air cap on.
11. Increase air pressure.
12. Make sure the solvent is dispensed in a purge cup, and dispense 250 drops. Do
this 5-6 times until the solvent is clear and all the solvent has been used from
the syringe.
13. Do steps 1-5 again.
14. Remove and clean the diaphragm and the nozzle plate as necessary. Refer to
Section 3.8.
15. Assemble the jet again. Refer to Section 3.