1
Various Shooting Functions
65
Automatic Exposure
<0GG>5IFFYQPTVSFWBMVFJTOPUBEKVTUFE
<0O>5IF FYQPTVSF WBMVF JT BEKVTUFE UP NBUDI UIF OVNCFS PG TIPUT UP CF
merged.
Save Each Shot
<0GG>4BWFTPOMZUIFGJOBMNFSHFEJNBHF
<0O>4BWFTBMMPGUIFVONFSHFEJNBHFT
Save Images In Prog-
ress
<0GG>4BWFTPOMZUIFGJOBMNFSHFEJNBHF
<0O>4BWFTUIFJNBHFXJUIFBDINFSHF
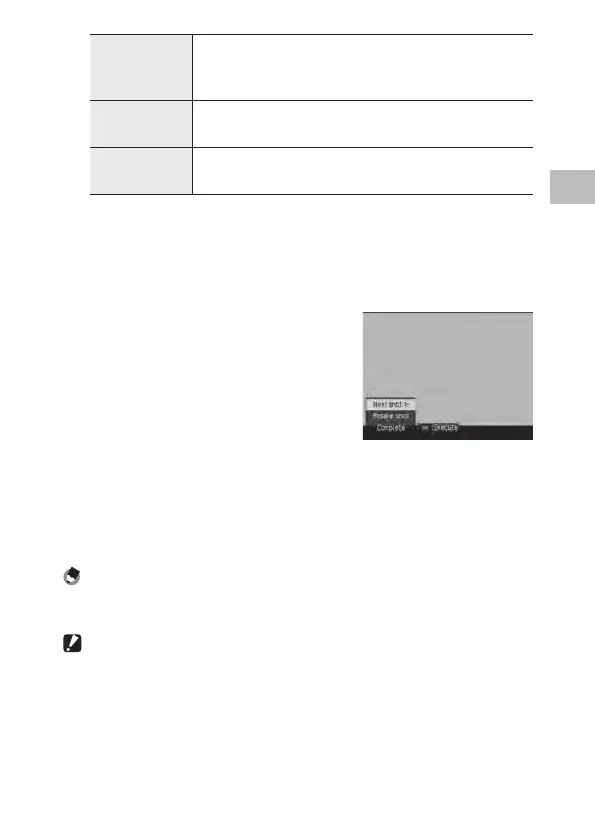
3 Press the MENU/OK button.
[Multiple Exposure Shooting] appears on the shooting screen.
4 Shoot the first image.
5 To shoot the next image, select
[Next shot >], and then press the
MENU/OK button.
To retake the shot, select [Retake shot].
6 Shoot the next image.
Repeat steps 5 through 6.
To return to the previous merged image, select [Retake shot]. To end mul-
tiple exposure shooting, select [Complete].
When shooting ends after the fifth image is taken or when [Complete] is
selected, the merged image is saved.
Note -----------------------------------------------------------------------------------------------------------
t *G<.VMUJ&YQPTVSF>JTTFUJO UIF<4FU'O #VUUPO>JOUIF <,FZ$VTUPN0QUJPOT>NFOVZPVDBO TUBSU
multiple exposure shooting simply by using the buttons. (GP. 107)
Caution -------------------------------------------------------------------------------------------------------
t <$SPQUPNN>JTOPUBWBJMBCMFEVSJOHUIFNVMUJQMFFYQPTVSFTIPPUJOH