37
Assigning Functions to USER Buttons
You can assign functions to the USER [1] through [5] buttons. This lets you switch a function on and o or display a screen for accessing the function
simply by pressing the USER button. By factory default, the functions appearing on the operation panel are assigned to the USER buttons.
Changing Function Assignments
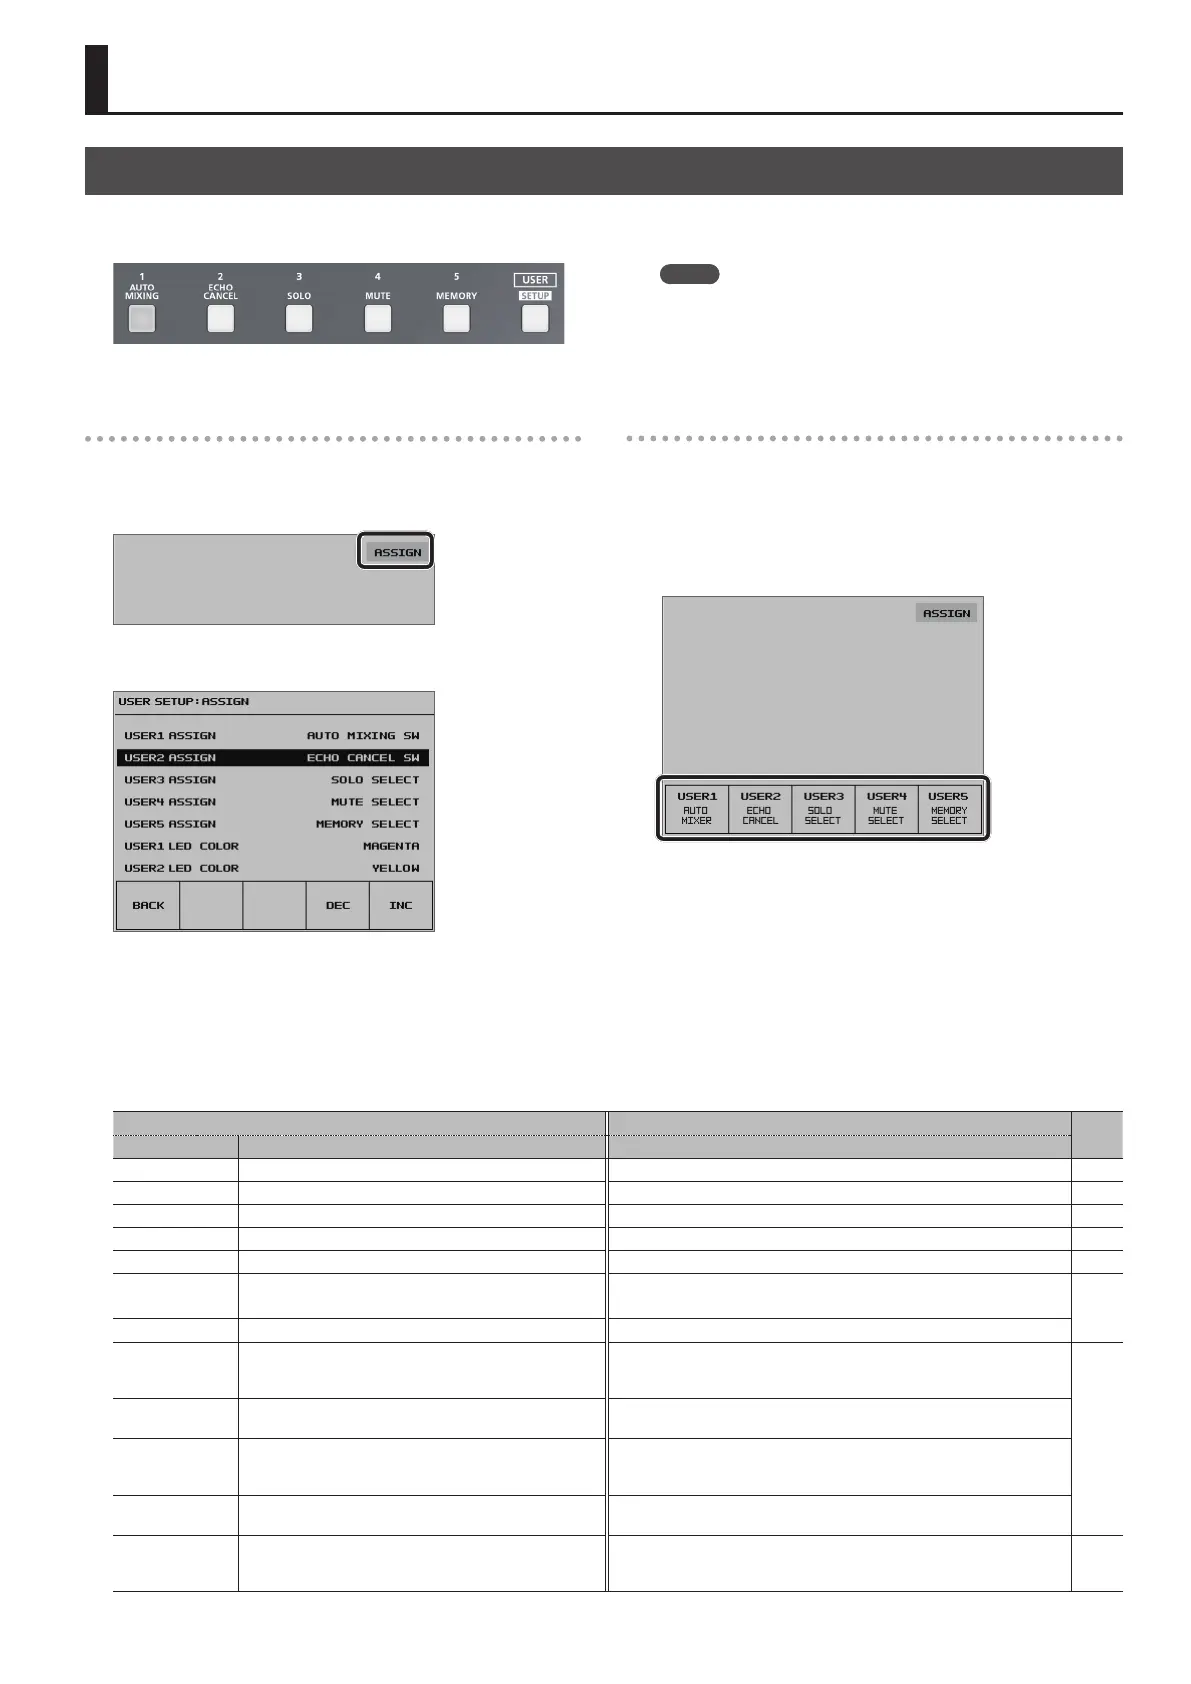
1. Press the USER [SETUP] button to display the setup screen.
2. Select <ASSIGN> to display the ASSIGN menu.
3. Select from among <USER1 ASSIGN> through <USER5
ASSIGN>.
4. Use the [VALUE] knob to specify the function assigned to
the USER button.
For details, refer to the table below.
5. Press the USER [SETUP] button several times to quit the
setup screen.
MEMO
5 You can specify which color each USER button lights up in. Use
the USER [SETUP] button g <ASSIGN> g the corresponding item
among <USER1 LED COLOR> through <USER5 LED COLOR> to
make the setting.
Making Advanced Settings for Assigned Functions
1. Press the USER [SETUP] button to display the setup screen.
2. Select from among <USER1> through <USER5> to display
the corresponding USER1 through 5 SETUP screen.
The functions currently assigned to the on-screen buttons are
displayed.
3. Make advanced settings for the function.
For information on what can be set, refer to the table below.
4. Press the USER [SETUP] button several times to quit the
setup screen.
Other Features
<USER1 ASSIGN>–<USER5 ASSIGN> Settings
<USER1> – <USER5> g USER1–USER5 SETUP Screen
Page
to see
Value Functions Assigned to the USER [1]–[5] Buttons Making Advanced Settings for Assigned Functions
NONE — (No function is assigned.) — —
ECHO CANCEL SW This switches the Echo Cancel feature on or o. This species items on the ECHO CANCEL screen. p. 31
AUTO MIXING SW This switches the Auto Mixing feature on or o. This species items on the AUTO MIXING screen. p. 32
AUDIO FLW SW This switches the Audio Follow feature on or o. This species items on the AUDIO FOLLOW screen. p. 34
AUTO SCAN SW This switches the Auto Scan feature on or o. This sets the interval for which video is displayed (AUTO SCAN TIME). p. 19
MEMORY SELECT
This displays the MEMORY LOAD screen.
This lets you select and call up a memory.
At the MEMORY SELECT setup screen, you can save settings to memory 1–8
and edit memory names.
p. 38
MEMORY LOAD This calls up a saved memory. The memory you want to call up is saved when you press the USER button.
MUTE SELECT
This displays the MUTE SELECT screen. This lets you specify
whether the Mute feature is on (red) or o for each individual
audio input and output.
—
p. 30
MUTE GROUP
This switches the Mute feature on or o globally for all audio
assigned to a group.
When you press the USER button, the input audio and output audio for which
the Mute feature is to be switched on are selected and assigned to a group.
SOLO SELECT
This displays the SOLO SELECT screen. This lets you specify
whether the Solo feature is on (red) or o for each individual
audio input.
—
SOLO GROUP
This switches the Solo feature on or o globally for all audio
assigned to a group.
When you press the USER button, the input audio and output audio for which
the Mute feature is to be switched on are selected and assigned to a group.
GPO
This outputs a control signal from the TALLY/GPIO connector.
The USER button lights up during output of the control
signal.
This species the GPO channel (1–4) on which the control signal is output and
the operation modes of the respective GPO channels.
p. 41
* Pressing a USER button to switch on (activate) its assigned function makes the USER button light up.