17
2021-04-12 / V1.1
Contactors CP Series – Installation and Maintenance Instructions
Installation
NOTICE
When installing, ensure that no dirt can get into the
contactor as a result of surrounding building activi-
ties.
NOTICE
Detent-edged rings and detent-edged washers have
a limited life time. After screws secured with detent-
edged rings or detent-edged washers have been
undone three times, the rings or washers must be
replaced by new ones.
X
Record the frequency of undoing of the screws
in the work log.
X
Replace detent-edged rings or detent-edged
washers with new ones after the screws have
been undone three times.
8.2.6 Tools required
- Socket spanner set, hexagon nuts
- Open-ended spanner set
- Torque wrench
8.2.7 Installation procedure
X
Make sure that the mounting surface on the
mounting plate (3) or mounting frame and the
bottom of the contactor are free from dirt and
other contaminants (e.g. metal chips).
X
Place the contactor (1) on the mounting plate (3)
or the mounting frame provided with the mount-
ing holes.
X
Screw the contactor (1) to the mounting plate (3)
or mounting frame using the 4 mounting screws
(2).
- If the mounting holes are designed as threaded
holes, screw the screws with suitable screw lock-
ing elements directly into the prepared threads.
- If the mounting holes are through holes, tighten
the screws with suitable screw locking elements
(on both sides) and nuts.
X
Tightened the mounting screws to the specied
torque, which depends on the strength class (min.
8.8) of the screws/nuts used.
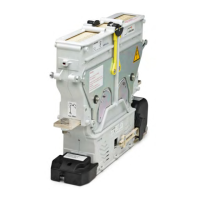
3
2
1
Nm
4 x M8
Fig. 11: Example for the installation of the device on a mount-
ing plate or mounting frame (the gure shows a NO/
NC device with large arc chamber)
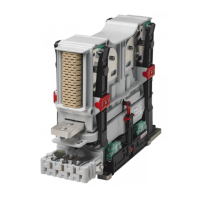
3
2
1
Nm
4 x M8
Fig. 12: Example for the installation of the device on a mount-
ing plate or mounting frame (the gure shows a NO/
NC device with medium arc chamber)
 Loading...