38
2021-04-12 / V1.1
Maintenance
Contactors CP Series – Installation and Maintenance Instructions
Installing the pre-charging contactor
(CPP)
With 1,200 A and 2,000 A devices
X
Position the new CPP (1) on the base plate of the
main contactor.
X
Screw in the 2 xing screws (2).
X
Tighten the 2 xing screws (2) to a torque of 4Nm.
X
Reconnect the cables to the CPP (1), see “8.4.8
Connecting the optional pre-charging contactor
(CPP)”.
With 600 A devices
X
Ensure that the contact surfaces on the mount-
ing plate (3) and the bottom of the CPP (1) are
free from dirt and other contamination (e.g. metal
chips).
X
Position the new CCP (1) on the mounting plate (3)
X
Screw the CCP (1) on the mounting ange to the
mounting plate (3) using 4 mounting screws M5
including washers (2).
X
Tighten the mounting screws to the specied
torque, which depends on the strength class (min.
8.8) of the screws/nuts used.
X
Reconnect the cables to the CPP (1), see “8.4.8
Connecting the optional pre-charging contactor
(CPP)”.
9.3.7 Replacing the optional high-
voltage discharging contact (CPD)
Safety
DANGER
Before beginning any work on the con-
tactors, make sure that
X
there is no voltage present,
X
all safety regulations are fully ob-
served.
X
Refer also to section „Dangers and
security measures“ on page 6.
Spare parts required
High-voltage discharging contact (CPD), see chapter
“10. Spare parts”
Tools required
- Set of torx bits
- Hexagon socket wrench set
- Circlip pliers (external)
- Torque wrench
Preliminaries
The cables at the high-voltage discharging contact
(CPD) are disconnected, see “9.3.7 Replacing the op-
tional high-voltage discharging contact (CPD)”.
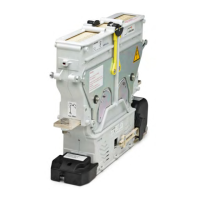
Removing the high-voltage discharging
contact (CPD)
X
Remove the shaft circlip (1).
X
Unscrew and remove the two screws (2) including
washers.
X
Remove the CPD (3).
2
1
3
3
Nm
Fig. 43: NO/NC contactors – remove the high-voltage
discharging contact (CPD)
 Loading...