24
2021-04-12 / V1.1
Installation
Contactors CP Series – Installation and Maintenance Instructions
8.4.6 Connecting the main contacts
Depending on the contactor type, the main circuit ter-
minals are either tted with one or two insert nuts or
through holes.
The gures show contactor types with main contacts
with two insert nuts each.
Proceed in the same way for contactors with one insert
nut, but omit the second terminal screw.
Proceed in the same way for contactors with through
boreholes, but use additional screw locking elements
(nuts and washers) to counter the terminal screws.
NOTICE
X
Ensure that the connection points for the main
contacts are free from corrosion.
NOTICE
X
Make sure that according to the insulation class
there is sucient clearance between the main
connections and the pole plates.
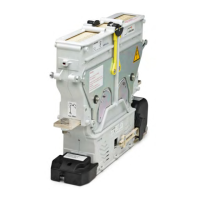
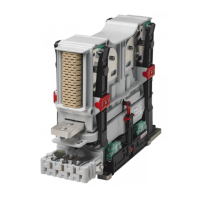
Main contact connection with busbars
For devices with arc chamber, the installation of bus-
bars with 2 terminal screws is easier if the arc chamber
is removed in advance.
X
Remove the arc chamber if applicable, see chapter
“9.3.1 Replacing the complete arc chamber unit”.
X
Route the busbars (4) to both main contacts (1).
If the busbars are very sti, the use of
compensating angles (7) is recommend-
ed. In this way tolerances can be allowed
for in all three planes.
X
Depending on the installation situation, use addi-
tional connecting bars (2) or compensating angles
(7) if necessary.
X
Connect the busbars (4) to the connecting bars
(2) or angled connecting bars (6) using approriate
screws (5), Nuts (6) and washers.
- Schaltbau recommends using Schnorr washers
(or similar).
X
Connect the connecting bars (2) or compensating
angles (7) to the main terminals (1) using the ter-
minal screws (3) and washers.
- Schaltbau recommends using Schnorr washers
(or similar).
X
Tighten the terminal screws (3) to a torque of
24-30Nm.
X
Reinstall the arc chamber if applicable, see chapter
“9.3.1 Replacing the complete arc chamber unit”.
5
24 - 30
Nm
1
2
2
1
3
3
4
6
5
4
6
24 - 30
Nm
Fig. 21: Example for the connection of the main circuit with
busbars (4) and connecting bars (2)
5
1
7
7
1
3
3
4
6
5
4
6
24 - 30
Nm
24 - 30
Nm
Fig. 22: Example for the connection of the main circuit with
busbars (4) and compensating angles (6)
 Loading...