EasyManua.ls Logo

Schlage GF3000 User Manual

Schlage GF3000
20 pages
To Next Page IconTo Next Page
Page #1 background imageLoading...
Page #1 background image
*30500*
30500
Models Covered: Standard, TRD,
BRD, SM, and TJ
Gravity Force Shear Locks:
Mortise & Surface Mount
INSTALLATION MANUAL
GF3000
© Allegion 2014
Printed in U.S.A.
30500 1/15-f
Customer Service
1-877-671-7011 www.allegion.com/us

Other manuals for Schlage GF3000

Question and Answer IconNeed help?

Do you have a question about the Schlage GF3000 and is the answer not in the manual?

Schlage GF3000 Specifications

General IconGeneral
BrandSchlage
ModelGF3000
CategoryLocks
LanguageEnglish

Summary

Introduction

Tools and Materials Needed Not Included in Box

Contact Information

Specifications

Electrical

Details electrical requirements, input voltage, current, and time delay settings.

Mechanical

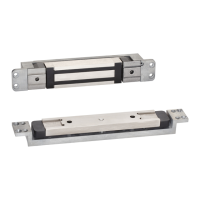
Covers mounting, shear holding force, door thickness, plating, and dimensions.

Operation

Preparing the Frame and Door

Establish Frame and Door Centerlines (Standard and TRD)

Critical step to align magnet and armature centerlines for vertical axis.

Establish Frame and Door Centerlines (BRD)

Installing the Lock - Standard, TRD, TJ, SM

Mounting Tabs (Standard, TRD)

Securing mounting tabs to frame for lock installation.

Surface Mount Armature Housing Sex Bolt Hole Sizes (TJ, SM)

Details hole sizes for armature housing on TJ and SM models.

FRAME AND DOOR PREP - Standard, TRD, TJ, SM

Frame Prep (Standard and TRD)

Describes frame preparation for Standard and TRD models.

Door Prep (Standard and TRD)

Hollow Metal/Aluminum - Flush to 1/4" Depth

Door preparation for hollow metal/aluminum with flush to 1/4" depth.

Hollow Metal/Aluminum - 1/4" to 1" Depth

Door preparation for hollow metal/aluminum with 1/4" to 1" depth.

Hollow Metal/Aluminum - 1/4" to 1-3/4" Depth

Door preparation for hollow metal/aluminum with 1/4" to 1-3/4" depth.

Standard and TRD Door Prep (continued)

Hollow Metal/Aluminum - 1-3/4" to 2-1/2" Depth

Door preparation for hollow metal/aluminum with 1-3/4" to 2-1/2" depth.

Wood Door Prep

Door preparation specifications for wood doors.

TRD Door Prep

Specific prep for TRD models where top adjustment is not accessible.

Template Information (TJ)

Template Information (SM)

Mounting the Lock - Standard, TRD, TJ, SM

Initial Component Installation

Installing armature spacer and faceplate onto the door.

Final Lock Assembly

Attaching magnet housing to frame and installing the magnet.

Installing the Lock - BRD

Preparing the Floor for the GF3000BRD Magnet

Creating a pocket and trench in the floor for the threshold box and conduit.

Installing the Lock - BRD

Installing the GF3000BRD Threshold Box

Positioning the threshold box, feeding conduit, and pouring concrete.

Preparing the Door for the Armature

Detailing the bottom rail preparation for armature mounting.

Mounting the GF3000BRD Armature in the Door's Bottom Rail

Mounting the armature bracket and assembly to the door's bottom rail.

Mounting the GF3000BRD Magnet Into the Threshold Box

Wiring the Lock-Standard, TRD, TJ, SM

Wiring Diagram

Visual representation of wiring connections for Standard, TRD, TJ, SM models.

Standard Features

Details operating voltage, automatic relock switch, and time delay features.

To Adjust Relock Time Delay

Step-by-step guide to setting the automatic relock time delay.

Wiring the Lock - BRD

Wiring Diagram

Wiring diagram specific to the GF3000BRD model.

Standard Features

Details operating voltage, automatic relock switch, and time delay for BRD.

To Adjust Relock Time Delay

Instructions to adjust the automatic relock time delay for BRD.

Door Status Monitor (DSM) - GF3000BRD

Air Gap Adjustment

Set Armature Height

Instructions for adjusting armature height for proper clearance.

Options

Optional Monitoring Outputs

Provides DSM for door status and MBS for magnetic bond monitoring.

Related product manuals