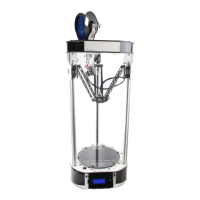
Rostock MAX v2 User's Guide
5 – Matter Control Basics: Slicing
MatterControl is a very complete 3D printing package and it's got a LOT of options. Some
people can find this intimidating, but I assure you – there's nothing to be worried about!
MatterControl is an integrated host application. This means that it provides everything needed
to control the Rostock MAX and to prepare models for printing. The task of preparing a model for
printing is called “slicing”. It's a very descriptive term for what is actually happening. In order to print
a 3D model, it needs to be converted from a solid object into a series of very thin layers that are in turn
converted into G-Code (more on this later). For example, if your print layer height is 0.2mm, the
slicing tool is going to “slice” your model into a number of layers – basically the model height divided
by 0.2mm. For a tall part, this can mean a LOT of layers!
MatterControl provides three slicers for your use. MatterSlice, CuraEngine, and Slic3r. This
guide will only cover the specifics of MatterSlice, but don't let that stop you from experimenting with
and using the other slicers! I'll show you how to change the slicing engine later on in this guide.
The final task of the slicer is to translate the sliced layers of model into something called G-
Code. G-Code is a simple control language that's used to position the print head and tell the extruder
how much plastic to deliver and at what rate. Going into the details of G-Code is beyond the scope of
this guide, but if you'd like to learn more you can check out the following resources:
http://en.wikipidia.org/wiki/G-code and http://reprap.org/wiki/G-code.
For the most part, you'll never directly interact with G-Code, but it's nice to know what's going
on behind the curtain!
5 – Matter Control Basics: Slicing - 47