SP395 SoundPro Audio Integrator Form7492 Operation Manual
25
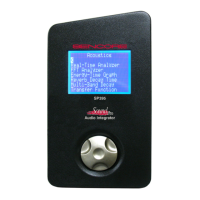
The following fields and parameters are displayed in the SLM function:
1. Averaging - Three ANSI-standard averaging modes are available. These modes use
exponential decay averaging, in which the more recent sounds have more bearing in the
average.
Slow – 1000 mS exponential decay, time-averaged RMS SPL.
Fast – 125mS exponential decay, time-averaged SPL.
Impulse – 35 mS exponential decay, time-averaged SPL
Peak – Peak, rather than RMS SPL.
Highlight the Averaging field and press the control knob to toggle between these four
modes.
2. Weighting - Standard unweighted (flat), A-weighted, and C-weighted filters are
available. These weighting filters make SPL readings correspond more closely to what
our ears hear. Ten ANSI Class 1 octave-band filters – 31, 63, 125, 250, 500, 1k, 2k, 4k,
8k, 16 kHz; and 30 ANSI Class 1 1/3 octave-band filters are also available. Highlight the
field and press the control knob. Rotate the knob to the desired filter and click to select it.
3. Test Function: Identifies the current test selected.
4. R - Relative (Seat to Seat SPL) Clicking on the “R” (relative) field sets the currently
displayed SPL reading as the relative SPL reference. Then, the numeric dB field will
show the difference between the current reading and the stored reference. This is useful
to show relative seat-to-seat SPL readings.
5. Max – Max Hold Clear The maximum SPL reading is constantly updated and displayed.
To reset the displayed value, highlight and click on the "Max" field.
6. Bar Graph SPL: Indicates SPL measurement in bar graph presentation.
7. Digital Readout: Indicates SPL measurement with a digital numeric value.
SLM Operation
1. Connect a test signal to the audio system input. SPL tests require a constant-level
signal, such as a single-frequency test tone or wide-band pink noise. To use the SP395 as
the signal source, connect a cable from an output connector to the desired audio system
input.
Caution: Preset the amplifier gain to minimum to prevent speaker damage
when the SPL test is turned on. There will be no output until the signal generator is
turned on in the bottom Toolbar.
2. Position the microphone. Position the microphone for SPL testing. For example, when
setting speaker level balance, position the microphone in the center of the listening
position.
3. Select one of the four available ANSI-standard averaging modes:
• Use Slow (1000 mS exponential decay time, time-averaged RMS) for most SPL
measurements. This averages transients and provides the best indication of the sound
level that our ears hear.
• Use Fast (125 mS exponential decay time, time-averaged RMS) to follow fast audio
changes.
• Use Impulse mode, (35 mS exponential decay time, time-averaged RMS) to measure
noise spikes.
• Use Peak mode to show peak SPL, rather than RMS.
4. Select the weighting filter. Select one of 38 filtering modes:
• C-weighting for louder SPL levels, including most system measurements.
• A-weighting for low SPL levels, or for measurements that need to correlate to noise-
induced hearing damage.
• Flat (un-weighted).