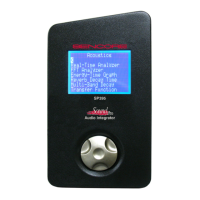
SP395 SoundPro Audio Integrator Form7492 Operation Manual
39
3. Trigger Mode - The ETG graph shows the time relationships of sounds, referenced to a
sound pulse trigger. This trigger pulse is graphed at time/distance 0, at the far left side of
the graph. Two trigger modes are provided:
• Int - Internal trigger: Use this mode when the SP395’s generator output is connected
to an amplified speaker. The graph updates repeatedly with each new output pulse.
This is the most common way to use the ETG function.
• Ext - External trigger: Use this mode to trigger the ETG using an external sound
impulse, such as a handclap, starter pistol, or balloon pop. In this mode, the graph
updates only when it detects a trigger pulse of sufficient SPL level (about 75 dB).
4. Horizontal Measurement Range – This field controls the full-scale resolution of the
measurement that is displayed by the horizontal (X) axis. The selected full scale range is
also displayed in the Horizontal Full Scale field. The following full scale range
selections are available:
• Millisecond ranges - 15, 30, 60, 120, 240, 480, 960
• Feet ranges - 16, 33, 67, 135, 271, 542, 1084
• Meter ranges - 5, 10, 20, 41, 82, 165, 330
5. Weighting – Any of 36 weighting filters are available, including unweighted (Flat); A-
weighted; C-weighted; ten ANSI Class 1 octave band filters – 31, 63, 125, 250, 500, 1k,
2k, 4k, 8k, 16 kHz; or 23 ANSI Class 1 1/3 octave band filters.
6. RT Select – RT60 is defined as the time it takes a sound to decay by 60dB. It is often used
to characterize rooms for reverberation decay time. The ETG function allows you to
calculate reverberation times from a sound energy decay slope, using the RT Cursor and
the Measurement Cursor. Select from the following: RT10, RT20, RT30, RT40, RT50,
and RT60.
7. RT Time – This field shows the desired RT10-60 time that is extrapolated from the points
marked on the decay slope by the RT Cursor and the Measurement Cursor. Measured
decay times that are less than the desired decay range (i.e.; 60 dB for RT60) are
mathematically projected, at the measured decay rate, to the desired RT measurement. The
RT time is shown in milliseconds.
8. Measurement data - Graphed dB SPL vs. time with triggered starting point at left of
graph.
9. RT Cursor/Offset – This is a dual-purpose field.
• When the ETG is running, the field just below the left graph axis is an offset value.
You can use this to offset the starting time of the display to a time greater than 0 mS,
to see the details of a reflection, for example, that are beyond the normal window time
width.
• When the ETG is paused, changing this field moves the RT Cursor to set an RT
calculation starting point on the ETG curve. The RT Cursor is the small marker that
looks like a short "T," located just above the graph. You can move the cursor to any
point to the left of the measurement cursor, to position it at the start of the decay slope.
10. RT Cursor Measurement Enabled – Indicates the RT calculation (based upon the
position of the cursor) is active or available. This occurs when the ETG function is
stopped.
11. Measurement Cursor – The Measurement Cursor allows you to analyze the ETG graph
in detail. It is an inverse-highlighted vertical bar that you can move horizontally along the
graph. As you move the cursor, the time (or sound travel distance) from the source pulse,
and the dB level relative to the maximum value received, are displayed in the
Measurement Cursor data field. The Measurement Cursor is also used to set the end time
for the RT calculation.