ACUSON Freestyle User Manual 5-9
Scanning
Real-Time Scanning Controls
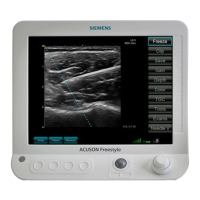
The Real-time Control Bar along the right side of the screen provides Soft Keys for the
functions described in the following table.
The larger, outer Rotary knob moves up or down the list, highlighting an active control. The
smaller, inner Rotary knob adjusts the settings of the highlighted function. The probe controls
also provide these functions. Additionally, the controls may be activated by pressing the button
area next to the control on the front panel.
Real-Time Scanning Controls
Real-time Control Bar Keys Description
Freeze/Unfreeze Freezes and unfreezes the image. When the image is frozen, the light
on the probe will ash on and off.
When you press Freeze during real-time scanning, you can select
Scroll and use the inner Rotary knob or probe keys to step frame-
by-frame through the image memory. The scroll memory is the
immediate sequence of frames that were produced just prior to the
freeze.
The Cine key plays the scroll memory in a repeating loop.
Save Stores a still-frame image to the Patient Study le in internal memory.
NOTE: During live scanning a circular symbol appears in the
upper right corner of the screen for the length of time the Save
or Clip is taking place. A new Save or Clip cannot be started
until the Save or Clip is completed.
NOTE: If you select Save or Clip and the system does not
have any study storage memory available, the study storage
memory used symbol will appear showing 100%. Delete studies
to make memory available.
Clip Stores a multi-frame image clip to the Patient Study le in internal
memory. In order for clips to be stored, the Enable Clip Storage
checkbox on the Setup/System/System Admin page must be
checked.
NOTE: During live scanning a circular symbol appears in the
upper right corner of the screen for the length of time the Save
or Clip is taking place. A new Save or Clip cannot be started
until the Save or Clip is completed.
NOTE: If you select Save or Clip and the system does not
have any study storage memory available, the study storage
memory used symbol will appear showing 100%. Delete studies
to make memory available.
Gain Adjusts the overall image gain.
Displayed in the on-screen settings window as G.
Depth Adjusts the scanning eld of view. Scale markers in centimeters are
displayed along the edge of the image. In the on-screen settings
window, the bottom depth number is displayed in centimeters.
Note that for linear array probes, distance markers are also shown
along the top of the image and the center of the probe is marked with
an arrow.
When making changes to the depth setting, the displayed depth
setting number turns blue until the actual image depth changes to the
new setting.
Color Turns color ow mapping on and off. The region of interest is moved
up or down with the Color Box Soft Key.
Displayed in the on-screen settings window as C Box.
N Gain Adjusts the near eld gain.
Displayed in the on-screen settings window as NG.
Tools Activates the Tools menu for additional image adjustment.
Exams Displays the list of factory and user-dened Exam Types.
For more information, see “Selecting an Exam Type from the List of
Exams” on page 5-11.
 Loading...

