| 27
Software setup | NSO evo2 Installation Manual
Autopilot setup
The NSOevo2 supports control of Navico autopilot computers, including the AC12N, AC42N,
SG05, NAC-1, NAC-2, NAC-3, and AC70. These instructions are relevant to the setup of the
AC12N, AC42N, SG05 and NAC-1 only. Due to signifi cant user interface changes, the NAC-2,
NAC-3 and AC70 pilots are covered in their own seperate documention.
The NAC-1 is small boat autopilot, and does not off er the in-depth confi guration options
found in the other autopilots. Only the rudder feedback/virtual rudder feedback calibration
and Rudder test need to be performed. Steering response on the autopilot settings page is
the only performance adjustment that can be made.
¼ Note: setting options may diff er between diff erent pilot computers, so the following content
may not be 100% applicable to every installation.
Commissioning the autopilot
When the autopilot installation is completed, the commissioning procedures must be
performed. Failure in setting up the autopilot correctly may prohibit the autopilot from
functioning properly.
The display should automatically detect the presence of the autopilot computer. The Home
page will display an additional icon for the autopilot, and pressing the STBY AUTO button will
open an autopilot control dialog.
The setup of the autopilot computer can be done in full from compatible Simrad displays or
instruments that feature autopilot control, or from an autopilot control unit. The following
sections describe how you confi gure the autopilot from the NSS evo2 unit.
If you connect the NSS evo2 to an already commissioned autopilot system, you only have to
do an automatic source selection as described above before the autopilot is ready to be used.
Rudder feedback selection
For installations using a rudder feedback unit, it’s necessary to select it as the rudder position
source. The RF25 connects to NMEA 2000 and should be selected per "Source selection"
on page 20. The RF300 connects directly to the autopilot computer, and should be
automatically detected and selected in preference to using VRF. If it is not selected, choose
the pilot computer as the “Rudder feedback” source also per "Source selection" on page 20.
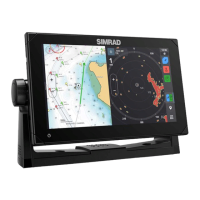
Dockside setup
Initiating the required dockside setup is done from within the Commissioning dialog.
Completed procedures are labelled with a tick.
When the autopilot computer is delivered from factory AND ANY TIME AFTER AN AUTOPILOT
RESET HAS BEEN PERFORMED, you will have to run a complete setup again.
All steps in all commissioning procedures are clearly described on-screen, and you will be
guided step by step through the process.
1. Ensure that the autopilot is in standby mode before starting (only relevant if previously
commissioned).
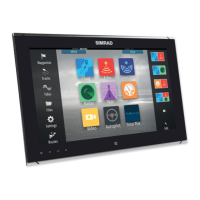
2. Select the Commissioning option and follow on screen instructions when the following
prompt is displayed;