22
Setting the Electronic Shutter
This section explains the different modes which can be
used for the electronic shutter and gives the procedures for
setting the shutter mode and shutter speed.
Note
When a camera control unit or a remote control device,
such as MSU-1000/1500 Master Setup Unit and RCP-1500/
1000 series Remote Control Panel, is connected, the
electronic shutter is controlled from the external control
device and control on the camera are disabled.
About the shutter modes
The shutter modes that can be used with the electronic
shutter of the camera and the shutter speeds that may be
selected are as follows:
* The values in the table are those with 59.94i. With other formats,
the available values are different.
Note
With artificial lighting, particularly fluorescent lights and
mercury vapor lamps, the brightness appears to be constant,
but in fact the strength of the red, green, and blue
components varies with the power supply frequency. This
phenomenon is known as “flicker.” When using the electronic
shutter under these lighting conditions, there are certain
cases in which the flicker is more noticeable. In particular,
color flicker is evident when the power frequency is 60 Hz. In
areas where the power frequency is 50 Hz, setting the shutter
speed to 1/100 second will reduce the flicker.
Selecting the shutter mode and speed
The shutter mode, and the shutter speed in standard mode,
are set using the SHUTTER switch.
Setting the shutter mode, and shutter speed in
Standard mode
1 Push the SHUTTER switch from the ON position to the
SEL position.
The current shutter setting will be displayed in the
setting change/adjustment process message display
area of the viewfinder screen for about three seconds.
Example: “SHUTTER: 1/250”
2 Push the SHUTTER switch to the SEL position again
before the display disappears. Repeat this action
until the desired mode or speed is displayed.
When all modes and speeds are displayed, they will be
displayed in the following order:
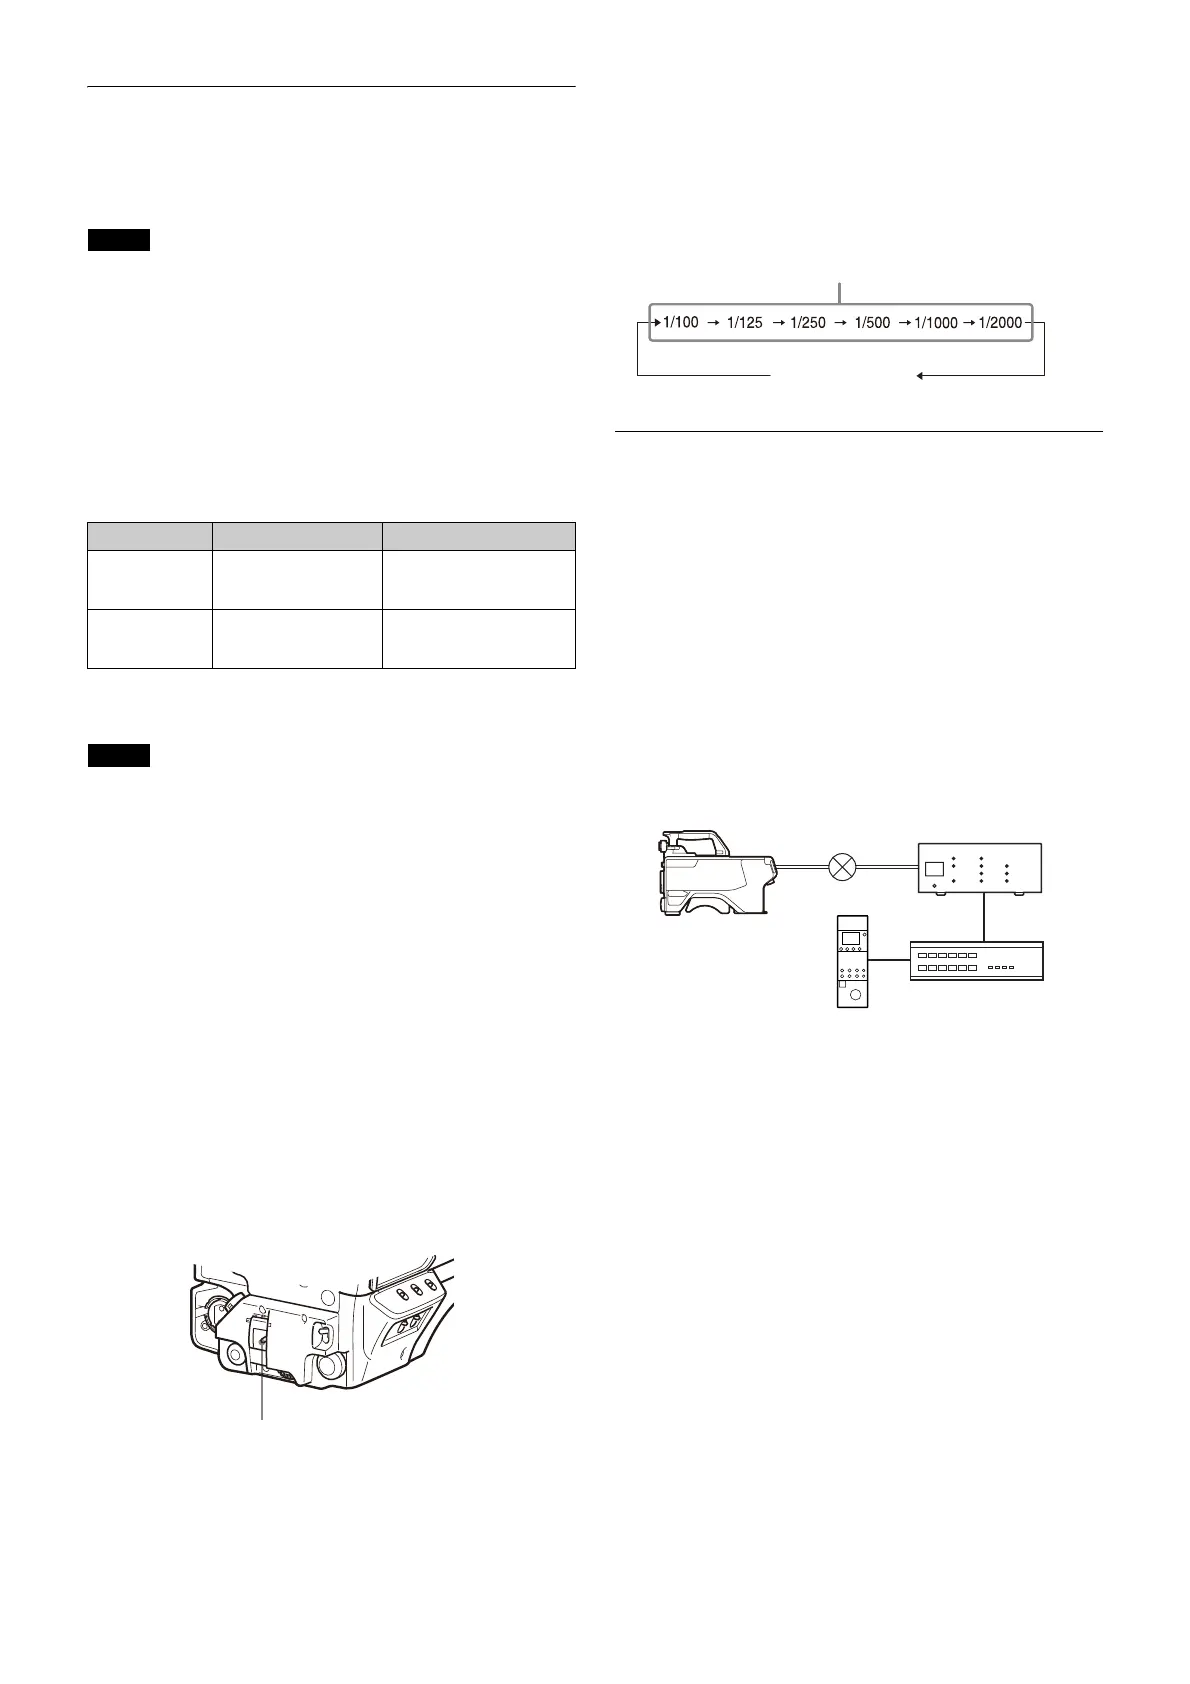
Example: with 59.94i
Setting the Transport Conversion
Function
This function converts the communications protocol from
the camera network system protocol to the simple protocol
internally in the HDC5500/3500.
Using the simple protocol for communication between the
HDC5500/3500 and CNA-1 (RS-422A/RS-232C) enables
camera control using transmission lines or networks that do
not support the camera network system protocol or which
have high latency, such as wireless networks.
You can toggle this function on/off on the <SIMPLE
PROTOCOL> page
(page 63)
.
For details about configuring the CNA-1, refer to the
operation manual of the CNA-1.
1)
Connect the RS-422A/RS-232C cable to the I/O connector of the
CNA-1.
2)
Set CNS Mode to Bridge, and Emulation Mode to CAM.
3)
Set CNS Mode to Bridge.
Transmission lines/networks that support the
simple protocol
Transmission lines/networks that meet the following
conditions are supported.
• Latency: 1 second or lower (one way)
• Bandwidth: 100 kbps or higher
Connectors used for simple protocol
communication
Use one of the following connectors on the HDC5500/3500.
• REMOTE connector on the connector panel (supports
RS-422A only)
• CRANE connector on the connector panel (supports
RS-422A/RS-232C)
• I/O connector on the HKC-WL50 Wireless Transmission
Adaptor (option) (supports RS-422A/RS-232C)
Change the PORT setting on the <SIMPLE PROTOCOL> page
for the connector that is used
(page 63)
.
Shutter modes and speeds
Shutter mode Shutter speeds* Usage
Standard 1/100, 1/125, 1/250,
1/500, 1/1000, 1/2000
seconds
Use to obtain clear images
of quickly moving subjects
ECS (Extended
Clear Scan)
Continuously variable
in the range of
59.96 Hz to 4300 Hz
Use to obtain images on
video monitors without
horizontal striping
HDC5500/3500
RS-422A/RS-232C
Network hub
CNA-1
1) 2)
RCP-3000/1000
series
3)