1-6
26
Setting Up the Remote
To check the channel settings
When displaying the “Set VCR Plus+ Channels” menu, press
M/m to select “Channel List,” then press ENTER.
The display lists the channels whose guide channel number is not
as same as the TV channel number.
To go to the next page, press m.
To return to the previous page, press M.
Setting Up the Remote
You can control your TV with the supplied remote by adjusting
the remote control’s signal.
If you connected the recorder to an AV amplifier (receiver), you
can also control the volume with the supplied remote.
Notes
• Depending on the connected unit, you may not be able to control your
TV or AV amplifier (receiver) with some or all of the buttons below.
• If you enter a new code number, the code number previously entered
will be erased.
• When you replace the batteries of the remote, the code number may be
reset to the default setting. Set the appropriate code number again.
Controlling TVs with the remote
a Slide the TV/DVD switch to TV.
b Hold down [/1.
c Enter your TV’s manufacturer code (see
“Code numbers of controllable TVs” below)
using the number buttons.
d Release [/1.
When the TV/DVD switch is set to TV, the remote
performs the following:
Settings - VCR Plus+ Channel List
Guide CH TV CH
2
4
6
10
11
25
28
-
-
-
-
-
-
-
21
32
9
121
13
36
2
Guide CH TV CH
45
53
- -
- -
- -
- -
- -
-
-
-
-
-
-
-
18
5
- -
- -
- -
- -
- -
Close
Page2
[/1 Turns your TV on or off
VOL +/– Adjusts the volume of your TV
CH +/– Selects the channel on your TV
WIDE MODE Switches to or from the wide mode of a
Sony wide-screen TV
TV/VIDEO Switches your TV’s input source
Number buttons and
SET
Selects the channel on your TV
TV/DVD switch
"/1
VOL +/–
Number buttons,
SET
TV/VIDEO
WIDE MODE
CH +/–
27
Setting Up the Remote
Basic Hookups and Settings
Code numbers of controllable TVs
If more than one code number is listed, try entering them one at
a time until you find the one that works with your TV.
Controlling the volume of your AV
amplifier (receiver) with the remote
a Slide the TV/DVD switch to DVD.
b Hold down [/1, and enter the manufacturer
code (see the table below) for your AV
amplifier (receiver) using the number
buttons.
c Release [/1.
The VOL +/– buttons control the AV amplifier’s
volume.
◆ If you want to control the TV’s volume
Slide the TV/DVD switch to TV.
z Hint
If you want to control the TV’s volume even when the TV/DVD switch
is set to DVD, repeat the steps above and enter the code number 90
(default).
Code numbers of controllable AV amplifiers
(receivers)
If more than one code number is listed, try entering them one at
a time until you find the one that works with your AV amplifier
(receiver).
Manufacturer Code number
Sony 01 (default)
Akai 04
AOC 04
Centurion 12
Coronado 03
Curtis-Mathes 12
Daytron 12
Emerson 03, 04, 14
Fisher 11
General Electric 06, 10
Gold Star 03, 04, 17
Hitachi 02, 03
J.C.Penney 04, 12
JVC 09
KMC 03
Magnavox 03, 08, 12
Marantz 04, 13
MGA/Mitsubishi 04, 12, 13, 17
NEC 04, 12
Panasonic 06, 19
Philco 03, 04
Philips 08, 21
Pioneer 16
Portland 03
Proscan 10
Quasar 06, 18
Radio Shack 05, 14
RCA 04, 10
Sampo 12
Samsung 03, 12, 20
Sanyo 11, 14
Scott 12
Sears 07, 10, 11
Sharp 03, 05, 18
Sylvania 08, 12
Teknika 03, 08, 14
Toshiba 07
Wards 03, 04, 12
Yorx 12
Zenith 15
Manufacturer Code number
Sony 80, 88, 89, 91
Denon 84, 85, 86
Kenwood 92, 93
Onkyo 81, 82, 83
Pioneer 99
Sansui 87
Technics 97, 98
Yamaha 94, 95, 96
TV/DVD switch
"/1
VOL +/–
Number buttons,
SET
,
continued
28
Setting Up the Remote
If you have a Sony DVD player or more
than one Sony DVD recorder
If the supplied remote interferes with your other Sony DVD
recorder or player, set the command mode number for this
recorder and the supplied remote to one that differs from the
other Sony DVD recorder or player.
The default command mode setting for this recorder and the
supplied remote is DVD3.
a Press SYSTEM MENU.
The System Menu appears.
b Press M/m to select “SETUP,” then press
ENTER.
c Press M/m to select “Options,” then press
ENTER.
d Press M/m to select “Command Mode,” then
press ENTER.
e Press M/m to select the Command mode
(DVD1, DVD2, or DVD3), then press
ENTER.
f Slide the COMMAND MODE switch on the
remote so it matches the mode you selected
above.
To return to the previous step
Press RETURN.
SYSTEM
MENU
M/m, ENTER
COMMAND MODE
RETURN
SETUP
Settings
Video
Audio
Features
Options
Easy Setup
Tuner Preset
Set VCR Plus+ Channels
Clock
Language
Settings
Video
Audio
Features
Options
Easy Setup
Format Disc :
Dimmer :
Auto Display :
Command Mode :
Factory Setup
Selectable
Bright
On
DVD3
SETUP
Settings
Video
Audio
Features
Options
Easy Setup
Format Disc :
Dimmer :
Auto Display :
Command Mode :
Factory Setup
Selectable
Bright
On
DVD3
SETUP
DVD 1
DVD 2
DVD 3
29
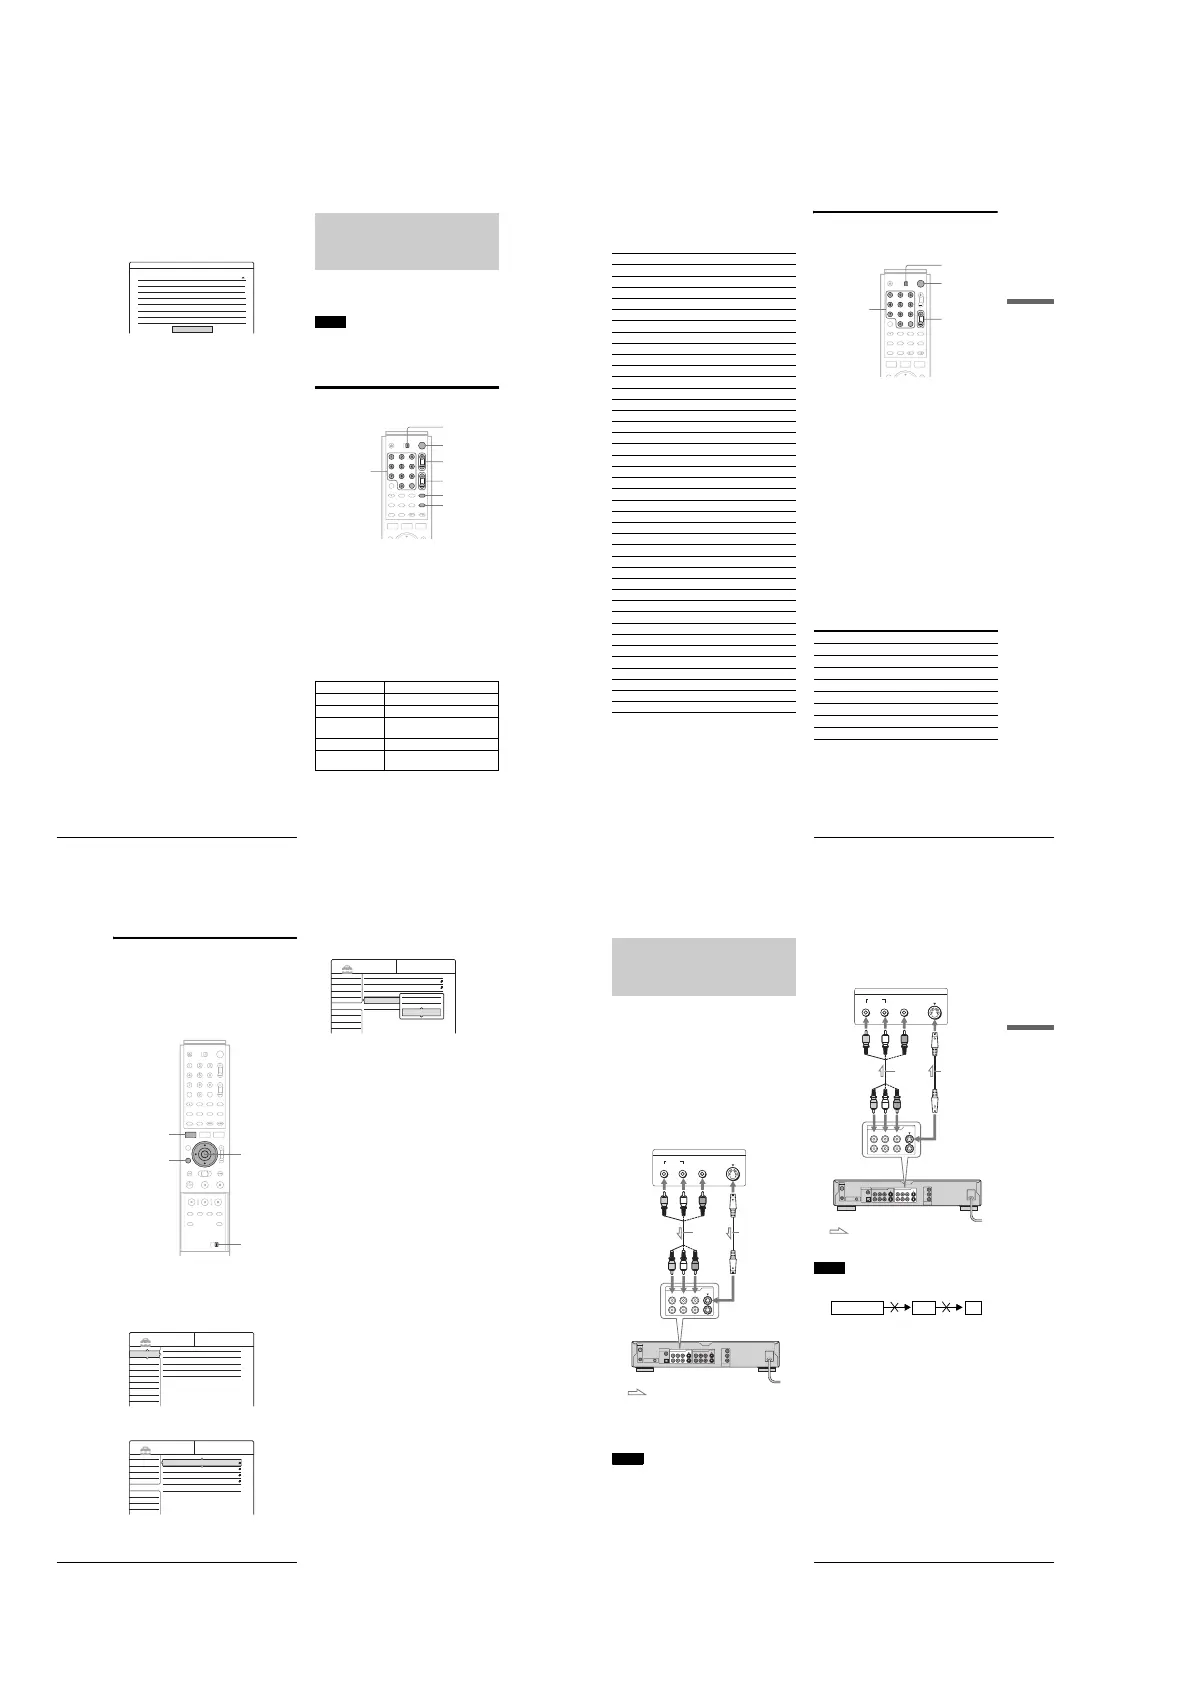
Connecting a VCR or Similar Recording Device to the LINE Jacks
Basic Hookups and Settings
Connecting a VCR or Similar
Recording Device to the
LINE Jacks
You can use this recorder as the source player or as the recording
deck.
After disconnecting the recorder’s power cord from an AC
outlet, connect a VCR or similar recording device to the LINE
jacks of this recorder.
Use the DV IN jack on the front panel if the equipment has a DV
output jack (i.LINK jack) (page 75).
See also the instruction manual supplied with the connected
equipment.
How to connect to record on this recorder
Connect a VCR or similar recording device to the LINE IN jacks
of this recorder. See “Recording from connected equipment” on
page 88.
z Hint
You can also use the LINE 2 IN jacks on the front panel of the recorder
(page 88).
Notes
• Do not connect the yellow LINE IN (VIDEO) jack when using an S
VIDEO cord (not supplied).
• Pictures containing copy protection signals that prohibit any copying
cannot be recorded.
How to connect to record on other equipment
Connect a VCR or similar recording device to the LINE OUT
jacks of this recorder.
Notes
• If you pass the recorder signals via the VCR, you may not receive a
clear image on the TV screen.
• Do not connect the yellow LINE IN (VIDEO) jack when using an S
VIDEO cord (not supplied).
~
AC IN
S VIDEO
VIDEO
R-AUDIO-L
COMPONENT
VIDEO OUT
PB
Y
PR
S VIDEO
VIDEOR-AUDIO-L
1
3
1
2
VHF/UHF
IN
OUT
DIGITAL OUT
PCM/DTS/DOLBY DIGITAL
COAXIAL
OPTICAL
CONTROL S IN
LINE IN LINE OUT
OUTPUT
S Video
AUDIO
RL
VIDEO
LINE IN
S VIDEO
VIDEOR-AUDIO-L
1
3
VCR, etc.
DVD recorder
Audio/video
cord (not
supplied)
S VIDEO cord
(not supplied)
: Signal flow
to LINE IN 1 or 3
~
AC IN
S VIDEO
VIDEO
R-AUDIO-L
COMPONENT
VIDEO OUT
PB
Y
PR
S VIDEO
VIDEOR-AUDIO-L
1
3
1
2
VHF/UHF
IN
OUT
DIGITAL OUT
PCM/DTS/DOLBY DIGITAL
COAXIAL
OPTICAL
CONTROL S IN
LINE IN LINE OUT
INPUT
LINE OUT
S VIDEO
VIDEOR-AUDIO-L
1
3
S Video
AUDIO
RL
VIDEO
VCR, etc.
DVD recorder
Audio/video
cord (not
supplied)
S VIDEO cord
(not supplied)
: Signal flow
to LINE OUT 1 or 2
VCRDVD recorder TV
 Loading...