1-21
86
Creating a Copy of the Edited Contents (Copy Dubbing)
3
To use the default name, press </, to select
“OK,” then press ENTER.
Notes
• You cannot set a scene to be shorter than one second.
• In order for a One Touch Dub recording to be added to the DV/D8 Edit
List, “Add to Edit List” in Features Setup must be set to “On”
(page 98).
Creating a Copy of the
Edited Contents
(Copy Dubbing)
You can make copies of the programs in the DV/D8 Edit List.
Each time you dub a DV/Digital8 format tape, the start and stop
points of the selected scenes (called a “program”) are saved in a
DV/D8 Edit List. You can select a program from the DV/D8 Edit
List and use this information to copy the same contents onto
another disc of your choice.
To use this function, you will do the following:
Be sure to insert the original DV/Digital8 format tape that
corresponds to the program in the DV/D8 Edit List.
m
m
The recorder will fast forward and rewind the tape automatically
and record the scenes to a disc of your choice. On a DVD-RW
(VR mode), chapter marks are inserted at the start of each scene
and where the recordings start on the tape. For other discs, the
recorder marks chapters either in 6 or 15 minute intervals
depending on the setting in “Auto Chapter” in Features Setup
(page 97)
.
a Follow steps 1 to 7 of “Preparing for recording
using the DV IN jack” (page 75), then press
SYSTEM MENU.
Be sure to insert the original DV/Digital8 format tape
that corresponds to the program in the DV/D8 Edit
List.
b Press M/m to select “DV/D8 EDIT,” then
press ENTER.
The DV/D8 Edit menu appears.
Connect your digital video camera and prepare for recording
Select a program from the DV/D8 Edit List
Dub the selected scenes to a disc
</M/m/,,
ENTER
RETURN
SYSTEM MENU
x REC STOP
87
Creating a Copy of the Edited Contents (Copy Dubbing)
Connecting a Digital Video Camera or Other Equipment
c Press M/m to select “DV/D8 Edit List,” then
press ENTER.
The DV/D8 Edit List menu appears.
1 Disc mark
2 Program name
3 Total playing time
4 Date of editing or recording
d Press M/m to select the program you want to
record on a disc, then press ENTER.
The sub-menu appears.
e Press M/m to select “DV Dubbing,” then
press ENTER.
The display for entering a title name appears.
To enter a new name, select “Enter,” and follow the
explanations on page 34.
f To use the default name, press </, to
select “OK,” then press ENTER.
The default title name is fixed, and the display asks
whether to start recording. If you want to change the
recording mode, press </, to move the cursor
then press M/m to select the mode.
g Press </, to select “Start,” then press
ENTER.
The recorder starts recording the tape contents as
programmed.
To stop during recording, press x REC STOP.
h When the recording is finished, press
ENTER to select “Close.”
The display returns to the DV/D8 Edit menu.
i Press RETURN repeatedly to turn off the
display.
To change the name of a program
1
While the DV/D8 Edit List is displayed, press M/
m to select the program name you want to change,
then press ENTER.
2
Press M/m to select “Rename” from the sub-
menu, then press ENTER.
The display for entering the program name appears.
3
Enter a name by following the explanations on
page 34.
To erase a program
1
While the DV/D8 Edit List is displayed, press M/
m to select the program you want to erase, then
press ENTER.
2
Press M/m to select “Erase” from the sub-menu,
then press ENTER.
3
Press </, to select “OK,” then press ENTER.
z Hints
• You can preview the scenes within the program title by selecting
“Preview” in step 5.
• On a DVD-RW (VR mode), chapter marks are inserted at the start of
each scene and where the recordings start on the tape. For other discs,
the recorder marks chapters either in 6 or 15 minute intervals
depending on the setting in “Auto Chapter” in Features Setup
(page 97).
Notes
• If you want to play the disc on other DVD equipment, finalize the disc
(page 73).
• In order for a One Touch Dub recording to be added to the DV/D8 Edit
List, “Add to Edit List” in Features Setup must be set to “On”
(page 98).
• Copy dubbing may not work if you have edited sections that do not
contain any recorded material.
• This function may not work with certain digital video cameras. In this
case, follow the instructions of “Recording From Equipment
Connected to the LINE IN Jacks” (page 88).
DV/D8 EDIT LIST
DV10/11/02 1:30PM - 11/12/02 4:46PM
DV12/11/02 1:00PM - 12/11/02 7:05PM
DV12/24/02 11:34AM - 12/25/02 1:24PM
1H12M 6/ 5
1H16M 6/10
1H24M 6/18
Title Name
Enter the title name.
OK Enter
DV10/11/02 1:30PM - 11/12/02 4:46PM
SP
DV/D8 Dubbing
Change the recording mode if necessary.
Select "Start" to start dubbing.
Start Cancel
88
Recording From Equipment Connected to the LINE IN Jacks
Recording From Equipment
Connected to the LINE IN
Jacks
You can connect other equipment (e.g. a VCR or video camera),
and output the audio/video signals to the recorder for recording.
Use the DV IN jack on the front panel if the equipment has a DV
output jack (i.LINK jack).
See also the instruction manual supplied with the connected
equipment.
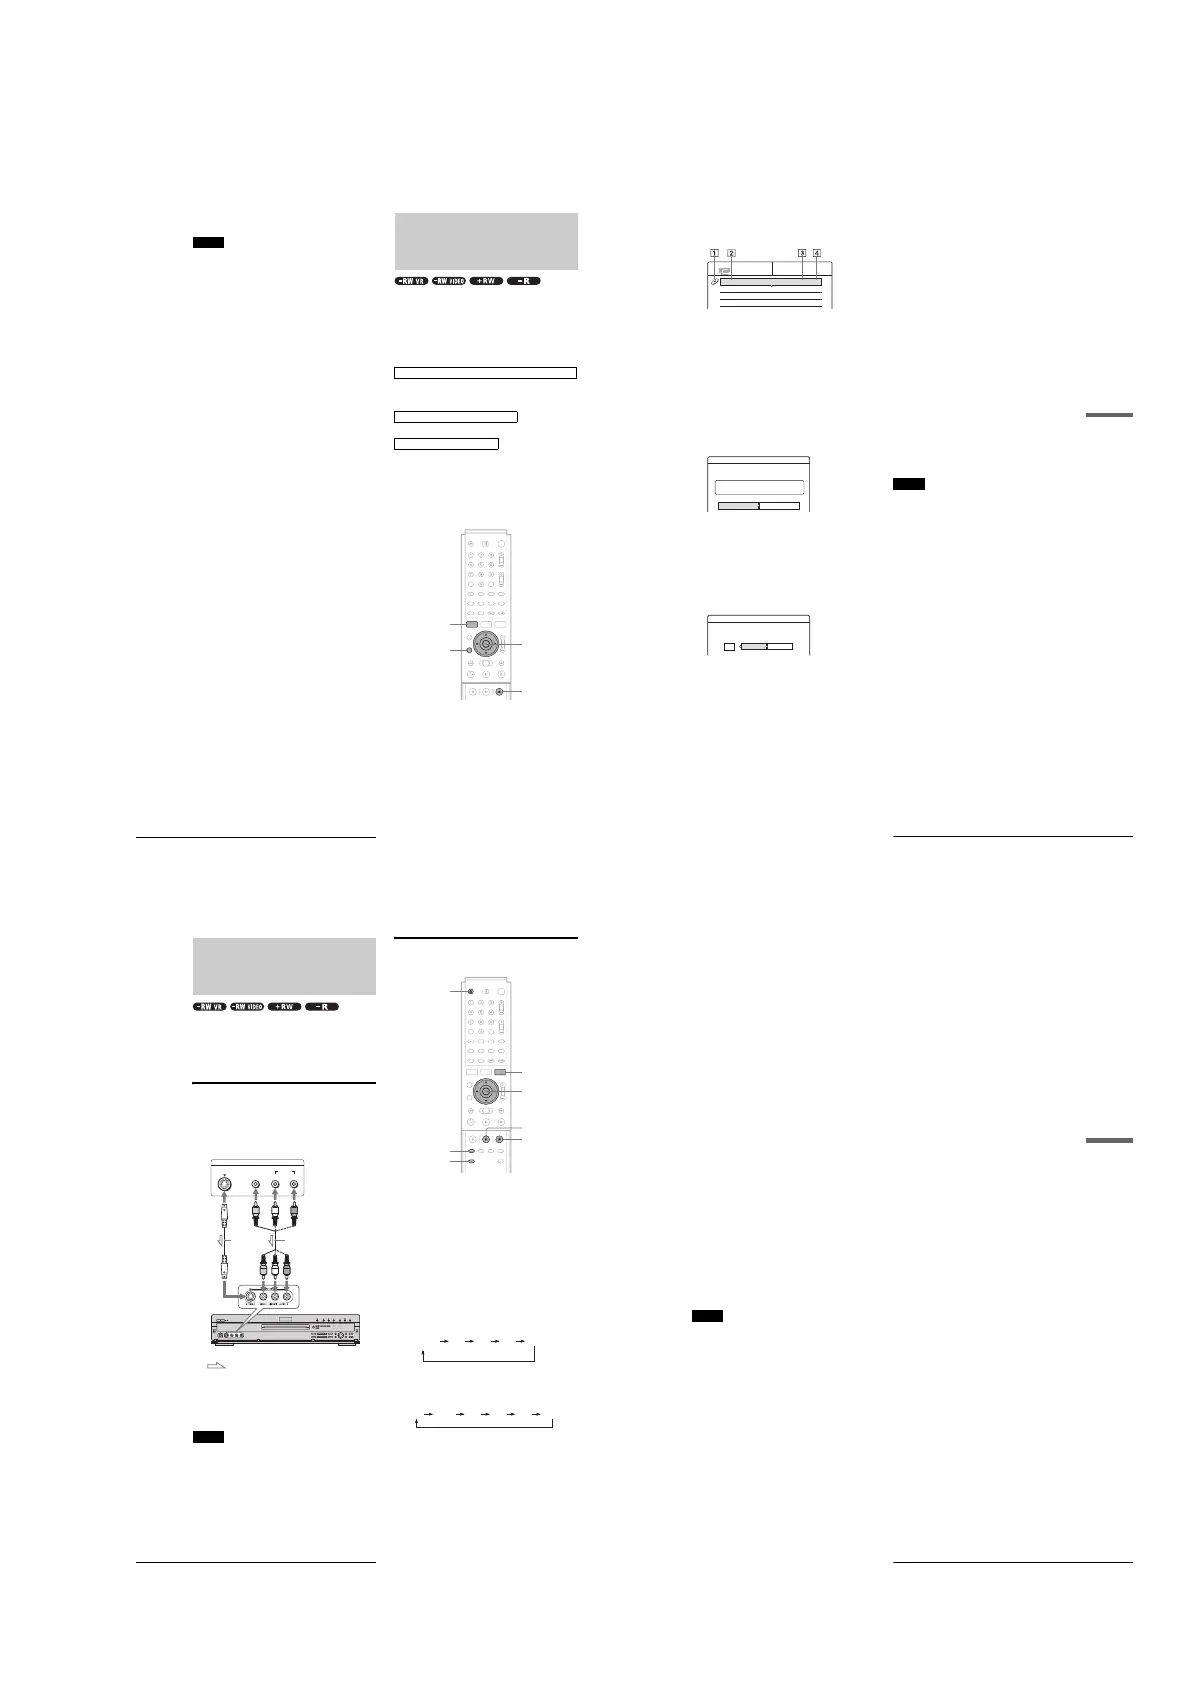
Connecting other equipment to the
LINE 2 IN jacks
You can monitor the recorded picture with a TV connected to the
recording equipment.
z Hint
When the connected equipment outputs only monaural sound, use audio
cables that distribute monaural sounds to left/right channels (not
supplied).
Notes
• Do not connect the yellow LINE IN (VIDEO) jack when using an S
VIDEO cord (not supplied).
• Do not connect the output jack of this recorder to another equipment’s
input jack with the other equipment’s output jack connected to the
input jack of this recorder. Noise (feedback) may result.
• Pictures containing copy protection signals that prohibit any copying
cannot be recorded.
Recording from connected equipment
a Turn on your TV and this recorder, then set
it to the connected channel (“VIDEO,” etc.).
b Press Z OPEN/CLOSE, and place a
recordable disc on the tray.
c Press Z OPEN/CLOSE to close the disc tray.
Wait until “LOAD” disappears from the front panel
display.
d Press INPUT SELECT to select a input
source according to the connection you made.
The front panel display changes as follows:
e Press REC MODE repeatedly to select the
recording mode.
The recording mode changes as follows:
OUTPUT
S VIDEO
AUDIO
LR
VIDEO
VCR, etc.
DVD recorder
Audio/video cord
(not supplied)
S VIDEO
cord (not
supplied)
to LINE 2 IN
: Signal flow
TOOLS
M/m, ENTER
X REC PAUSE
x REC STOP
Z OPEN/CLOSE
REC MODE
INPUT SELECT
L2L1 L3 DV
Channel
number
HQ SP LP EPHSP SLP
89
Recording From Equipment Connected to the LINE IN Jacks
Connecting a Digital Video Camera or Other Equipment
f Select the audio input using the TOOLS
menu.
A Press TOOLS.
B Press M/m to select “Line Audio Input,” then
press ENTER.
C Press M/m to select the item, then press
ENTER.
• Stereo (default)
• Main/Sub*
* When “Main/Sub” is selected, the two different types of sounds
are recorded. You can select either sound when playing a disc.
Select “Main/Sub” only when using a DVD-RW (VR mode).
For other discs, select “Stereo.” Only stereo sound is recorded.
g Press X REC PAUSE to set this recorder to
record pause.
h Insert the source tape into the connected
equipment and set to playback pause.
i At the same, press X REC PAUSE on this
recorder and the pause or play button on the
connected equipment.
Recording starts.
j To stop recording, press x REC STOP on
this recorder.
◆If you connect a digital video camera with a DV IN jack
(without using the DV Edit functions)
• Select “DV” in step 4.
• Select “Stereo1,” “Mix,” or “Stereo2” from “DV/D8 Audio
Input” in step 6.
z Hint
You can adjust the settings for the recording picture before recording.
See “Adjusting the Recording Picture Quality and Size” (page 46).
Note
When recording a video game image, the screen may not be clear.
 Loading...