1-18
74
Labeling, Protecting, or Finalizing the Disc
b Press M/m to select “Disc info.,” then press
ENTER.
The Disc Information display appears.
c Press M/m to select “Erase All,” then press
ENTER.
The display asks for confirmation.
When there is a protected title on the disc, a list of
protected titles appears.
d Press </, to select “OK,” then press
ENTER.
The titles are erased.
Reformatting a disc (Format)
By reformatting, you can change the recording format of DVD-
RWs, or record again on DVD-RWs (Video mode) that have
been finalized. Make sure nothing important is left on the disc,
as all the disc contents will be erased. For DVD+RWs, reformat
the disc if you want to create a blank disc.
a Press TOOLS while the disc is in the
recorder.
The TOOLS menu appears.
b Press M/m to select “Disc Info.,” then press
ENTER.
The Disc Information display appears.
c Press M/m to select “Format,” then press
ENTER.
The display asks for confirmation.
d Press </, to select “OK,” then press
ENTER.
◆ When you place a DVD-RW and set “Format
Disc” to “Selectable” in Options Setup
The display asks you to select the recording format.
Press </, to select “VR” or “Video,” then press
ENTER.
The recorder starts formatting the disc.
Notes
• Even when you have set protection for the title, all the contents will be
erased after formatting the disc.
• A protected disc cannot be reformatted (DVD-RW in VR mode only).
Disc Information
DiscName Movie
Close
Media DVD-RW Format VR
Title no. Original 3 / Playlist 2
Protected Not Protected
Date 9/15/2003 ~ 10/28/2003
HQ : 0H30M
LP : 1H30M
HSP : 0H45M
EP : 2H00M
SP : 1H00M
2. 3 / 4. 7GB
SLP : 3H00M
Remainder
Disc Name
Forma t
Erase All
Finalize
Protect Disc
Erase All Titles
Do you want to erase all the titles?
OK Cancel
Disc Information
DiscName Movie
Close
Media DVD-RW Format VR
Title no. Original 3 / Playlist 2
Protected Not Protected
Date 9/15/2003 ~ 10/28/2003
HQ : 0H30M
LP : 1H30M
HSP : 0H45M
EP : 2H00M
SP : 1H00M
2. 3 / 4. 7GB
SLP : 3H00M
Remainder
Disc Name
Forma t
Erase All
Finalize
Protect Disc
Format
Select the recording format.
VR Video
75
Before Recording/Editing
Connecting a Digital Video Camera or Other Equipment
Connecting a
Digital Video
Camera or
Other
Equipment
You can record from connected equipment,
such as a digital video camera.
Before Recording/Editing
The recorder has a DV IN jack that inputs digital signals, and
LINE jacks that input/output analogue signals.
The DV IN jack on this recorder conforms to the i.LINK
standard. You can connect other equipment that has an i.LINK
(DV) jack. For more information, see “About i.LINK”
(page 106).
If you plan to do additional editing on a disc after the initial dub,
use the DV IN jack and record on a DVD-RW in VR mode.
◆When recording from the DV IN jack
See “Preparing for recording using the DV IN jack” below.
◆When recording from the LINE IN jacks
See “Recording From Equipment Connected to the LINE IN
Jacks” (page 88).
Preparing for recording using the DV IN
jack
You can connect a digital video camera to the DV IN jack on the
recorder to record or edit from a DV/Digital8 format tape.
Operation is smooth because the recorder will fast forward and
rewind the tape for you – you do not need to operate your digital
video camera. Do the following to start using the DV Edit
functions of this recorder.
See also the instruction manual supplied with the digital video
camera before connecting.
◆If you connect a digital video camera but cannot use the DV
Edit functions
See “Recording from connected equipment” (page 88).
Notes
• The DV IN jack on this recorder is for input only. If you want to have
the recorder output signals, for example, when you use this recorder as
source player, connect other equipment to this recorder’s LINE OUT
jacks.
• Only DVC-SD format signals can be input to the DV IN jack on this
recorder. Do not connect a MICRO MV format digital video camera
even if it has an i.LINK jack.
• Recording may be limited if the images on the tape contain copyright
protection signals.
•
Before Recording/Editing
. . . . . . . . . .
page 75
•
Available DV Dubbing Functions
. . . . .
page 77
•
Recording an Entire DV/Digital8 Format Tape
(ONE TOUCH DUB)
. . . . . . . . . . . . . . . . . . . . . .
page 78
•
Program Edit
. . . . . . . . . . . . . . . . . . . . . . . . . . . .
page 79
•
Advanced Program Edit
. . . . . .
page 81
•
Re-editing the “program” in the DV/D8 Edit List
. . . . . . . . . . . . . . . . . . . . . .
page 84
•
Creating a Copy of the Edited Contents (Copy
Dubbing)
. . . . . . . . . . . . . . . . . . . . . . . . . . . .
page 86
•
Recording From Equipment Connected to the
LINE IN Jacks
. . . . . . . . . . . . . . . . . . . . . .page 88
,
continued
76
Before Recording/Editing
Hookups
a Turn on your TV and this recorder, then set
the TV to the connected channel (“VIDEO”
etc.).
b Press Z OPEN/CLOSE, and place a
recordable disc on the tray.
Make sure that the disc has enough free space to
record the contents of your tape.
c Press Z OPEN/CLOSE to close the disc tray.
Wait until “LOAD” disappears from the front panel
display.
If you use an unused DVD, formatting starts
automatically.
When using an unused DVD-RW, select the
recording format, VR or Video.
d Insert the source DV/Digital8 format tape
into the digital video camera.
For the recorder to record or edit, the digital video
camera must be set to video playback mode.
e Press INPUT SELECT on the remote
repeatedly to select “DV.”
The front panel display changes as follows.
f Press REC MODE on the remote repeatedly
to select the recording mode.
The recording mode changes as follows:
g Select the audio input for the digital video
camera using the TOOLS menu.
A Press TOOLS.
B Press M/m to select “DV/D8 Audio Input,”
then press ENTER.
C Press M/m to select the item, then press
ENTER.
• Stereo1 (default)
• Mix (both stereo 1 and stereo 2)
• Stereo2
You are ready to start recording.
z Hints
• You can adjust the settings for the recording picture before recording.
See “Adjusting the Recording Picture Quality and Size” (page 46).
• If you plan to re-edit the “program” (page 77), insert a DVD-RW and
format it in VR mode.
Notes
• You cannot connect more than two pieces of digital video equipment
to the recorder.
• Depending on the digital video equipment, you may not be able to
control the equipment.
• You cannot control the recorder using another device or another
recorder of the same model.
• You cannot record date, time or the contents of the cassette memory
onto the disc.
• If you record from a DV/Digital8 format tape with a sound track that
is recorded in multiple sampling frequencies (48 kHz, 44.1 kHz, or 32
kHz), no sound will be output when playing back the switched point on
the disc.
• In order to use this recorder’s Auto Scene Chaptering feature, be sure
to correctly set the clock on your digital video camera before shooting.
• The recorded picture may be momentarily affected if the picture size
of the source image changes, or if there is nothing recorded on the tape.
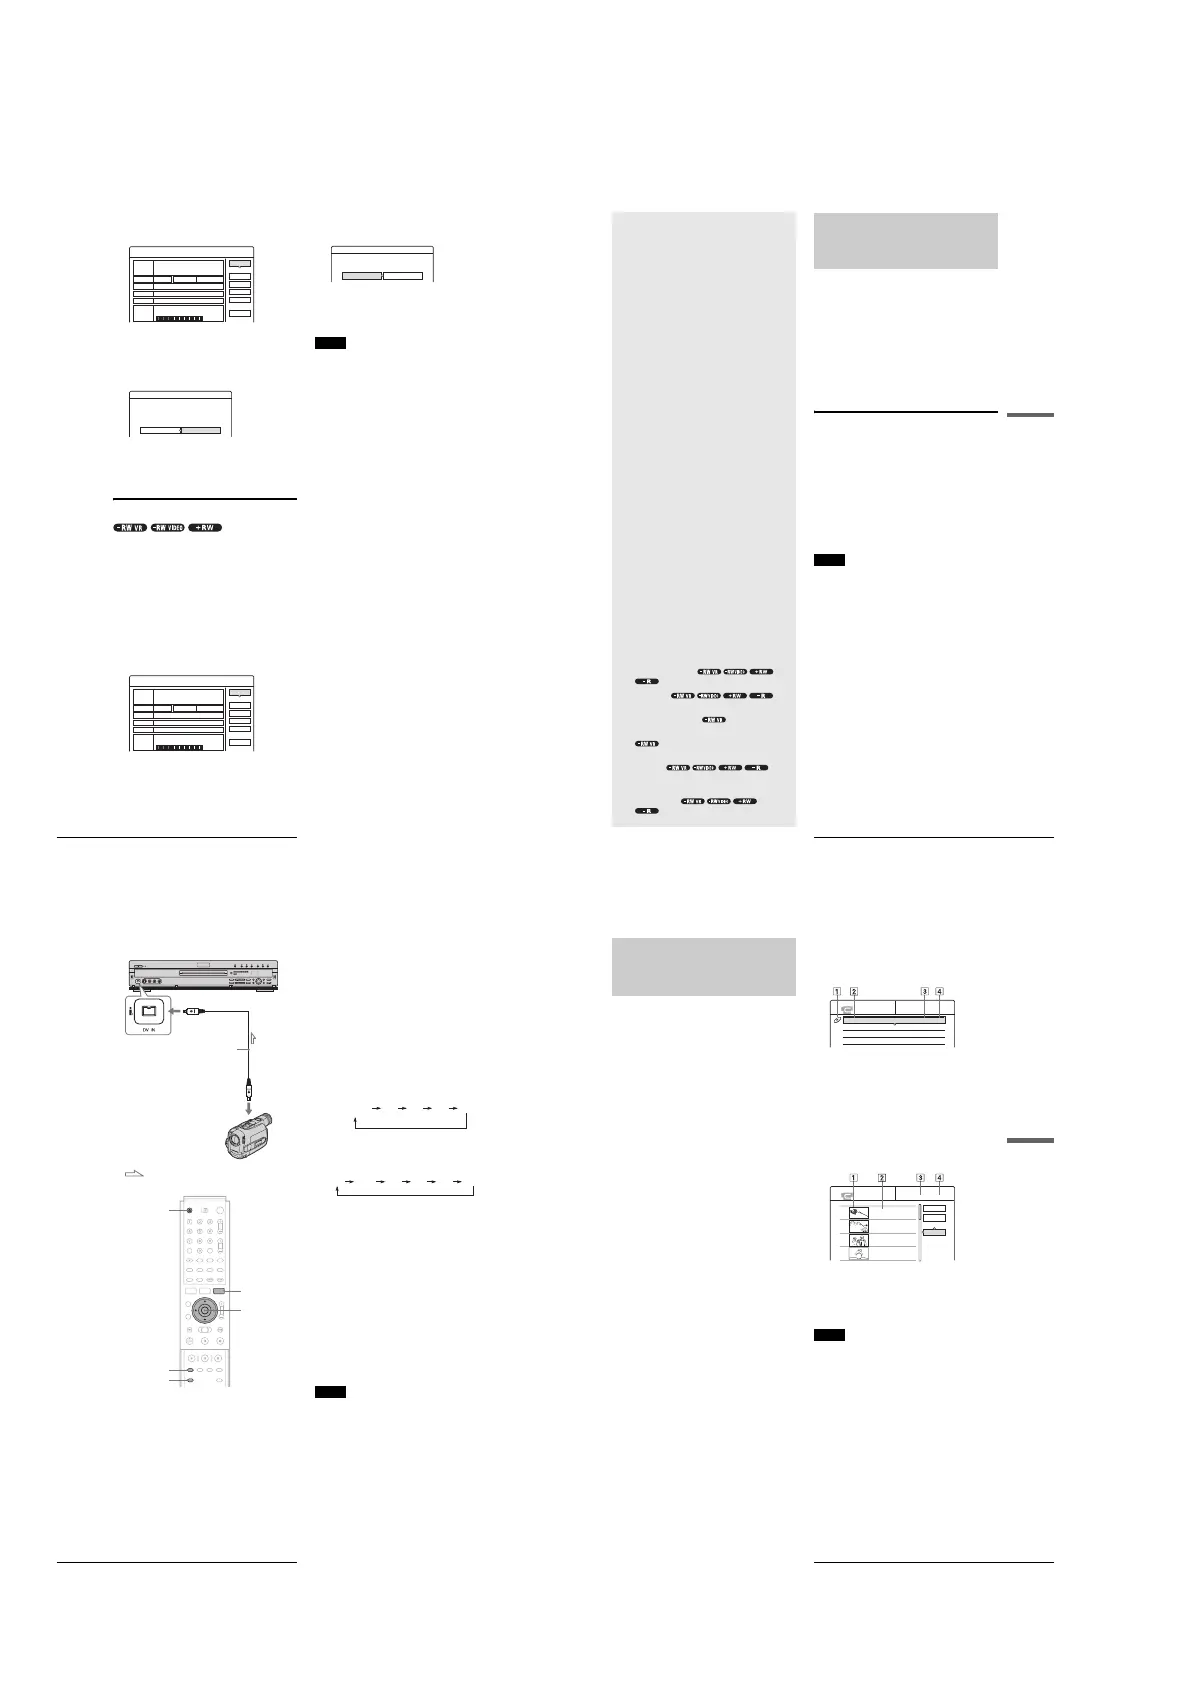
DVD recorder
To DV IN
i.LINK cable
(not supplied)
DV output
Digital video camera
: Signal flow
TOOLS
M/m, ENTER
REC MODE
Z OPEN/CLOSE
INPUT SELECT
L2L1 L3 DV
Channel
number
HQ SP LP EPHSP SLP
77
Available DV Dubbing Functions
Connecting a Digital Video Camera or Other Equipment
Available DV Dubbing
Functions
◆One Touch Dub
(page 78)
Records the entire contents of a DV/Digital8 format tape to a
disc of your choice with a single touch of the ONE TOUCH
DUB button.
◆Program Edit
(page 79)
Allows you to select scenes from a DV/Digital8 format tape, and
then record the selected scenes to a disc of your choice. As you
select the scenes, you will create a “program” (see below), which
will then be used to dub the selected scenes to a disc. Before you
dub the scenes, you can rearrange the order and make other
changes using the “Scene List” (see below).
◆Advanced Program Edit
(page 81)
Allows you to select scenes from a DV/Digital8 format tape by
first recording the entire contents of the tape to a DVD-RW (VR
mode), whereupon you can easily create a “program” (see
below). By first copying the entire contents of the tape to a disc,
the start and stop points on the tape automatically become scenes
(you can also select scenes manually). These scenes are
displayed in a “scene list” (see below). You can then delete,
rearrange, or select new scenes to create a “program.” Once the
“program” is complete, you will use it to copy the scenes to a
disc of your choice from the “DV/D8 Edit List” (see below).
Furthermore, you can also automatically create a Playlist of the
edited scenes and save it on the DVD-RW (VR mode) you used
to originally record the entire contents of the tape.
◆Re-editing the “program” in the DV/D8 Edit List (DVD-RW in
VR mode only)
(page 84)
Allows you to select the “program” (see below) created during
One Touch Dub or Advanced Program Edit from the “DV/D8
Edit List” (see below), and make further edits before coping the
contents to a disc. You can delete or create new scenes, or
rearrange the order of existing scenes.
◆Copy Dubbing
(page 86)
Allows you to make duplicate copies of the “programs” (see
below) in the “DV/D8 Edit List” (see below) to a disc of your
choice. When making copies, you will need the original DV/
Digital8 format tapes used to create the “program.”
About “programs”
“Programs” are automatically created whenever you make a One
Touch Dub, Program Edit, or Advanced Program Edit. These
programs are stored in the “DV/D8 Edit List” (see below) and
contain editing information such as which scenes have been
selected, moved, or deleted.
Programs are useful when you want to make duplicates of the
edited contents because you do not have to select the same
scenes again from the tape – just select the program. You can
also re-edit the program to create different variations of the
original program. Note that programs contain only the start and
stop points of the scenes; they do not contain the actual scenes
themselves so you need to use the original DV/Digital8 format
tapes to copy a program to a disc.
◆About the “DV/D8 Edit List”
The “DV/D8 Edit List” contains the “programs.” If you re-edit
the program, the re-edited program is stored in the DV/D8 Edit
List, but the original program is lost. You can store up to 20
programs in the DV/D8 Edit List.
1 Disc mark
2 Program name
3 Total playing time
4 Date of editing or recording
◆About the “Scene List”
The contents of the programs are contained in the “Scene List.”
A thumbnail of each scene, as well as the length of the scene is
displayed in the list. You can add or delete scenes, or change the
order of the scenes. 50 scenes can be made for each program.
1 Thumbnail picture
2 Time information
3 Total duration of the program
4 Total number of scenes
Note
After you make a dubbing, do not throw away or record over your tapes.
You will need them later to make additional edits or copies.
DV/D8 EDIT LIST
DV10/11/02 1:30PM - 11/12/02 4:46PM
DV12/11/02 1:00PM - 12/11/02 7:05PM
DV12/24/02 11:34AM - 12/25/02 1:24PM
1H12M 6/ 5
1H16M 6/10
1H24M 6/18
SCENE LIST
Total 1:23:30 Scenes 20
OK
Quit
Add
0:00:30-0:00:52
Duration 0:00:22
1
0:01:40-0:06:23
Duration 0:06:43
2
0:07:07-0:10:51
Duration 0:03:44
3
0:11:40-0:16:19
Duration 0:04:39
4
 Loading...