1-8
34
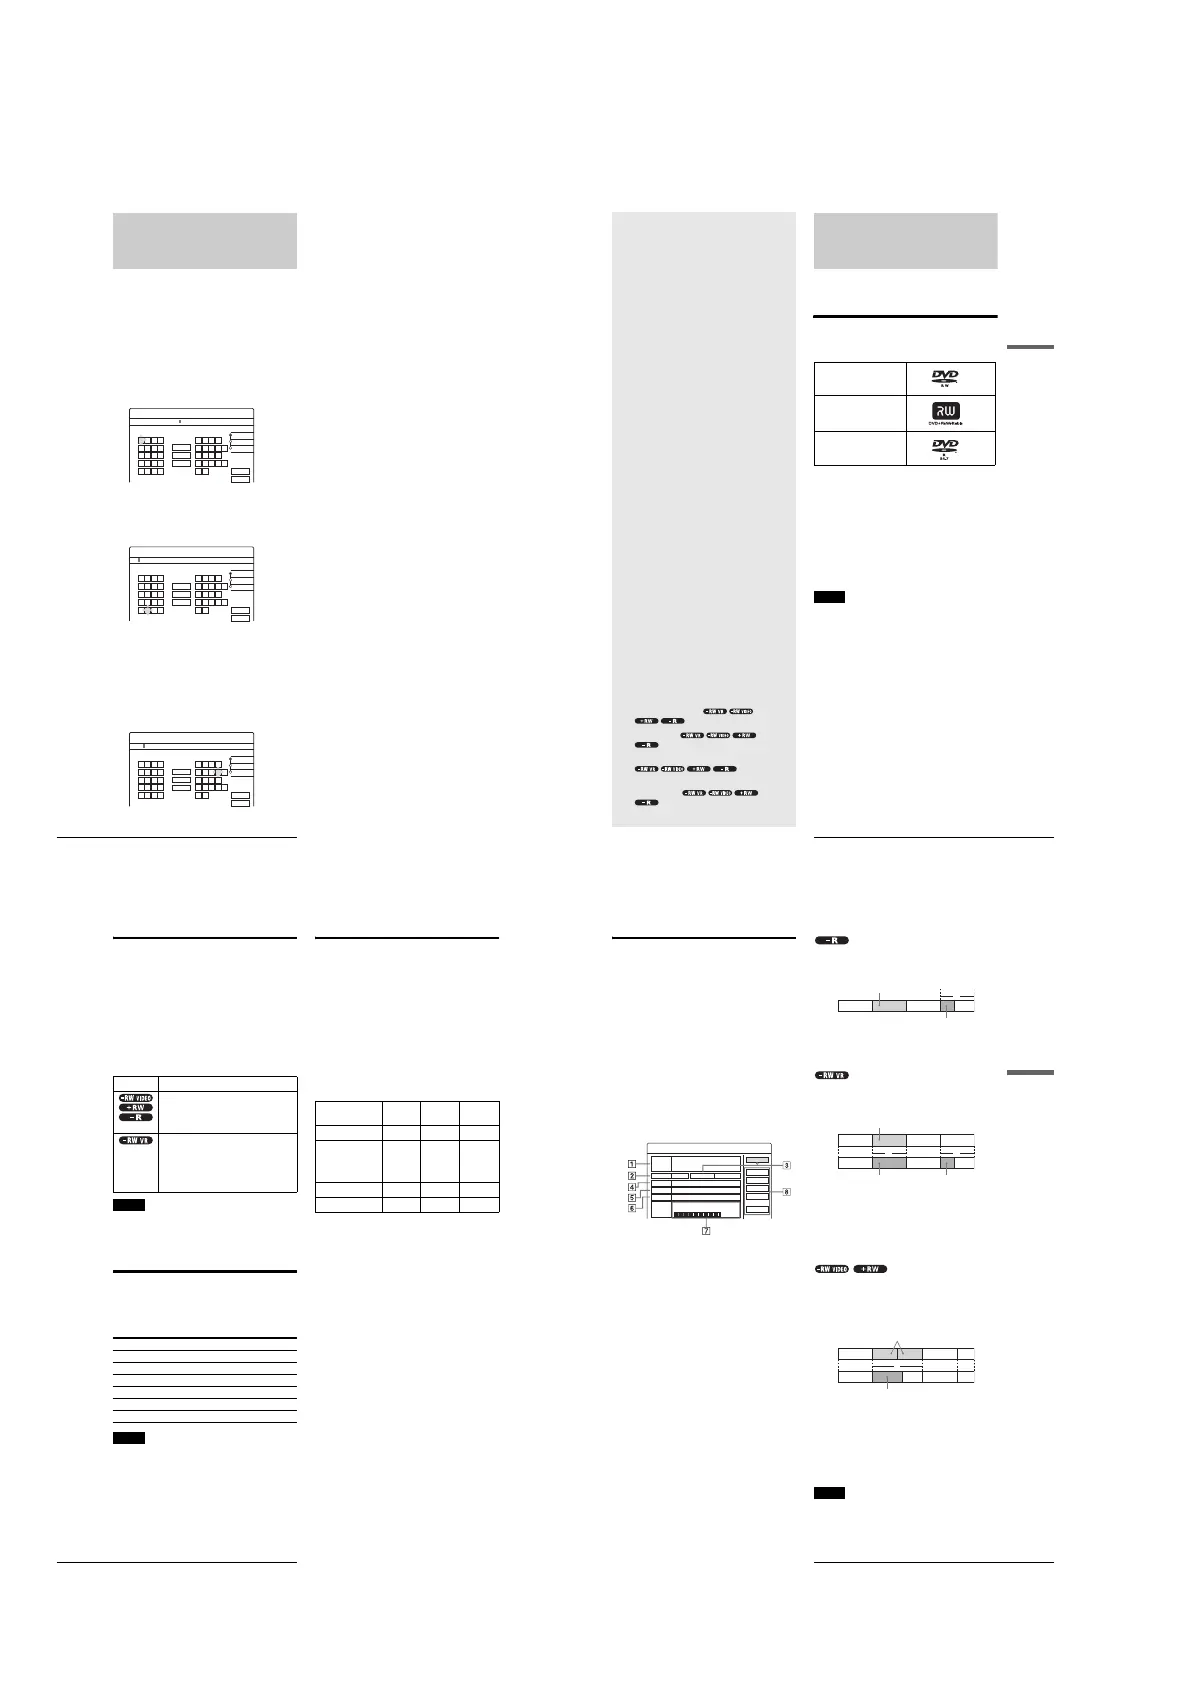
How to Enter Characters
How to Enter Characters
You can label a title, disc, or program by entering characters.
You can enter up to 64 characters for a title/disc/program name,
but the actual number of characters displayed in the menus such
as the Title List will vary. When the display for entering
characters appears, follow the steps below.
a
Press </M/m/, to move the cursor to the
right of the screen and select “A” (upper-
case), “a” (lower-case), or “Symbol,” then
press ENTER.
The characters of the selected type are displayed.
Example: Input Title Name
b
Press </M/m/, to select a character you
want to enter, then press ENTER.
The selected character appears at the top of the
display.
To enter a letter with an accent mark, select an accent
followed by the letter.
Example: Select “ ` ” and then “a” to enter “à.”
To insert a space between the characters, select
“Space.”
c
Repeat steps 1 and 2 to enter all the
characters for the name.
◆ To erase a character
A Press </M/m/, to move the cursor to the
input row.
B Press </, to move the cursor to the right of
the character you want to erase.
C Press </M/m/, to select “Back,” then press
ENTER.
◆ To insert a character
A Press </M/m/, to move the cursor to the
input row.
B Press </, to move the cursor to the right of
the point where you want to insert a character.
C Press </M/m/, to select the character you
want to insert, then press ENTER.
◆ To erase all the characters
Press </M/m/, to select “Clear All,” then press
ENTER.
d
Press </M/m/, to select “Finish,” then
press ENTER.
To cancel the setting, select “Cancel.”
To use the number buttons
You can also use the number buttons to enter characters.
1
In step
2
above, press the number buttons
repeatedly to select the character you want to
enter.
Example:
Press the number 3 button once to enter “D.”
Press the number 3 button three times to enter “F.”
2
Select the next character, or press SET.
3
Repeat steps 1 and 2 to enter all of the characters
for the name.
4
Press </M/m/, to select “Finish,” then press
ENTER.
25ch 1:00PM - 2:00PM
"A"
"a"
Symbol
Cancel
Finish
Space
Clear All
Back
,. - 1
BA C 2
ED F 3
HG I 4
KJ L5
1
2
3
4
5
NM O 6
QP R S
UT V 8
XW Y Z
7
9
0
6
7
8
9
0
Input Title Name
K
"A"
"a"
Symbol
Cancel
Finish
Space
Clear All
Back
,. - 1
BA C 2
ED F 3
HG I 4
KJ L5
1
2
3
4
5
NM O 6
QP R S
UT V 8
XW Y Z
7
9
0
6
7
8
9
0
Input Title Name
Kids
"A"
"a"
Symbol
Space
Clear All
Back
,. - 1
BA C 2
ED F 3
HG I 4
KJ L5
1
2
3
4
5
NM O 6
QP R S
UT V 8
XW Y Z
7
9
0
6
7
8
9
0
Input Title Name
Cancel
Finish
35
Before Recording
Recording/Timer Recording
Recording/
Timer
Recording
This section covers the basics of DVD
recording, and the available methods for
setting the timer.
Before Recording
This recorder can record on various discs. Before you record,
read the following and select the disc type according to your
needs.
Recordable discs
This recorder can record on the following discs.
◆Disc type
*
1
“DVD-RW,” “DVD+RW,” and “DVD-R” are trademarks.
*
2
CPRM (Content Protection for Recordable Media) is a coding
technology that protects copyrights for images.
DVD-RWs and DVD+RWs are rewritable. DVD-Rs are non-
rewritable.
The recorder cannot record on the following discs:
• 8 cm discs
• DVD+R
• DVD-RW (Ver 1.0)
• DVD-RAM
• CD-R/CD-RW
Notes
• The following type of high-speed discs can be used for recording: up
to 2×-speed DVD-RWs (Revision 1.0), up to 4×-speed DVD-Rs
(Revision 1.0), or up to 4×-speed DVD+RWs. Note that high-speed
discs will not record at higher speed. You cannot record on the disc if
it is not 1×-speed compatible.
• Use a disc with CPRM to record Copy-Once TV programs (page 36).
• It is recommended that you use discs with “For Video” printed on their
packing.
• You cannot add new recordings to DVD-Rs and DVD-RWs (Video
mode) that contain recordings made on other DVD recorders.
• In some cases, you may not be able to add new recordings to
DVD+RWs that contain recordings made on other DVD recorders. If
you do add a new recording, note that this recorder will rewrite the
DVD menu. If the disc contains PC data unrecognizable by this
recorder, the data will be erased.
DVD-RW*
1
Ver. 1.1
Ver. 1.1 with CPRM*
2
DVD+RW*
1
DVD-R*
1
Ver. 2.0
•
Before Recording
. . . . . . . . . . . . . . . . .
page 35
•
Recording TV programs
. . . . . . . . . . . . . . . .
page 38
•
Timer Recording
. . . . . . . . . . . . . . . . . . . . . .
page 40
•
Adjusting the Recording Picture Quality and Size
. . .
page 46
•
Recording from External Equipment with a Timer
(Synchro Rec)
. . . . . . . . . . . . . . . . . . . . . .
page 47
,
continued
36
Before Recording
About recording formats
When you insert an unused disc, the recorder automatically starts
formatting. Since available functions differ depending on the
disc type, select the disc that best suits your needs using the chart
below.
You can preset the format for unused DVD-RWs in Options
Setup. When “Format Disc” is set to either “VR” or “Video”
(page 99), the recorder starts formatting in the selected mode
without asking for confirmation. Select “Selectable” if you want
to select the mode each time you insert an unused DVD-RW.
Differences between the disc types
See pages in parentheses for details.
Notes
• To play a recorded disc on other DVD equipment, you need to finalize
the disc. For details on finalizing, see page 73.
• You cannot mix the two formats on one DVD-RW. To change the
disc’s format, reformat the disc (page 74). Note that the disc’s contents
will be erased after reformatting.
Recording mode
While the recorder is stopped, you can select one of six recording
modes by pressing REC MODE repeatedly for the desired
recording time and picture quality. The picture quality generally
improves as the recording time decreases.
Notes
• The recording times are an estimate and actual times may differ.
• Situations below may cause slight inaccuracies with the recording
time.
– Recording a program with poor reception, or a program or video source
of low picture quality
– Recording on a disc that has already been edited
– Recording only a still picture or just sound
Unrecordable pictures
Pictures with copy protection cannot be recorded on this
recorder.
When the recorder receives a copy guard signal while recording,
the recorder stops recording and a message appears on your TV
screen.
About pictures with Copy Control Signals
Broadcasts that contain Copy Control Signals may have one of
the following three signal types, Copy-Free, Copy-Once, and
Copy-Never. This recorder limits the recording according to
copy protection signal as shown below.
If you want to record a Copy-Once program, use a DVD-RW
with CPRM in VR mode.
◆Available recording options
* The recorded disc can be played only on CPRM compatible
equipment.
Disc type Characteristics
– Automatically creates chapters at specified
intervals (page 97)
– Simple editing (erasing titles/changing
title name) (page 64)
– Creates chapters manually or
automatically (page 67)
– Various editing options using a created
Playlist (page 67)
– Records Copy-Once programs provided
that the disc has CPRM
Recording mode Recording time (minute)
HQ 60
HSP 90
SP (Standard mode) 120
LP 180
EP 240
SLP 360
Copy-
Free
Copy-
Once
Copy-
Never
DVD-RW (Ver.1.1) a ——
DVD-RW (Ver.1.1
with CPRM
VR mode
Video mode
a
a
a*
—
—
—
DVD+RW a ——
DVD-R (Ver.2.0) a ——
37
Before Recording
Recording/Timer Recording
Checking the available disc space
(Disc Info.)
When recording on a used disc, make sure that there is enough
disc space for recording. With DVD-RWs or DVD+RWs, you
can free up disc space by erasing titles.
a Press TOOLS while the disc is in the
recorder.
The TOOLS menu appears.
b Press M/m to select “Disc Info.,” then press
ENTER.
The Disc Information display appears.
Items in the display differ depending on the disc type
or recording format. Note that the remaining disc
space indicator is an estimate and actual available
space may differ.
Example: DVD-RW (VR mode)
1 Disc Name
2 Media:
Disc type
3 Format:
Recording format type (DVD-RW only)
4 Title no.:
Total number of titles
5 Protected:
Indicates whether protection is set (DVD-RW in
VR mode only)
6 Date:
Dates when the oldest and the most recent titles
are recorded
7 Continuous Rem. Time/Remainder:
• The longest continuous recording time in each of the
recording modes (approximate)
• Disc space bar (approximate)
• Remaining disc space/total disc space (approximate)
8 Disc setting buttons
• Disc Name: Labels the disc (page 72)
• Protect Disc: Protects the disc (DVD-RW in VR
mode only) (page 72)
• Finalize: Finalizes the disc/Creates a DVD menu
(page 73)
• Unfinalize: Unfinalizes the disc if it has already been
finalized (DVD-RW in VR mode only) (page 73)
• Erase All: Erases all titles on the disc (page 73)
• Format: Reformats the disc (page 74)
◆How programs are recorded on a DVD-R
A new program is recorded on the last space [a] only. Check that
the remaining disc space is large enough for the recording.
You cannot free up disc space on a DVD-R. Erasing a title will
only hide the title name in the Title List menu. The erased titles
will still take up space on the disc.
◆How programs are recorded on a DVD-RW (VR mode)
A program is recorded on the free disc space [a]. Check that the
total remaining disc space is large enough for recording.
◆To free up disc space
You can free up disc space by erasing titles. The original title
used for a Playlist cannot be erased.
To erase a title, see page 65.
To erase multiple titles, see page 65.
◆How programs are recorded on a DVD-RW (Video mode) or
DVD+RW
The recorder searches for the largest block of space [a] and
records there. Check that there is a continuous free block large
enough for the recording. If not, the recording will stop.
◆To check or free up disc space
For DVD-RWs (Video mode) and DVD+RWs only, you can
check free disc space and title location, and also erase titles using
the Disc Map display (see below).
z Hint
You can erase all of the disc’s titles (other than protected titles) at once
(page 73).
Notes
• When you erase titles, the title order may change depending on the disc
type or format.
• After finalizing, you cannot record further on a DVD-RW (Video
mode) or DVD-R.
Disc Information
DiscName Movie
Close
Media DVD-RW Format VR
Title no. Original 3 / Playlist 2
Protected Not Protected
Date 9/15/2003 ~ 10/28/2003
HQ : 0H30M
LP : 1H30M
HSP : 0H45M
EP : 2H00M
SP : 1H00M
2. 3 / 4. 7GB
SLP : 3H00M
Remainder
Disc Name
Format
Erase All
Finalize
Protect Disc
A CB
a
Erasing “B” does not free up any space
New recording
A CB
A C
aa
Erasing “B” frees up more space
New recording New recording
(continued)
A D
D
B C
A
a
Erasing “B” and “C” creates a block of free space
New recording
,
continued
 Loading...