1-12
50
Playing Discs
Discs that cannot be played on this recorder
The recorder cannot play the following discs:
• All CD-ROMs (including PHOTO CDs)
• CD-Rs/CD-RWs, other than those recorded in the music CD
format
• Data part of CD-Extras
• VIDEO CDs
• Super VCDs
• DVD-ROMs
• DVD Audio discs
• DVD-RAMs
• HD layer on Super Audio CDs
• DVD VIDEOs with a different region code (page 49)
• A disc recorded in a color system other than NTSC, such as
PAL or SECAM
Notes on playing DTS sound tracks on a CD
• When playing DTS-encoded CDs, excessive noise will be
heard from the analog stereo jacks. To avoid possible damage
to the audio system, the consumer should take proper
precautions when the analog stereo jacks of the recorder are
connected to an amplification system. To enjoy DTS Digital
Surround™ playback, an external 5.1-channel decoder system
must be connected to the digital jack of the recorder.
• Set the sound to “Stereo” using the AUDIO button when you
play DTS sound tracks on a CD (page 57).
• Do not play DTS sound tracks without first connecting the
recorder to an audio component having a built-in DTS decoder.
The recorder outputs the DTS signal via the DIGITAL OUT
(COAXIAL or OPTICAL) jack even if “DTS” is set to “Off”
in the Audio Setup (page 96), and may affect your ears or cause
your speakers to be damaged.
Notes on playing DVDs with a DTS sound track
• DTS audio signals are output only through the DIGITAL OUT
(COAXIAL or OPTICAL) jack.
• When you play a DVD with DTS sound tracks, set “DTS” to
“On” in the Audio Setup (page 96).
• If you connect the recorder to audio equipment without a built-
in DTS decoder, do not set “DTS” to “On” in the Audio Setup
(page 96). A loud noise may come out from the speakers,
affecting your ears or causing the speakers to be damaged.
Notes
• The following type of high-speed discs can be played back on this
recorder: up to 2u-speed DVD-RWs (Revision 1.0), up to 4u-speed
DVD-Rs (Revision 1.0), or up to 4u-speed DVD+RWs/DVD+Rs.
• DVD-RW/-Rs, DVD+RWs/+Rs, or CD-RW/-Rs recorded on another
recording device cannot be played on this recorder if they have not
been correctly finalized. Some discs cannot be played due to the
recording quality or physical condition of the disc, or the
characteristics of the recording device and authoring software.
Playing Discs
Depending on the disc, some operations may differ, or certain
restrictions may apply. Refer to the operating instructions
supplied with your disc.
a
Press }/1.
The recorder turns on and the power indicator lights
up in green.
b
Turn on the TV, and switch the input selector
on your TV so that the signal from the
recorder appears on the TV screen.
◆ When using an amplifier
Turn on the amplifier (receiver) and select the
appropriate channel so that you can hear sound from
the recorder.
c
Press Z OPEN/CLOSE to open the disc tray.
d
Place a disc on the disc tray.
e
Press Z OPEN/CLOSE to close the disc tray.
Wait until “LOAD” disappears in the front panel
display.
Number
buttons, SET
</M/m/,,
ENTER
MENU
"/1Z OPEN/CLOSE
TOP MENU
H PLAY
x STOP
With the playing side facing down
51
Playing Discs
Playback
◆ When playing a DVD-RW/DVD+RW/DVD-R
You can select the title from the Title List menu. See
“Selecting a Recorded Title on a Disc” (page 53).
◆ If a menu appears on the TV screen
See “Using the DVD’s Menu” below.
f
Press H PLAY.
The recorder starts playback.
To adjust the volume
Adjust the volume of your TV or amplifier (receiver).
To stop playback
Press x STOP.
To turn off the recorder
Press @/1.
z Hint
You can also start or stop playback using the TOOLS menu.
To play a DVD VIDEO for which Parental Control
is set
When the message “Do you want temporarily change parental
control to *?” appears on the TV screen, follow the steps below.
1
Press </, to select “OK,” then press ENTER.
The display for entering your password appears.
2
Enter your four digit password using the number
buttons.
The cursor moves to “OK.”
3
Press ENTER to select “OK.”
The recorder starts playback.
To register or change the password, see “Parental Control (DVD
VIDEO only)” (page 97).
Using the DVD’s Menu
When you play a DVD VIDEO which contains several titles, you
can select the title you want using the TOP MENU or MENU
button.
When you play DVD VIDEOs that allow you to select items
such as the language for the subtitles and the language for the
sound, select these items using the MENU button.
a Press TOP MENU or MENU.
The disc’s menu appears on the TV screen.
The contents of the menu vary from disc to disc.
b Press </M/m/, or the number buttons to
select the item you want to play or change.
c Press ENTER.
z Hint
If you are playing a finalized DVD-R, DVD+RW, or DVD-RW (Video
mode), you can display the menu with the TOP MENU or MENU button.
See “Finalizing a disc (Finalize)” (page 73) for more information about
finalizing and DVD menus.
Using the PROGRESSIVE button
You can fine-tune the Progressive 480p video signal output
when you press PROGRESSIVE on the front panel (the
PROGRESSIVE indicator lights up) and connect the recorder
using the COMPONENT VIDEO OUT jacks to a TV that is able
to accept the video signal in progressive format.
Press PROGRESSIVE repeatedly to toggle the displays as
follows:
• INTERLACE
Select this when you are connected to a standard (Interlace
format) TV.
• PROGRESSIVE
Select this when you are connected to a TV compatible with
progressive signals. The recorder outputs video signals in
progressive format.
◆ Conversion modes
DVD software can be divided into two types: film based
software and video based software. Video based software is
derived from the TV, such as dramas and sit-coms, and displays
images at 30 frames/60 fields per second. Film based software is
derived from film and displays images at 24 frames per second.
Some DVD software contains both Video and Film.
In order for these images to appear natural on your screen when
output in PROGRESSIVE mode (60 frames per second), the
progressive video signal needs to be converted to match the type
of DVD software that you are watching. The title recorded on
this recorder is Video based software. If you want to set the
conversion mode for Video based software regardless of the
software type, set “Progressive Mode” in Video Setup to
“Video” (page 95).
Notes
• When you play video based software with progressive signals, sections
of some types of images may appear unnatural due to the conversion
process when output through the COMPONENT VIDEO OUT jacks.
Images from the LINE OUT (S VIDEO) 1/2 and LINE OUT (VIDEO)
1/2 jacks are unaffected as they are output in the normal (interlace)
format.
• If you have set the recorder to progressive format even though your TV
is not compatible with progressive format (480p) signals, you cannot
view pictures. Some video signals recorded on the disc may not be
converted in progressive format. In either of these cases, set the
recorder to interlace format.
Parental Control
Enter your password.
Cancel
Passwo rd
INTERLACE (the PROGRESSIVE indicator turns off)
PROGRESSIVE (the PROGRESSIVE indicator lights up)
,
continued
52
Playing Discs
Basic operations/Changing the
playback speed
To: Operations Discs
Pause Press X PAUSE. To resume playback, press X PAUSE or H PLAY. All discs
Locate the beginning of
the title/chapter/track
During playback, press > NEXT or . PREV.
• > NEXT : Goes to the next title/chapter/track.
• . PREV : Goes back to the beginning of the previous title/chapter/
track.
For DVD-RWs (VR mode), you can manually add chapter marks
(page 67).
All discs
Stop play and remove
the disc
Press Z OPEN/CLOSE. All discs
Replay the previous
scene
Press
INSTANT REPLAY.
This function is useful when you want to review a scene or dialogue you
missed.
Briefly fast forward the
current scene
Press INSTANT SEARCH.
This function is useful for skipping a scene you do not want to watch.
Fast forward/fast
reverse (search)
During playback, briefly push the Jog Stick to the left or right. Each time
you push the Jog Stick, the search speed changes as follows:
fast reverse m fast forward M
FR1 T t FF1
FR2 T T t t FF2
FR3* T T T t t t FF3*
To resume to the normal speed, press H PLAY.
When you push and hold the Jog Stick down to the left or right, fast
forward/fast reverse continues at the selected speed until you release the
Jog Stick. Actual speeds may differ with some discs or recording modes.
* Music CDs cannot be played at FR3/FF3.
All discs
Frame by frame (Slow-
motion play)
Push m / M Jog Stick for more than one second when the
recorder is in pause mode.
To return to the normal speed, press H PLAY.
Watch one frame at a
time (Freeze Frame)
Push m / M Jog Stick briefly when the recorder is in pause
mode.
To return to the normal speed, press H PLAY.
INSTANT SEARCH
</M/m/,, ENTER
TOOLS
Z OPEN/CLOSE
H PLAY
X PAUSE
x STOP
m / M (Search)
./> PREV/NEXT
Jog Stick
INSTANT REPLAY
53
Selecting a Recorded Title on a Disc
Playback
To resume playback from the point where you
stopped the disc (Resume Play)
When you stop the disc, the recorder remembers the point where
you pressed x STOP.
• For DVDs:
Resume Play works as long as you do not open the disc tray
(you may turn off the recorder).
• For CDs:
Resume Play works as long as you do not turn off the recorder
or open the disc tray.
1
While playing a disc, press x STOP to stop
playback.
“RESUME” appears on the front panel display.
If “RESUME” does not appear, Resume Play is not
available.
2
Press H PLAY.
The recorder starts playback from the point where
you stopped the disc in step 1.
◆To play from the beginning of the disc
Reset the resume point using the TOOLS menu.
Press TOOLS and press M/m to select “Reset Resume,” then
press ENTER.
◆To play from the beginning of the title
You can locate the beginning of the title/track using the TOOLS
menu. Press TOOLS and press M/m to select “Play From Start,”
then press ENTER. Playback automatically starts from the
beginning of the title.
Notes
• Depending on the disc, the recorder may not resume playback from
where you stopped the disc.
• Depending on where you stopped the disc, the recorder may not
resume playback from exactly the same point.
• The point where you stopped playing is cleared when:
– you open the disc tray.
– you play another title.
– you switch the Title List menu (Original or Playlist).
– you edit the disc, such as erasing a title.
– you change the settings on the recorder.
– you turn off the recorder (CD only).
– you make a recording (except for DVD-RWs in VR mode).
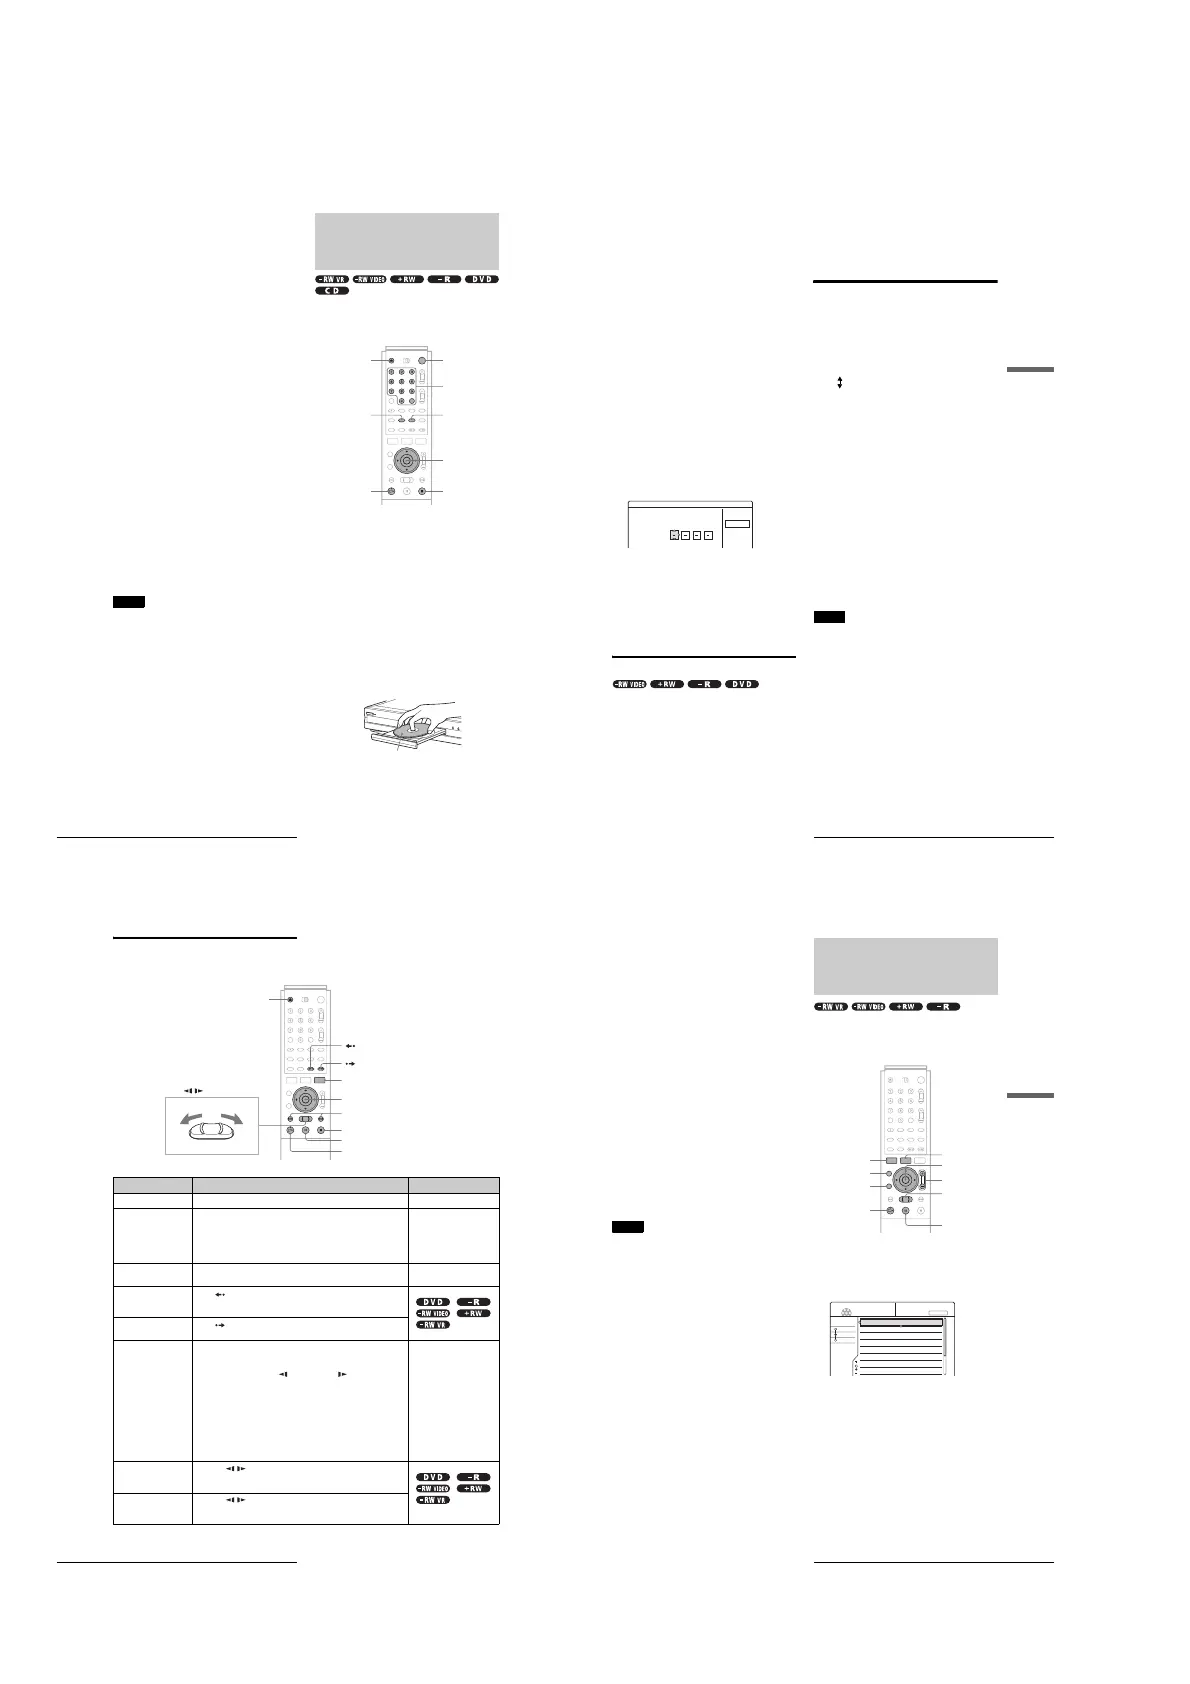
Selecting a Recorded Title
on a Disc
The Title List menu displays all the titles recorded on the disc
and you can select the one you want to play. For details, see also
page 32.
a
Insert a disc and press TITLE LIST.
The Title List menu appears.
For a DVD-RW (VR mode), select “Original” or
“Playlist” using the TOOLS menu (page 32).
b
Press M/m to select the title, then press
ENTER.
The sub-menu appears.
c
Press M/m to select “Play,” then press
ENTER.
Playback starts from the selected title on the disc.
z Hints
• You can also display the Title List menu using the System Menu. Press
SYSTEM MENU and select “TITLE LIST,” then press ENTER
(page 32).
• You can select Page mode by pressing CURSOR MODE (page 32). In
Page mode, you can change the page of the Title List using M/m.
• You can also use the H PLAY button to start playback.
• To change the title name, see “Labeling a title (Title Name)”
(page 64).
TITLE LIST
</M/m/,,
ENTER
ZOOM +/–
H PLAY
SYSTEM MENU
CURSOR MODE
RETURN
m/M
X PAUSE
Sort
Date
Number
Title
My Movies
TITLE LIST
ORIGINAL
-RW.VR
1.5/4.7GB
1 2ch 1:00PM - 2:00PM
2 5ch 8:00PM - 9:00PM
3 12ch 9:00AM - 9:30AM
4 3ch 8:00PM - 8:30PM
5 25ch 8:00PM - 8:30PM
6 L2 9:00PM - 9:30PM
7 8ch 9:00PM - 9:30PM
8 125ch 10:00AM - 10:30AM
9/15
9/17
9/25
9/25
10/15
10/19
10/26
10/28
,
continued
 Loading...