55
10. Here, you’ll need to enter the relevant information for connecting to your DVR.
These are:
Your • username and password. Specifically, these are the ones
entered in the Setting up the DVR for Mobile Access above.
Server address• . If your ISP provides static IP addresses, then the
server address you’ll need is your public IP address.
The • port that the DVR has been configured to use for mobile access.
Again, this is the port that you selected in the Mobile Device setup
on the DVR.
Choose a channel• from 1 through 4 – as mobile devices have
limited bandwidth, the DVR4-2000 will only stream one channel at
a time. To choose another channel, reconnect. As the software is
designed to function with multiple DVR systems, it will display up to
16 channels, only four of which will interface with the DVR4-2000.
11. Then, click .
12. Standard playback controls and PTZ features (if applicable) are located across the
bottom of the playback window.
Accessing the DVR4-2000 from a Mobile device running Windows Mobile
You’ll need the mini-CD which came with the DVR4-2000, as that contains the software
you’ll need to install on the Microsoft Windows Mobile
®
based device.
Insert the mini-CD into your computer.1.
Attach your mobile device to your computer. Depending on your specific mobile 2.
device, it may be connected via USB, Bluetooth, FireWire or other method. If you’re
unsure, consult your mobile device manufacturer’s documentation.
Locate the file on the mini-CD called 3. AMPLAYERSETUP.EXE. It is located in the folder
called Mobile ActiveX Windows.
Copy 4. AMPLAYERSETUP.EXE to the PROGRAMS folder on your mobile device.
Disconnect the mobile device from your computer. Remember to use the 5. Safely Remove
Hardware option, if applicable.
Using your mobile device, execute the 6. AMPLAYERSETUP.EXE file. Follow the prompts
to complete the installation.
Once installation is complete, open the 7. Start Menu.
Run the program called 8. QQeye.
Click the button labeled 9. Setting located near the top of the main interface.
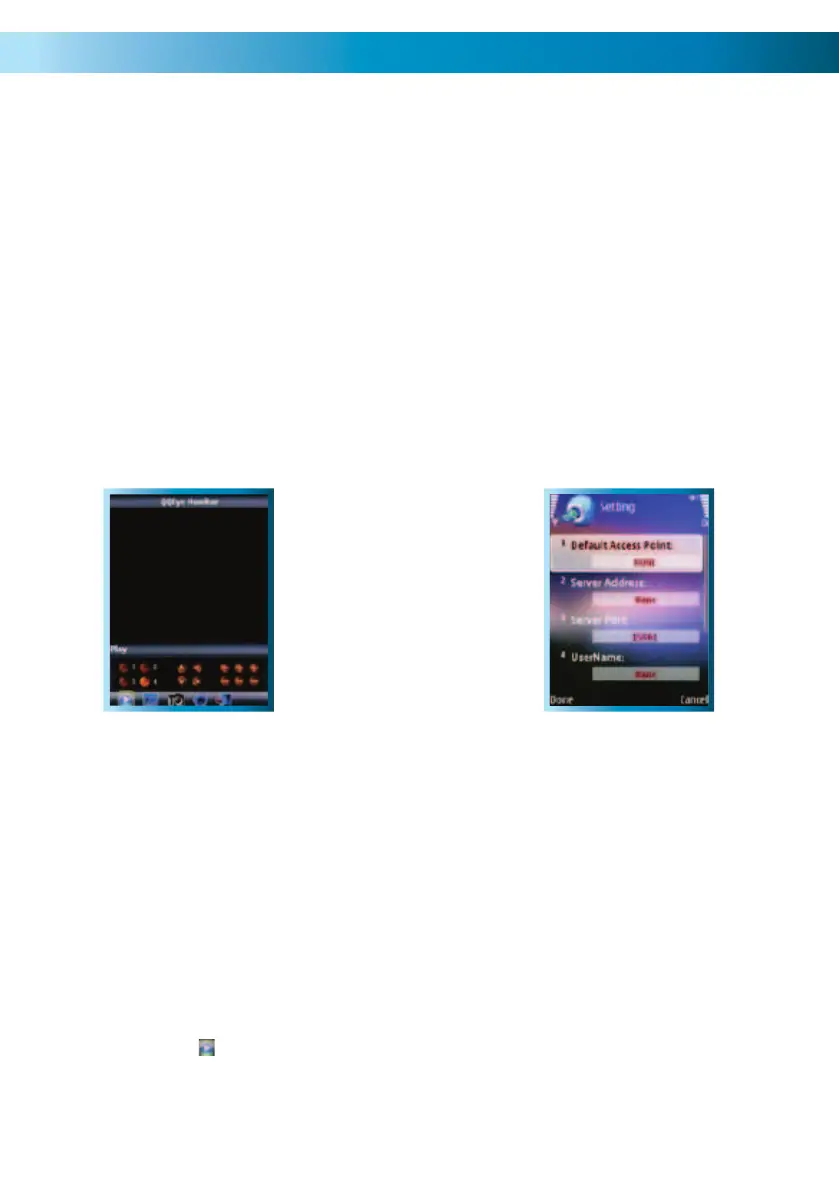
Left: The main viewing interface of
QQEye. The viewing controls
are located across the bottom
of the screen.
Right: The Settings screen, where
you can enter the address
and user information for
your DVR.