46
Model PH90Operating Procedures
080221
Daily Opening Procedures
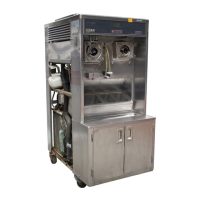
Evaluate the condition of LED’s (lights) and screen
messages (Hard Lock or Soft Lock, etc.) before
performing opening procedures. As indicated in the
illustration below, 4 flashing LED’s, indicate a “locked”
condition.
Figure 80
MAKE SURE YOUR HANDS ARE CLEAN
AND SANITIZED BEFORE PERFORMING THESE
NEXT STEPS.
Step 1
With the drain plugs closed, check the water level in
the two heated topping wells. Fill the wells with water
to the indicating mark on the bottom of the well.
Step 2
Place the heater switches in the ON position.
Caution: As soon as the heater switches are
turned on, the topping wells will begin heating.
This heating process will take 2- 1/2 hours to reach
temperature. The water level in the wells should
be checked daily.
Step 3
Prepare a 2- 1/2 gallon (9.5 liter) pail of cleaning/sanit-
izing solution with an active chlorine concentrate of
100 - 200 PPM. USE W ARM WATER AND FOLLOW
THE MANUFACTURER’S SPECIFICATIONS.
Step 4
Sanitize the topping pumps by placing the entire pump
assembly in the pail of sanitizing solution. Pump the
solution through to thoroughly sanitize the pump.
Step 5
Fill all four topping containers with topping. Place the
stainless steel topping containers in the heated wells.
Place the remaining two topping containers in the
unheated wells. Cover the containers.
Step 6
Sanitize the two topping ladles and place in the cold
topping containers. Place the topping pumps in the
heated topping containers.
Shake Side
Step 1
When the heating cycle is complete, the normal dis-
play will appear, showing the machine in the
STANDBY mode.
Step 2
Prepare a small amount of cleaning/sanitizing solu-
tion with an active chlorine concentrate of 100 - 200
PPM. USE WARM WATER AND FOLLOW THE
MANUFACTURER’S SPECIFICATIONS.
Step 3
Remove the syrup hole plugs and spout cap with
o- ring from the freezer door. Sanitize the restrictor
cap, syrup hole plugs, spout cap and o- ring, shake cup
holder, front drip tray, and splash shield in this solution.