ENGINE
COOLING
CIRCUIT
Changing
the
Raw
Water
Pump
Impeller
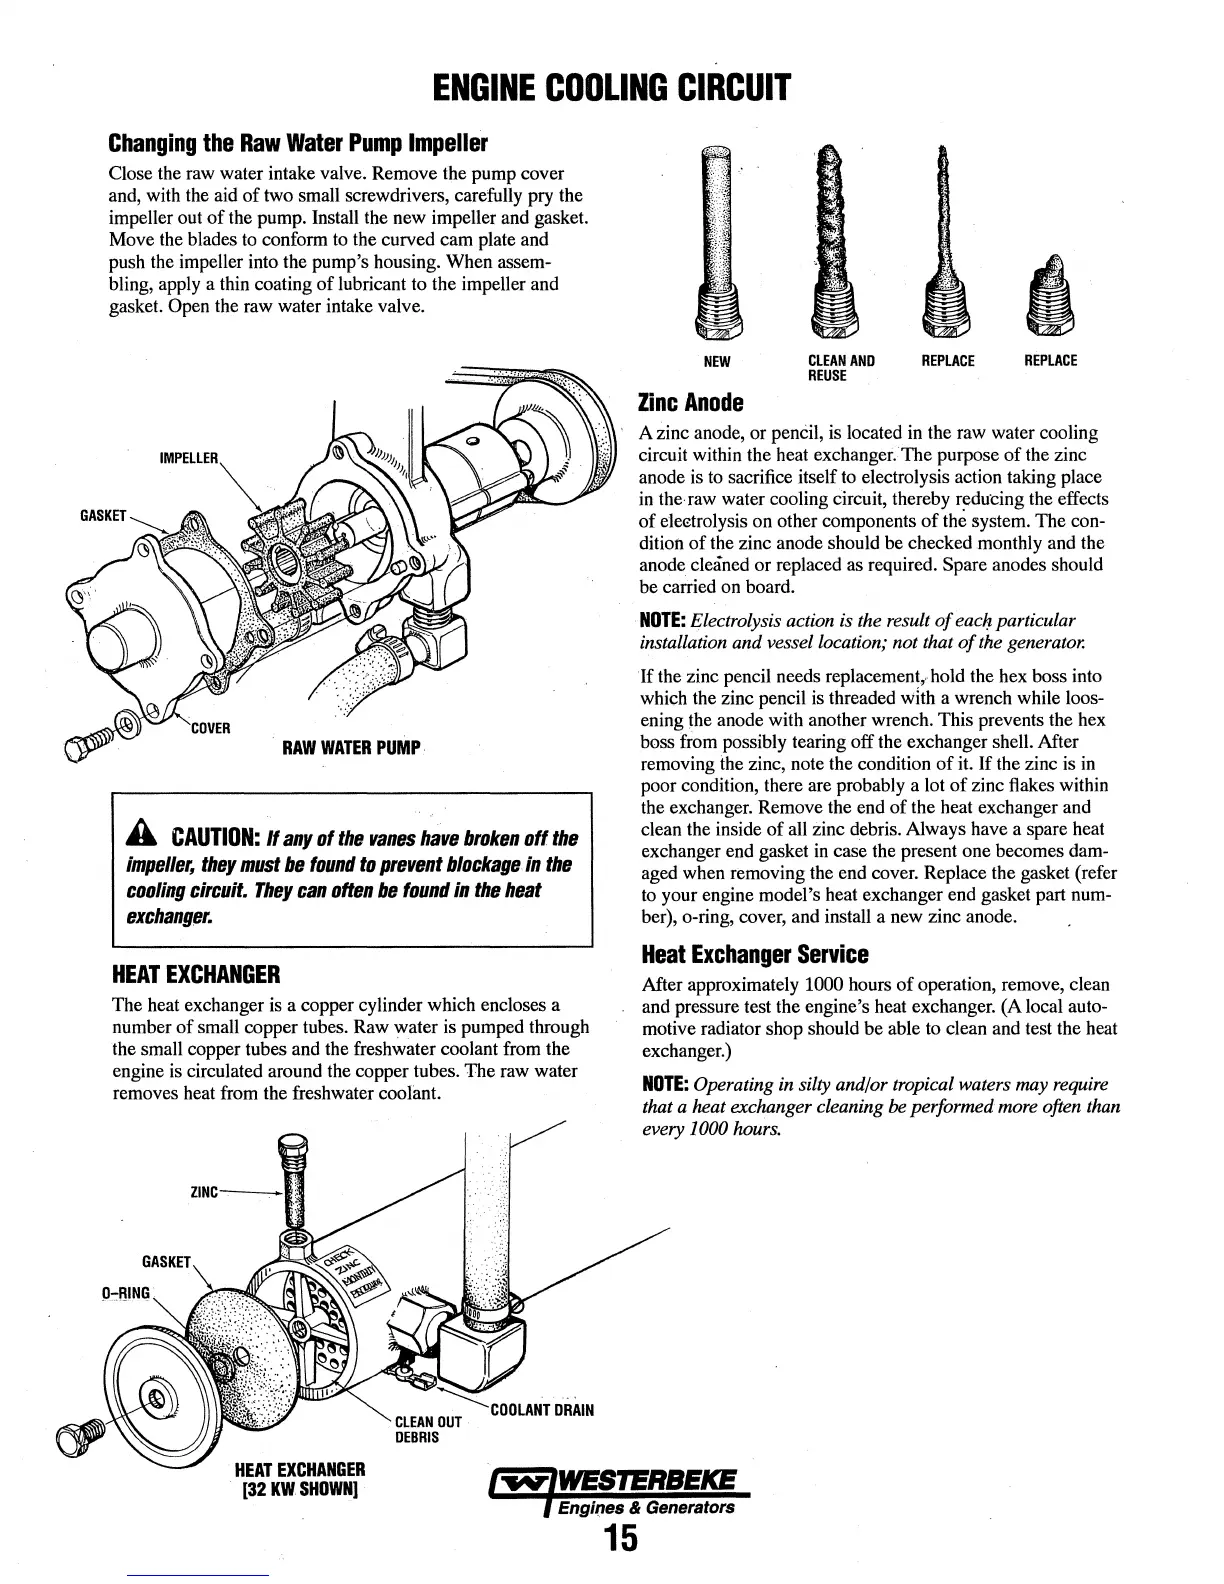
Close the raw water intake valve. Remove the pump cover
and, with the aid
of
two small screwdrivers, carefully pry the
impeller out
of
the pump. Install the new impeller and gasket.
Move the blades to conform to the curved cam plate and
push the impeller into the pump's housing. When assem-
bling, apply a thin coating
of
lubricant to the impeller and
gasket.
Open the raw water intake valve.
.
RAW
WATER
PuMP.
A
CAUTION:
H
any
of
the
vanes
h~ve
broken
off
the
impeller,
they
must
be
found
to
prevent
blockage
in
the
cooling
circuit.
They
can
often
be
found
In
the
heat
exchanger.
HEAT
EXCHANGER
The heat exchanger is a copper cylinder which encloses a
number
of
small copper tubes. Raw \Vater is pumped through
the small copper tubes and the freshwater coolant from the
engine is circulated around the copper tubes. The raw water
removes heat from the freshwater coolant.
HEAT
EXCHANGER
[32
KW
SHOWN]
NEW
Zinc
Anode
CLEAN
AND
REUSE
REPLACE
REPLACE
' A zinc anode,
or
pencil, is located in the raw water cooling
circuit within the heat exchanger.
The
purpose
of
the zinc
anode is to sacrifice itself
to
electrolysis action taking place
in the· raw water cooling
dreuit, thereby reducing the effects
of
elec::trolysis
on
other components
of
the system.
The
con-
dition
of
the zinc anode should be checked monthly and the
anode. cleaned
or
replaced as required. Spare anodes should
be carried
on
board.
NOTE:
Electrolysis action is
the
result
of
eaciJ
particular
installation and vessel location; not that
of
the
generator.
If the zinc pencil needs
replacement~
hold the hex boss into
which the zinc pencil is threaded
with a wrench while loos-
ening the anode with another wrench.
This
prevents the hex
boss
from possibly tearing
off
the exchanger shell. After
removing
the zinc, note the condition
of
it.
If
the zinc is in
poor condition, there are probably a lot
of
zinc flakes within
the exchanger. Remove the end
of
the heat exchanger and
clean the inside
of
all zinc debris. Always have a spare heat
exchanger end gasket in case the present one becomes dam-
aged when removing the end cover. Replace the gasket (refer
to your engine model's heat exchanger end gasket part num-
ber), o-ring, cover, and install a new zinc anode.
Heat
Exchanger
Service
After approximately 1000 hours
of
operation, remove, clean
and pressure test the engine's heat exchanger. (A local auto-
motive radiator shop should
be
able to clean and test the heat
exchanger.)
NOTE:
Operating in silty and/or tropical waters may
require
that a heat exchanger cleaning
be
performed
more
often
than
every 1000
hours.
Engi(Jes
&
Generators
15
 Loading...