IN AN EMERGENCY
120
Fix&GoKIT
(for versions/markets, where provided)
The Fix&Go quicktyre repair kit is
located in the bootinside a dedicated
container.
138)139)140)
31)
TYREREPAIR
PROCEDURE
Preliminary operations:
Stop the car in a position that is not
dangerous for oncoming traffic where
you can change the wheel safely. The
ground must be flat and sufficiently
compact;
stop the engine and engage the
parking brake;
engage 1
st
gear if the car is uphill, or
reverse if the car downhill;
steer the wheels completely;
in the event of a steep slope, place a
wedge or stone behind the wheels;
Wear the reflectivesafety jacket
(compulsory by law) before getting
out of the car. In any case, follow the
road safety laws inforce in the country
where you are driving;
wear the gloves.
Tyrerepair:
Remove the adhesive speed label
(3) fig. 125 and fig. 128 and apply
it in a clearly visible position on the
dashboard.
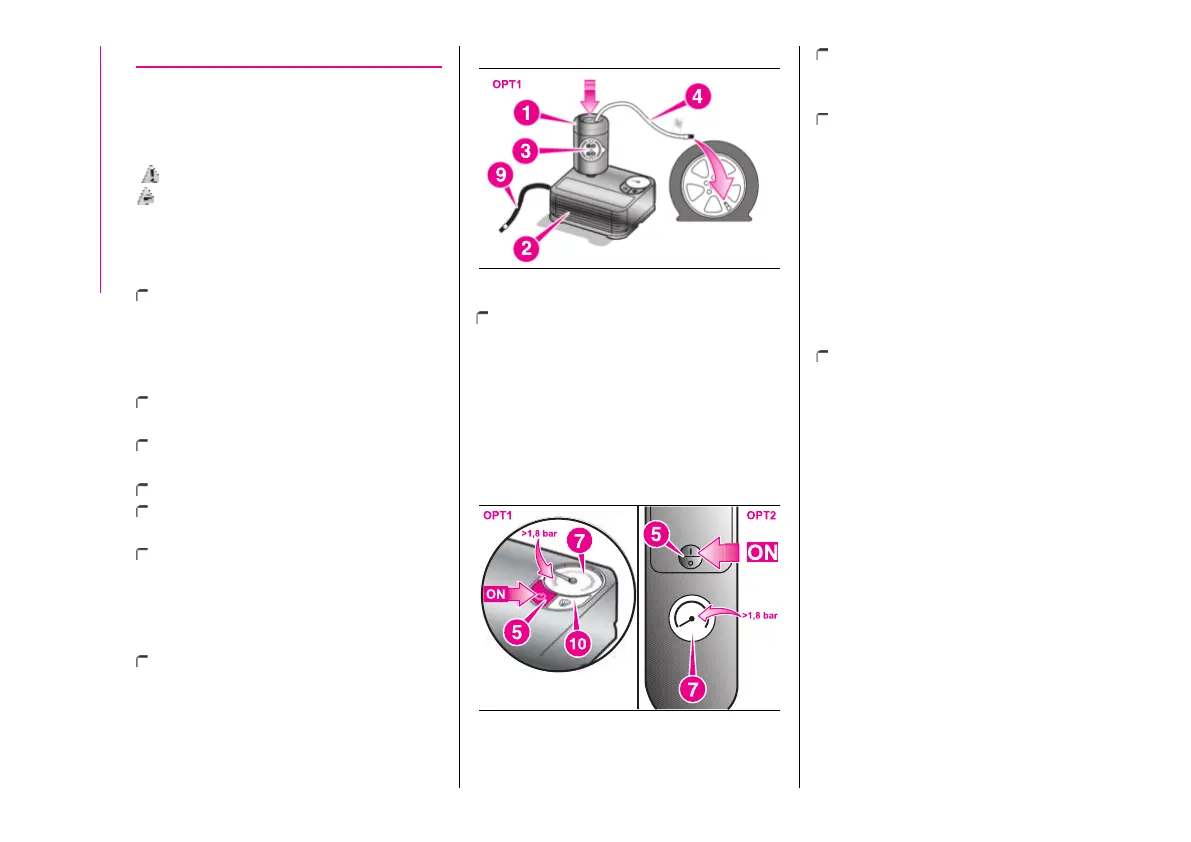
OPT1kit
125AB0A0477
remove the cap from the tyre valve
and connect andscrew the transparent
tube of the sealant (4) fig. 125 onto the
valve. If a 250 ml cartridge is present
the housing of thetransparent tube
is provided with removable ring to
facilitate extraction.Make sure that the
ON/OFF button (5) fig. 126 is in the off
position (button notpressed);
126AB0A0478
plug the electricalconnector of the
tyre inflation kit intothe 12V socket of
the car and start the engine;
operate the compressor by pressing
the ON/OFF button (5) fig. 126. When
the pressure gauge (7) indicates the
prescribed pressure indicated in
the "Wheels" chapter in this Owner
Handbook or on the label, switch
off the compressor by pressing the
button again and inany case do not
disconnect the hose until the sealing
liquid has been blown in (about 2
minutes);
If the pressure gauge (7) fig. 126
reads a pressurelower than 1.8
bar / 26 psi 15 min. after turning
on the compressor, switch off the
compressor, disconnect the sealant
hose (4) fig. 125 fromthe tyre
valve proceed withthe procedure
for restoring pressure after repair
described in the following paragraph
after having disconnected the cartridge.
Disconnect the cartridge (1) from the
compressor, by pressing the release
button (8) and liftingthe cartridge (1)
upwards fig. 127.