137
negative (-) symbols, and are shown
on the battery cover. The battery
terminals must alsobe corrosion-free
and firmly securedto the terminals.
If a "quick-type" battery charger is
used with the battery fitted on the car,
before connectingit disconnect both
cables of the battery itself. Do not use a
"quick-type" battery charger to provide
the starting voltage.
WARNING
158)
Battery fluid is poisonous and
corrosive: avoid contact with your skin and
eyes. The battery should be charged in a
well ventilated place,awayfromnaked
flames or possible sources of sparks:
danger of explosion and fire.
159)
Do not attempt to recharge a frozen
battery: first it must be thawed, otherwise
there is a riskof explosion. If freezing has
occurred, the battery should be checked
by skilled personnel to make sure that the
internal elements arenotdamaged and
that the body is notcracked, with the risk
of leaking poisonous and corrosive acid.
REPLACINGTHE
WINDSCREEN/REAR
WINDOWWIPER
BLADES
WIPERBLADES
Replace the bladesif the rubber
edge is deformed or worn. In any
case, it is advisableto replace them
approximately once a year.
160)
A few simple precautions can reduce
the possibility of damage to the blades:
if the temperaturefalls below zero,
make sure that icehas not frozen the
rubber to the glass. Use a de-icing
product to releaseit if required;
remove any snowfrom the glass:
in addition to protecting the blades,
this prevents efforton the motor and
overheating;
do not operate thewindscreen and
rear window wipers on dry glass.
RAISINGTHE
WINDSCREENWIPER
BLADES
Lift the windscreenwiper arm and
position the blade so that it forms a 90°
angle with the arm.
REPLACINGWIPER
BLADES
Proceed as follows:
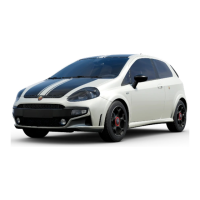
lift up the windscreen wiper arm (1)
fig. 134 and positionthe blade so thatit
forms a 90° angle with the arm;
press the button (1) and extract from
the arm (2) the blade (3);
insert the new blade making sure it is
locked into place.
134AB0A0112C
REPLACINGTHEREAR
WINDOWWIPERBLADE
Proceed as follows:
raise the cover (1)fig. 135 and
remove the arm from the car, undoing
the nut (2) fig. 135 that fixes it to the
pivot pin;
correctly position the new arm and
tighten the nut fully;
lower the cover.