LOCAL OPERATION
3-3
List of figures
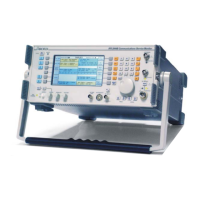
Fig. 3-1 Front panel. ..................................................................................................................... 3-4
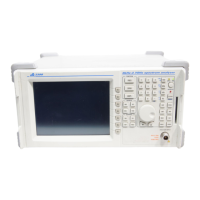
Fig. 3-2 Typical displays............................................................................................................... 3-5
Fig. 3-3 Rear panel layout, (with optional GPIB fitted................................................................. 3-8
Fig. 3-4 AF Filter HELP/SETUP page ....................................................................................... 3-12
Fig. 3-5 Relationship of measurement and number of samples .................................................. 3-18
Fig. 3-6 Transmitter test connections..........................................................................................3-24
Fig. 3-7 Distortion level and signal to noise level measurements............................................... 3-36
Fig. 3-8 Receiver test connections .............................................................................................. 3-39
Fig. 3-9 Selectivity test setup...................................................................................................... 3-50
Fig. 3−10 Spurious response ‘Image Frequency’ location.......................................................... 3-51
Fig. 3−11 One port duplex test setup .......................................................................................... 3-53
Fig. 3−12 Alternative two port duplex setups............................................................................. 3-54
Fig. 3−13 Spectrum analyzer test setup ...................................................................................... 3-55
Fig. 3−14 Spectrum analyzer test setup using the tracking generator......................................... 3-55
Fig. 3-15 Spectrum Analyzer setup, Look and Listen function .................................................. 3-60
Fig. 3-16 Audio test setup........................................................................................................... 3-63
Fig. 3-17 Tones selection screen and Tones mode receiver input level setting .......................... 3-69
Fig. 3-18 RF Sequential tones encoder display, main menu....................................................... 3-72
Fig. 3-19 RF Sequential tones standard selection menu ............................................................. 3-72
Fig. 3-20 RF Sequential tones decoder screen............................................................................ 3-74
Fig. 3-21 RF CTCSS encoder screen and menu ......................................................................... 3-76
Fig. 3-22 RF DCS ENCODER screen and menu........................................................................ 3-79
Fig. 3-23 RF DTMF DECODER screen and menu .................................................................... 3-81
Fig. 3-24 POCSAG radio pager test screen and menu................................................................ 3-85
Fig. 3-25 Alternative address/warning messages........................................................................ 3-86
Fig. 3-26 Parallel printer port socket contacts ............................................................................ 3-93
Fig. 3-27 Simplified diagram of rear accessory port switching .................................................. 3-94
Fig. 3-28 Rear accessory port socket connections ...................................................................... 3-94
About this chapter
This chapter deals with using the Communications Service Monitor as a ‘stand alone’ instrument.
The front panel layout is described and a brief explanation of all controls and connections is
given.
The connectors and occasional controls on the rear panel are identified.
An introduction to each of the test modes explains the principles behind tests that can be
carried out and suggests some applications for the use of the monitor.
The power up and setup procedures are explained.
The operating sequences for each of the test modes is explained and the relevant menus
outlined.
The internal setup and results memories are described and their use explained.
Producing hard copy of results on an external printer is described.
Before using the instrument, familiarize yourself with the power requirements and powering up
procedure described in Chapter 2, Installation.