66 16901A Logic Analysis System Service Guide
6 Replacing Assemblies
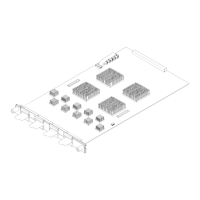
To remove and replace the keypad and keypad board
1 Perform previous procedures:
• “To prepare the instrument for disassembly” on
page 46.
• “To remove and replace the cover” on page 50.
• “To remove and replace the front panel assembly” on
page 57.
2 Pull to remove the cursor knob from the front of the
frame.
3 Using a Torx T10 screwdriver, remove the 3 screws
securing the keypad board to the front frame.
4 Remove the keypad board and keypad from the frame.
Wear ESD finger cots or use care not to touch the black pads on
keypad and on the keypad board. Finger oils can impair contact. If
necessary, carefully clean the contacts using alcohol and lint-free
swabs or wipes.
T-10
screws
(3)
Keypad
board
Keypad
Cursor
knob
Front
frame
Alignment
holes and
pins
 Loading...