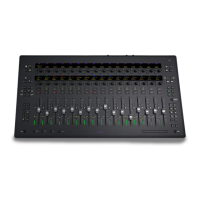
Pro Tools | Carbon Front Panel Operation
12
8 Talkback button — A single press latches Talkback on (unmute the Talkback mic input). Press the button again to unlatch and turn
Talkback off (mute the Talkback mic input). Press and hold the
Talkback button to engage Talkback temporarily and release to dis-
engage. The button flashes red when Talkback is engaged.
DIM (24) is engaged while the talkback mic is active. You can also use a
Footswitch to engage and disengage Talkback (see Footswitch).
9 Z button — Press to cycle through the available impedance settings (Variable Z) for the selected input (the Z button changes color
to indicate the impedance setting for the input):
•
MIC inputs 5–8 on the back panel.
•
INST inputs 1–2 on the front panel
10 INPT (Input) button — Cycles between the available inputs for the selected channel: MIC, LINE, INST. Use the Input encoder button
(7) to select the desired input channel. The selected input channel lights above the I/O Meters (14).
11 LINK button — Links odd (left) and even (right) channel input pairs for stereo linking. When linked, preamp controls affect both
channels identically. The even channel inherits the settings of the odd channel settings when linked. When enabled, the
LINK button
lights green.
12 Ø button — Toggles the polarity of the selected input channel. The button lights amber when the polarity is inverted.
13 48V— Press to enable or disable phantom power for the selected MIC input. Phantom power can only be enabled when there is an
XLR connection for the selected input. When phantom power is enabled for the selected input, the
48V button lights red. If there is
an XLR connection for the selected input and phantom power is disabled, the button lights white. The button is unlit when there is
no XLR connection, or if there is an XLR connection but the input is set to
INST or LINE and phantom power is disabled.
For linked channels, phantom power behaves as follows:
• If both linked channels have XLR connections, phantom power works the same as with one channel.
• If only the first linked channel has an XLR connection, the
48V button lights white but pressing the button has no effect.
• If only the second linked channel has an XLR connection, the
48V button does not light.
• If either XLR connection is broken while phantom power is enabled on linked channels, phantom power is disabled for that channel.
• If the connection to the second linked channel is broken, the
48V button lights red and phantom power is disabled for the second
channel.
• If the connection to the first linked channel is broken, the
48V button does not light and phantom power remains on for the second
channel.
Variable impedances for Mic channel inputs 5–8
Impedance Color
5k Ohm White (default)
50k Ohm Cyan
1k Ohm Fuchsia
Variable impedances for Instrument channel inputs 1–2
Impedance Color
1M Ohm White (default)
230k Ohm Cyan
90k Ohm Blue
70k Ohm Violet
32k Ohm Fuchsia
Use Variable Z on INST inputs when connecting guitar or bass with passive pickups. Variable Z alters the frequency response by
loading the pickups in the same manner as plugging in to different real amps or effects.
Unlike other input channel parameters, phantom power is not restored when the device is powered off and back on. This protects
connected microphones and equipment which may be configured differently when the device is powered back on.