EN39EN 38
D - BEGINNING OPERATION
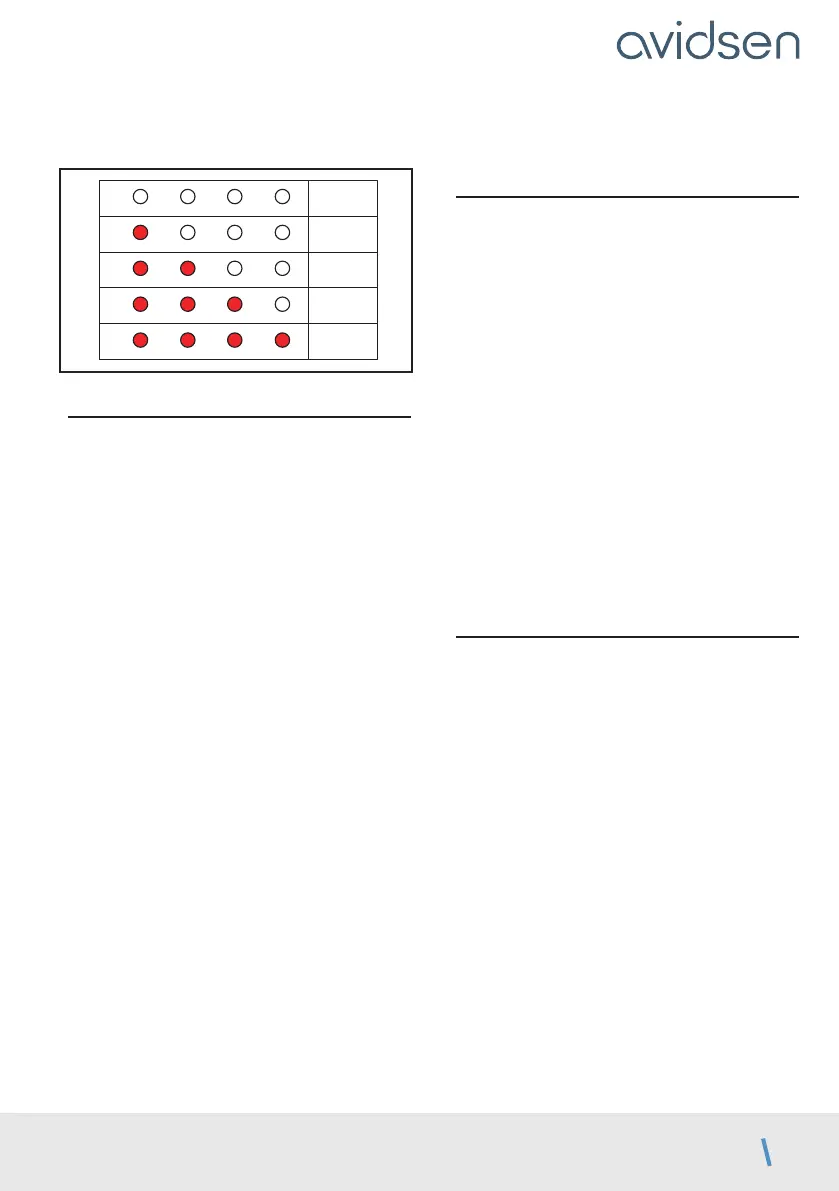
This time is adjustable from 15 seconds to 90
seconds and is 15 seconds by default.
L1
L2 L3 L4
15 s
L1
L2 L3 L4
30 s
L1
L2 L3 L4
45 s
L1 L2 L3 L4
60 s
L1 L2 L3 L4
90 s
2.5. Motor force
This system controls the force of the motors by
detecting the maximum current they can absorb.
As a result, if an obstacle pushes with enough force
against a gate panel, the motor current exceeds the
detected value and the gate stops. In most cases, it
is not necessary to change this setting.
The force is adjustable from 0 to 4 and is set to 3
by default.
However, if the gate is solid and the force is
insufficient, a gust of wind may cause one or more
panels to stop.
• In this case, it is necessary to increase the level of
force to 4.
• On the other hand, if the gate has a rather weak
structure and a low wind load, it is recommended
that the force be reduced.
Note
To meet the requirements of Standard 12453,
it may be necessary to change the force of the
motors.
To adjust the force, follow the procedure below
• Press PROG for 3 seconds. L0 will flash once
and L1 will switch on.
• Press “
+
” twice and L3 will turn on instead of L1.
• Press OK, and the number of LEDs that turn on
will indicate the set force value.
• Use the “+” and “-” buttons to change the force
and confirm with the OK button. All the LEDs will
switch on and off to confirm the operation.
NOTE: if the force setting is changed, self-
learning must be repeated.
2.6. Speed
You can adjust the speed by a value of 0 to 4. The
default speed is 4.
If the gate is too fast, it may be necessary to reduce
the speed.
To adjust the speed, follow the procedure
below
• Press PROG for 3 seconds. L0 will flash once and
L1 will turn on.
• Press “+” 3 times. L4 will turn on instead of L1.
• Press OK and the number of LEDs that turn on
will indicate the set value.
• Use the “–” and “+” buttons to change this value.
• Press OK to confirm this value. All the LEDs will
turn on and off to confirm the operation.
NOTE: if the speed setting is changed, self-
learning must be repeated.
2.7. Self-learning
The role of self-learning:
In order for the card to learn which motors are
connected and the path of the door, self-learning
must be launched.
In addition, if certain settings are changed (force,
speed), self-learning must be repeated.
IMPORTANT
• The panels must have fixed stops at the end
of the closing motion (central stop) and at
the end of the opening motion (side stops),
during self-learning, and they must not be
moved or removed afterwards. If the stops
are not firmly attached to the ground, this
can lead to self-learning failure.
• The panels can be in any position (open,
closed, ajar) before starting the self-learning
procedure.